
Бесплатный фрагмент - 3D drawing
Introduction

Artist Farit.
3D DRAWING
Detailed course 3D drawing
Volume One.
The Introduction.
Table of contents
Introduction.
Errors in 3D drawings.
Instructions on how to photograph a 3D drawing.
Conclusion
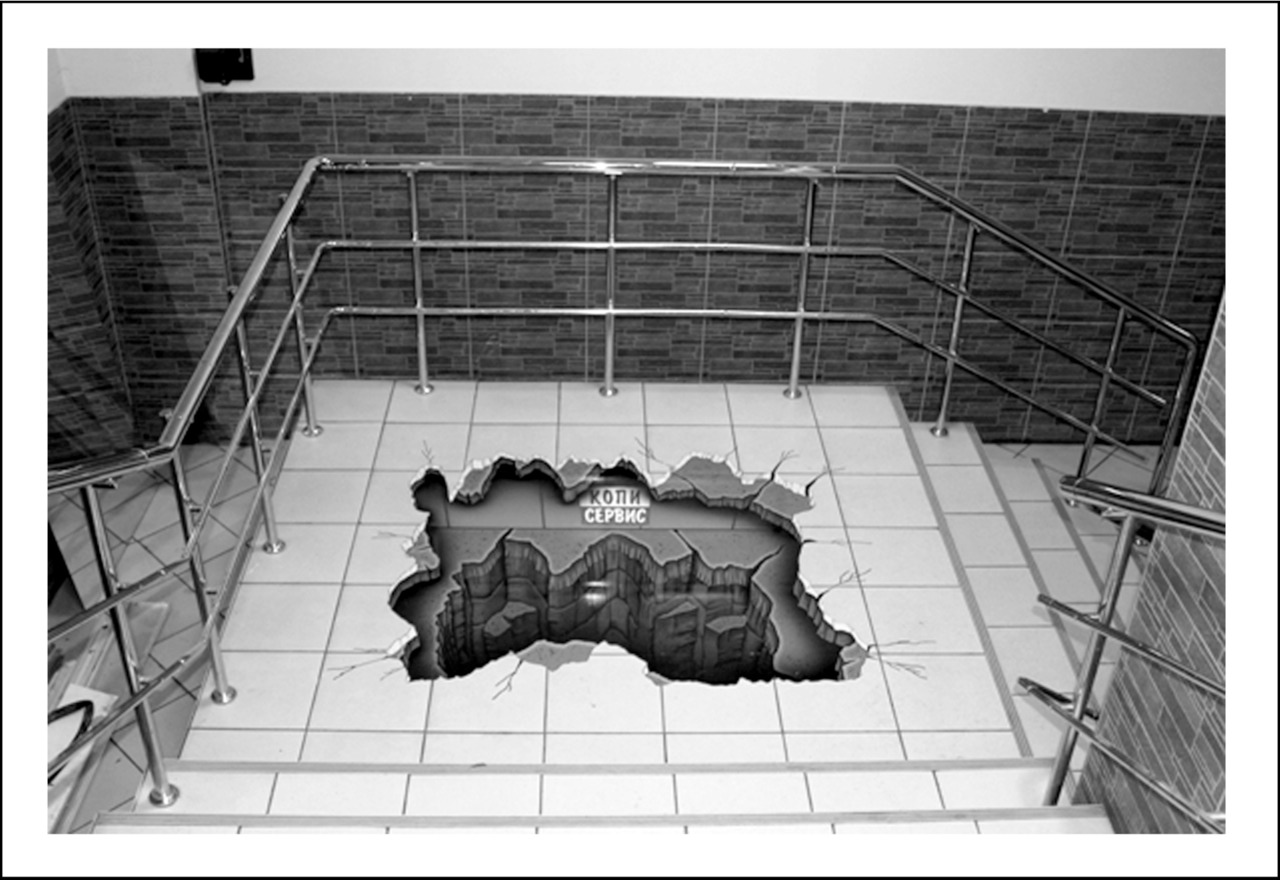
This drawing lasted only one day on the stairs of the shopping center. One woman, seeing the drawing, was frightened, but when she looked closely, she laughed. Later, one of the visitors was more seriously afraid, and complained to the director of the shopping center. The director said — Remove the drawing, I do not need heart attacks on the stairs of my shopping center.
Introduction
Keep learning. Learn more about computers, about crafts, gardening — about anything. Never leave your brain lazy. “An idle brain is the devil’s workshop.” And the name of the devil is Alzheimer.
George Carlin.
At a fairly late age, I learned to draw 3D drawings. I learned on my own, not finding instructions in books or on the Internet. I came up with a very simple and visual way to learn how to draw 3D drawings. The course teaches an understanding of how to draw a 3D drawing. Detailed explanations of the fundamentals and principles, thoughtful exercises, will help readers master the secrets of the art of 3D drawing.
The course is intended for a wide range of readers. The course will be useful to novice artists, and experienced. Errors in building the perspective of 3D drawing I have met even experienced artists. If you draw at a professional level, the book will help you deepen your perspective building skills.
The course may be of interest to teachers of geometry, drawing and drawing of secondary schools, drawing schools, colleges and higher educational institutions. 3D drawing lessons will help to make drawing, sketching and geometry lessons more interesting for teenagers, youth and students. The course will be useful for the development of spatial, geometric thinking. For a better understanding of geometry.
My course is a good way to interest geometry, adolescents and youth. Learning to draw a 3D drawing, a good way in a fun way, explain some of the laws of geometry. An interesting intellectual occupation, which can captivate adolescents and youth. To improve spatial vision and imagination.
Drawing a 3D drawing (in some cases) is much easier than painting a portrait or landscape.
3D drawing, it is more — GEOMETRY. Geometry that is not studied at school. But from this it does not cease to be geometry. Many objects can be drawn using only a ruler and a dividers. Perhaps if my course becomes quite popular, a new section will appear in school geometry — geometry 3D drawing. 3D drawing is a kind of offshoot of geometry.
The course may be of interest to parents of adolescents and children. Joint development of the ability to draw 3D drawings is a good activity for spending family time. Occupation useful for the development of the brain of children, adolescents and parents. To distract teenagers and children from computer games and gadgets.
ATTENTION to producers of video and TV programs.
offer to producers of video and TV programs.
I bring to your attention a NEW EDUCATIONAL and entertainment TV project.
My TV project is about the relationship between three-dimensional drawing and geometry.
My TV project is 3D drawing lessons. TV lessons based on my course and my books on the basics of 3D drawing.
A bit of background.
I suggested to the Discovery channel to make a TV course “3D drawing”.
Here’s what they answered.
— — – – - — – – –
Dear Farit,
Thank you for contacting Discovery.
We regret we are only able to accept proposals from established production companies. If you are an individual with a programme idea or are interested in being on a programme, we suggest you do some research into production companies and contact them directly.
If you are a producer and wish to submit a programme, please visit the Discovery Producer’s Portal at http://producers.discovery.com
Kind regards,
Colin | Discovery Viewer Services | discoveryuk.com
— ---- – ------ ---- ----- ----- – - ---------
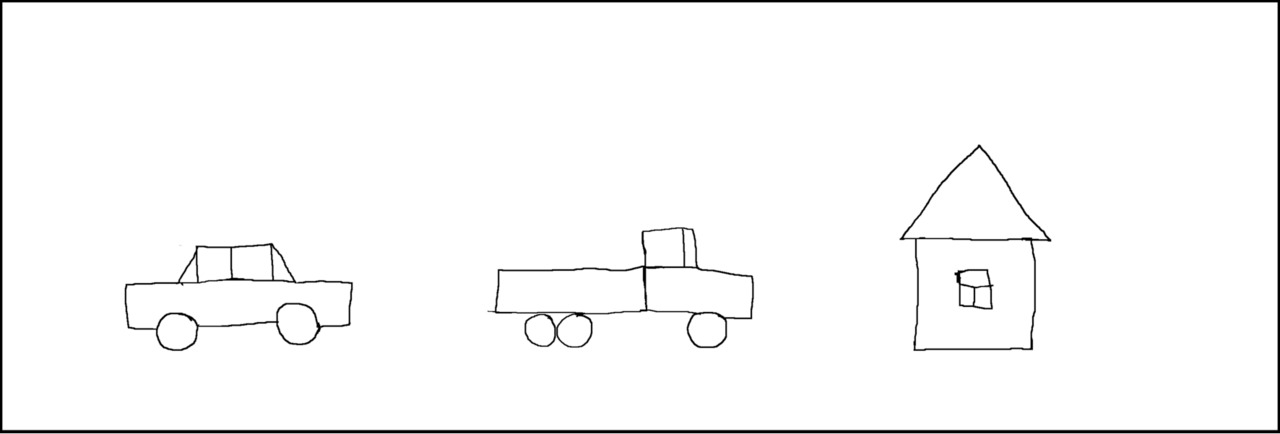
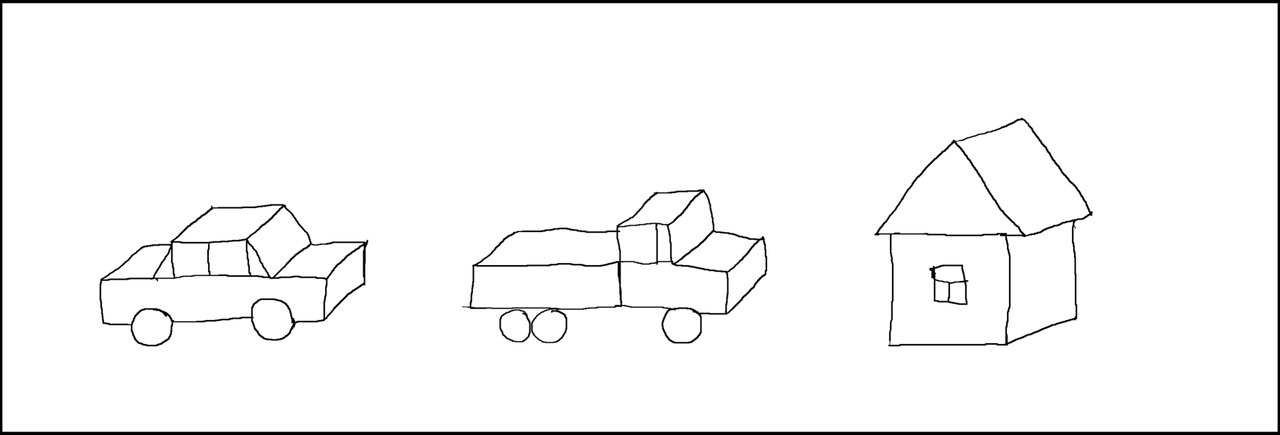
The course will be useful even to parents of 6–7 year old children. The sooner you show your child what perspective and geometry are, the better. I began to draw “voluminous” (NOT 3D) drawings in kindergarten, aged 5–6 years. Then I did not understand what geometry or perspective is. The kindergarten teacher showed me one small “trick” how to make “voluminous” drawings from my flat drawings such as “side view”.
I am many years old; this lesson in kindergarten was a very long time ago. I don’t remember the details, but I well remember what effect the conversion of my “flat” drawings into “voluminous” had on me. It was like an insight. Thanks to this effect, I remember that case. Perhaps that lesson, with a little “trick”, started the process of mastering and understanding geometry in my brain. After that “lesson”, I drew “flat” objects and turned them into “voluminous” ones. For me it was one of the most interesting activities.

Preschoolers should watch similar lessons. If they have a predisposition to spatial vision, it will be very useful and interesting for them. Unless they are predisposed to drawing and geometry, they will not suffer from these lessons.
Perhaps if the kindergarten teacher did not show me this “trick”, I would not be able, at an older age, to independently master the 3D-drawing and write this guide on the basics of 3D-graphics.
The brain in childhood is particularly tuned to learning. The first, main and main goal of the children’s brain is learning. Learning, everything that will help to survive in the race for survival, in conditions of natural selection. Therefore, children can quickly learn a second, non-native language. Learning a second language for adults is very difficult.
Surely, both the basics of perspective and the beginning of geometry, children can master in childhood better than later, as adults.
My “voluminous” drawings in childhood were not 3D drawings. 3D drawing is a bit more complicated than simple “three-dimensional” drawings. The prospect of “volumetric” drawings, in childhood, was not central, but axonometric, or parallel to oblique projection.
This type of perspective was used in drawing and painting before the central perspective was discovered and mastered during the Renaissance.
The axonometric (parallel, oblique) perspective was used in Byzantine and Old Russian painting. The Chinese and Japanese also used axonometric perspective in their paintings. Perhaps because an axonometric perspective is the easiest to understand perspective.
If young children themselves cannot master the prospect, they will be able to be proud (and show off) of their parents who can draw 3D drawings. There is such a good saying — “Do not raise a child, he will still become like you, educate yourself.” Therefore, advice to parents of young children — Learn to draw! Children looking at you will also learn.
3D drawing is not only an interesting and developing activity for free time (hobby), but also an interesting work. Being able to draw 3D drawings, you can draw advertising (commercial) or entertaining 3D drawings. Having spent several dollars on the book, you can earn ten or one hundred times more. A small 3D drawing of medium complexity can cost from 250—500 dollars/euro. Complex and large 3D drawings can cost a lot more.
Thanks to the ability to draw simple 3D drawings, I went to the international street art festival for the cost of just one 3D drawing. Moreover, I traveled abroad of my country, to a fairly large distance. 3000 km one way. Part of the road (2 hours) flew by plane, traveled by train for two nights, and this is only one way. At night I rode on the train, and during the day I walked around the cities, around Moscow, around Riga, along Bremen.
In addition, the organizers of some festivals compensate for the cost of the road, provide accommodation, partially provide food and give out some materials.
Being able to draw a 3D drawing, you can increase the number of views and the number of subscribers to your YouTube channel, or social networks. Many videos with 3D drawing, gaining thousands of views. Some videos with 3D drawing, gaining millions of views.
Drawing 3D, like any intellectual action, very good training and “gymnastics” for the brain. A diversified brain in any direction works more efficiently. Learning to draw 3D drawings, you will train your brain, and the brain will last you longer. Your brain will remain clarity and health longer.
By drawing 3D drawings, you will postpone the meeting of your Alzheimer, Parkinson and other older satellites for several years.
Drawing a 3D picture on the pavement is also good physical education. Drawing a 3D drawing on the pavement, you have to squat a lot. After drawing my first 3D drawings, my leg muscles were very sore. With a noticeable effort, I sat down and got up from my chair. But constantly drawing, “training”, squatting, the leg muscles got used to the loads and stopped hurting.
Errors in 3D drawing
About how many wonderful discoveries we have
Prepares an Enlightened Spirit
And outliving the son of ERRORS is difficult
And the genius of the paradoxes is different.
Alexander Pushkin.
Everything in this book may turn out to be ERROR.
Richard Bach.
Having analyzed the perspective errors in 3D drawings, I realized one interesting thing. Parsing perspective errors is much more complicated and longer than drawing the same picture with the correct perspective. Therefore, do not be alarmed by this chapter. Do not be alarmed by these “complex” schemes. This chapter is much more complicated than 3D drawing lessons. Learning how to draw the right perspective is much easier than seeing and understanding the errors of the wrong perspective.
Drawing 3D drawings, I made a lot of mistakes. Even after I drew about thirty 3D drawings, I was mistaken again and again. On the Internet, I sometimes encounter perspective errors in 3D drawings by other artists.
My mistakes, mistakes of other artists, and encouraged me to write this course on building the perspective of 3D drawing.
The course will be useful to experienced artists who draw 3D drawings. Since I have seen mistakes in building perspectives, even among experienced artists. I am familiar with some of these artists. I hope they don’t take offense at me if they recognize their drawings.
All the errors of other artists that I found do not say that I consider myself the smartest or the most talented among all the artists who draw 3D drawings.
I participated in the international street art festival Internationales Street Art Festival in Wilhelmshaven (WHV) northern Germany.
www.streetart-wilhelmshaven.de
The festival was attended by 38 artists. In my humble opinion, I did not even take the 38th place, but approximately 70 or 80th place. The drawings of all other artists were much better made than my drawing.
I do not describe the mistakes of others in order to rise above those who are mistaken. I do this only in order to teach those who want to draw the perspective (geometry) of a 3D drawing correctly on my own and others’ mistakes.
“Everyone can offend the artist”
Not everyone can only — draw.
Igor Ohrimenko
It’s easy to offend the artist,
To call a poet a fool.
But the boxer difficult to offend —
Boxers, guys, well done!
(found online)
Like any creative person, I am not unambiguous in criticism. Here, I myself am forced to act as a critic.
BUT! I do not criticize the artistic merits and demerits of the drawings. I criticize only the prospect. Artistic qualities cannot be evaluated objectively. As they say — They don’t argue about tastes. One likes one, the other likes the other.
In this chapter, I criticize only the wrong perspective of 3D drawings. Perspective is geometry. Geometry is a branch of mathematics — the queen of sciences. Geometry has laws, and these laws are not subjective, they are objective. The laws of geometry do not depend on tastes. The laws of geometry do not depend on whether you know these laws or not. The laws of perspective do not depend on whether you like these laws or not. The laws of geometry do not change from whether you draw according to these laws or draw without observing the laws of perspective (geometry).
There are exceptions to perspective laws. An exception is the reverse perspective on some icons in Byzantine and Old Russian icon painting. Rather, this is not even an exception, but a rare special case based on the peculiarities of human perception of a part of space very close to the eyes. But! To make exceptions, you better know the rules.
In order not to violate copyright laws, I will not use photographs of other people’s drawings in the book. Of course, the most striking “mistakes” will be hard not to recognize. But most of the drawings with errors in the future, it will not be easy to find out. I outlined only the contours of the erroneous details of these figures. I redrawn, preserving the distortion of perspective that I noticed in these figures. Without retaining most of the details, and even slightly changing the picture.
The essence of this chapter is not to indicate to a particular artist his mistakes. The essence of this chapter is to show the most common mistakes in building the perspective of 3D drawings.
So, let’s begin. Let’s start with the obvious mistakes. I hope everyone sees these errors. It is strange that the artists themselves did not see them.
But! This is apparently a feature of 3D drawing. Or a feature of the brain’s perception of a 3D pattern. I also saw many of my mistakes only the next day, and even two days after I drew the picture. Apparently, this is how the human brain works. When I wrote this book, I did not immediately see my mistakes in the illustrations. Sometimes I noticed errors in the illustrations in a day or two, with a fresh mind. I corrected some illustrations from 3 to 5 times. I corrected it after I decided that this was no longer a draft, but a complete illustration. No wonder there is a saying — Good thinking, comes afterwards. This saying illustrates very well the process of finding errors in a 3D drawing.
Besides. It may well be that all the “mistakes” I noticed by other artists, not mistakes at all. Perhaps all of these drawings were so conceived. Artists (I know for myself) are a peculiar people, and they love everything unusual. Perhaps this is such an artistic device? Maybe all the “mistakes” I saw are a kind of surrealism, intentional distortions of perspective (geometry), or such a vision of artists. And I just did not understand their plan, and took this for a mistake?
It may also be that the customer chose the photo for the drawing, and insisted on that particular photo, the customer was the buyer. And the buyer, as is always known, is RIGHT.
The customer does not always understand what will happen if a photograph with inappropriate shooting conditions (inappropriate perspective, geometry) is simply transferred to the drawing. A photograph taken at a different angle, or taken from a different distance, cannot be correctly transferred to the drawing. Definitely will be visible distortion in perspective.
Itself faced a similar situation. I was once offered to draw something like that. I refused. I can’t draw if the result is an obvious and very noticeable error in perspective, in the geometry of the drawing.
Perhaps, and even for certain, the mistakes of perspective, not all viewers will see or notice. But you must admit, it is better to draw without errors than to hope that not everyone sees the mistakes of perspective.
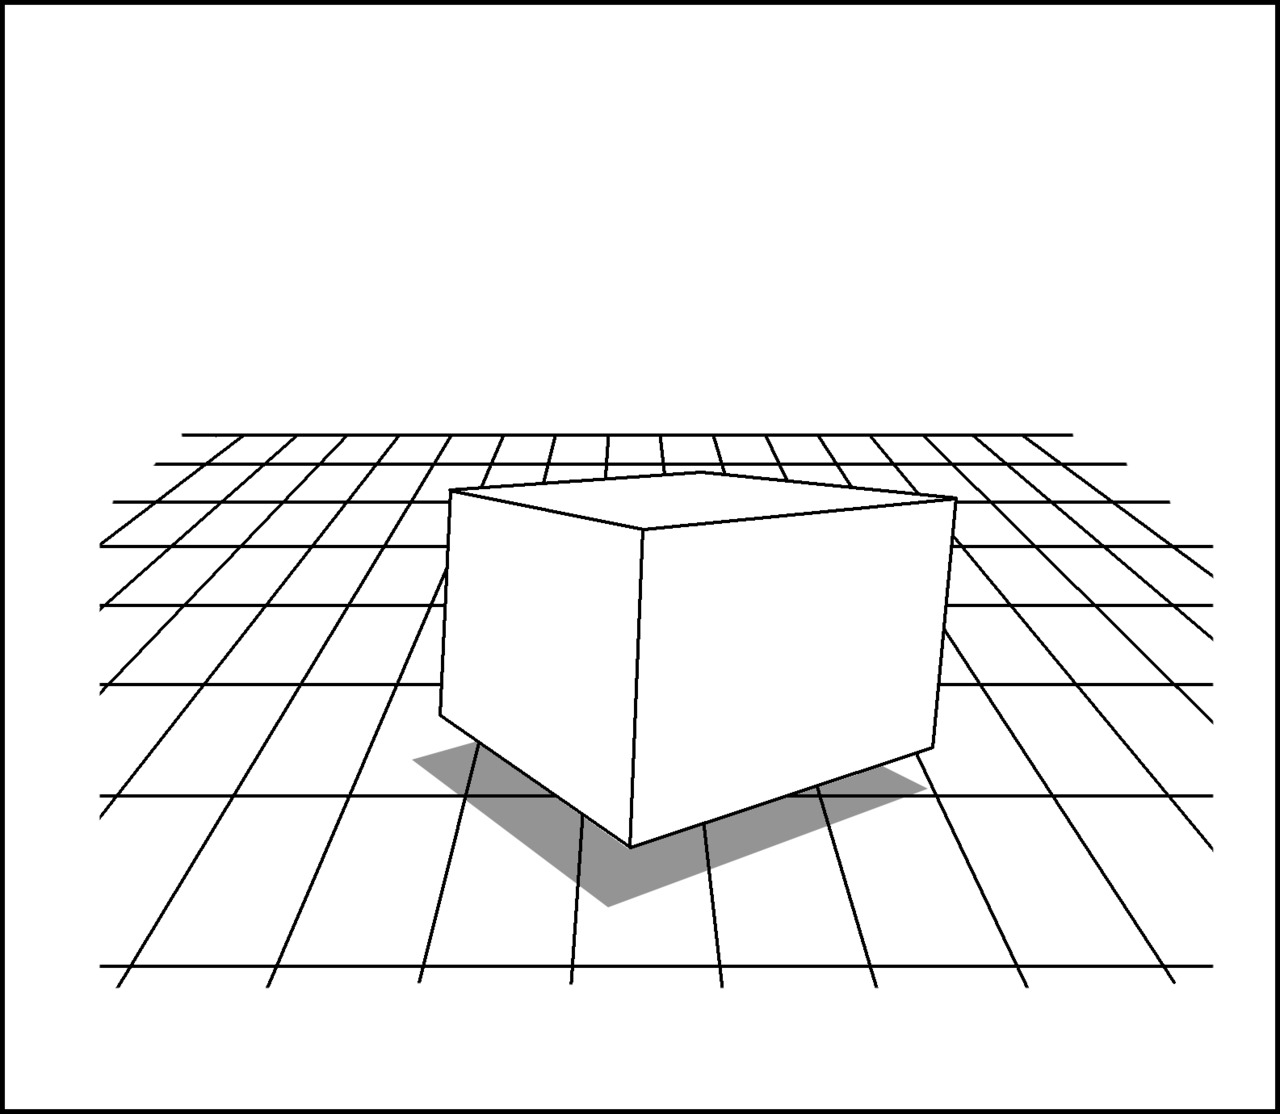
The most common mistake that I saw was the incorrect construction of the perspective of the picture. One of the signs of such errors is the discrepancy between the horizon of the site and the horizon of the drawn 3D drawing. Simply put, we look at a drawing from one angle, and the photograph (from which painted) was taken from a different angle.
Such perspective errors are obtained because many artists draw a 3D drawing without building a projection according to the laws of perspective. They transfer the drawing on the asphalt in the cells from the photograph, or from their preliminary sketch. From a photograph taken from a different angle, or from a different distance. From a sketch that is also drawn “by eye”, and not by a method of constructing a projection according to the laws of perspective.
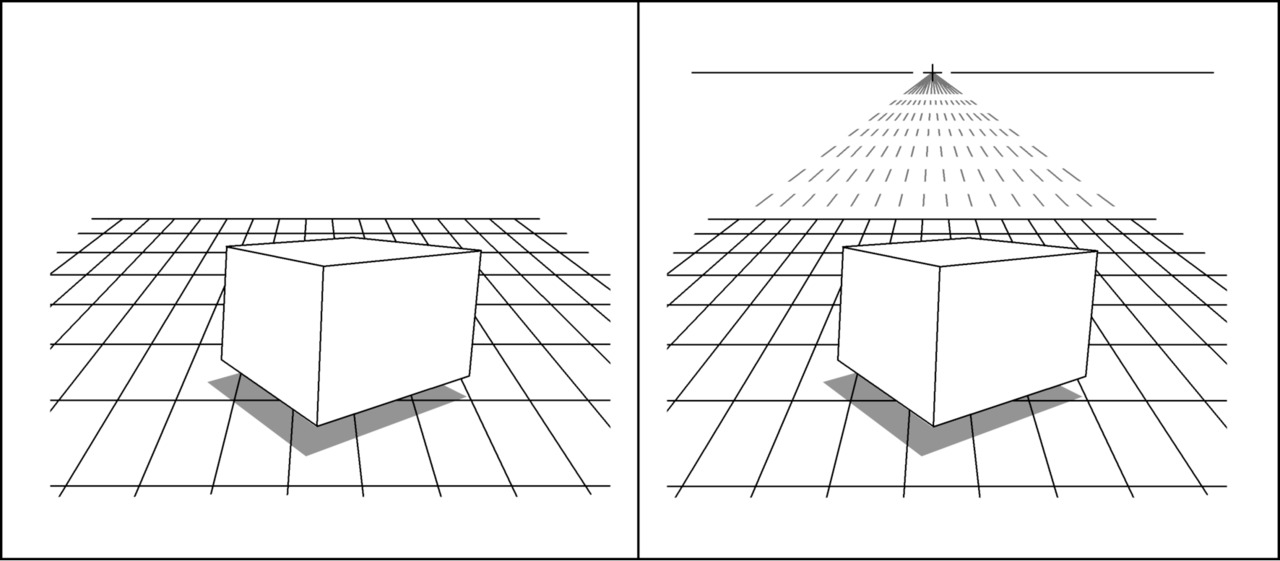
In order for the 3D drawing made from the photograph to work out correctly, the distance to the object and the angle of shooting of this object must absolutely exactly coincide with the viewer’s angle of view of the drawn 3D drawing, and with the distance from the viewer to the drawing. But this is not always the case. This condition is very difficult to observe if you don’t know from what distance and at what angle the object that you want to draw from this photograph is photographed.
If you want to draw from a photograph. It is possible to avoid mistakes in the perspective of the picture only if you yourself are photographing the object you need. If you are photographing an object from that distance, and at the angle from which the 3D drawing will be viewed and photographed.
If the shooting angle of the photo does not coincide with the angle of view in the 3D drawing, distortion of perspective is obtained. If the distance from which the subject was photographed does not coincide with the distance from which the picture is photographed, distortion of perspective is obtained.
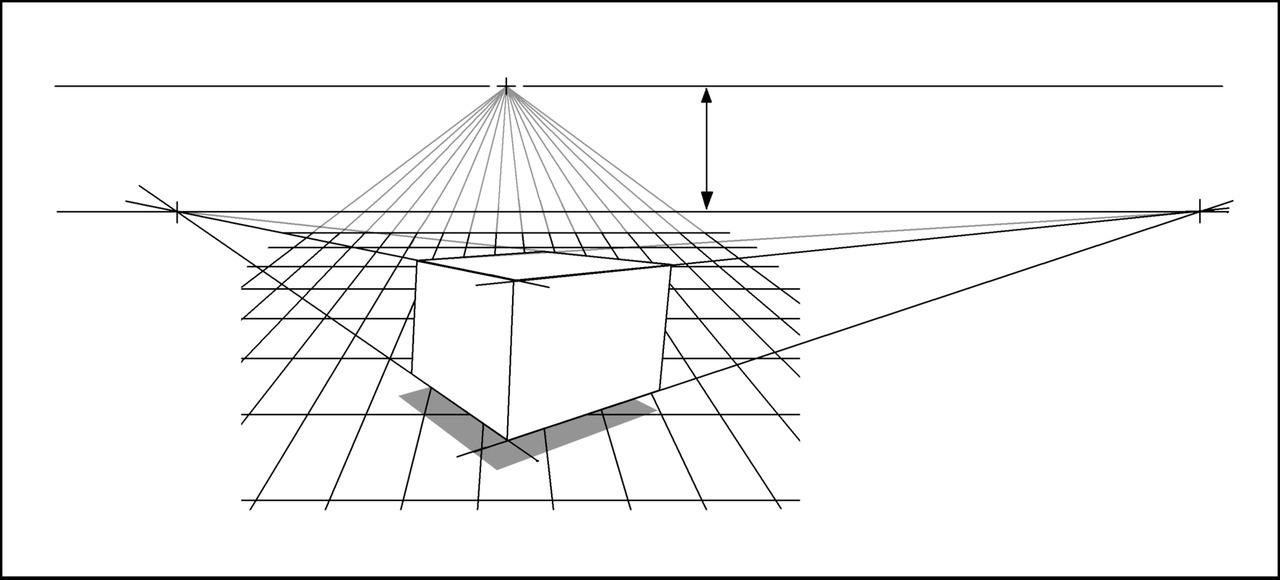
In order not to make such mistakes, it is advisable to draw a 3D drawing, having previously built the projection according to the laws of perspective (geometry). How to build a projection correctly, I will explain it in detail and in detail, and show you step by step in this course.
What should I do if the customer of the picture insists on a certain photo, or if the artist himself likes a certain photo and the photo has an inappropriate perspective? You can preconstruct a projection of objects with the correct perspective, and then superimpose on this projection, details and texture of the photo or sketch.
In everything else, except for the perspective, the drawings cited as an example are well drawn (in my humble opinion).
Parsing errors
Not does error, he who does nothing.
Proverb.
The first example.
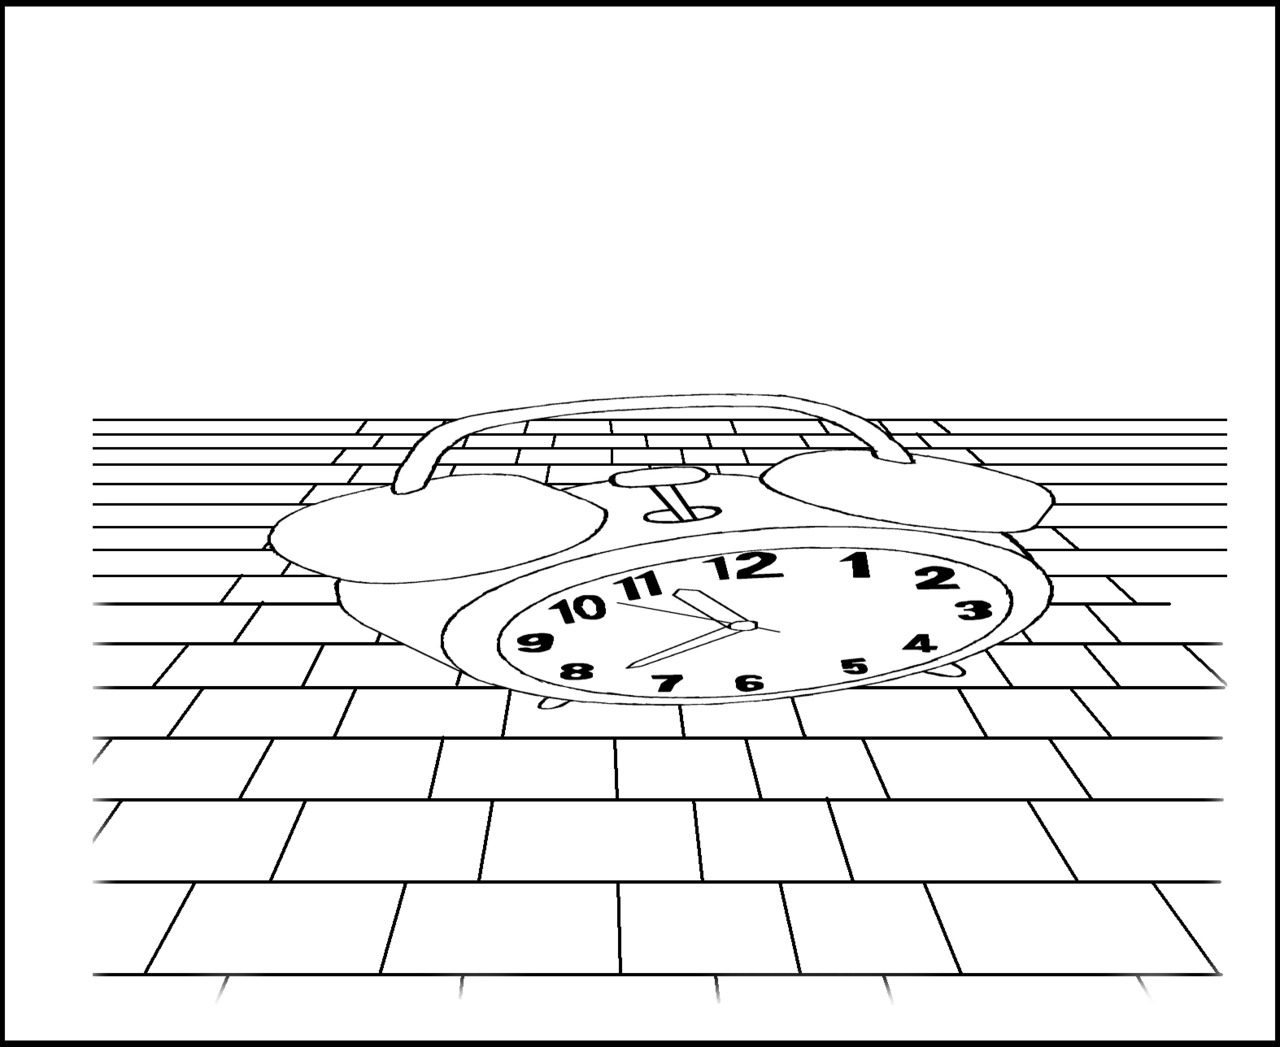
I “saw” the error in building the perspective in this figure, and decided to make out why the clock could have turned out to be of such an “irregular” shape. For me, this is one of the good examples where you can parse the perspective errors of a 3D drawing.
This watch is beautifully painted in terms of painting. Colors, shadows, highlights, reflections, all is well! BUT! With very large violations of perspective (geometry).
The picture is probably made from a photograph. Perhaps the photo was not stretched vertically, or not squeezed horizontally to make the dial look like a circle.
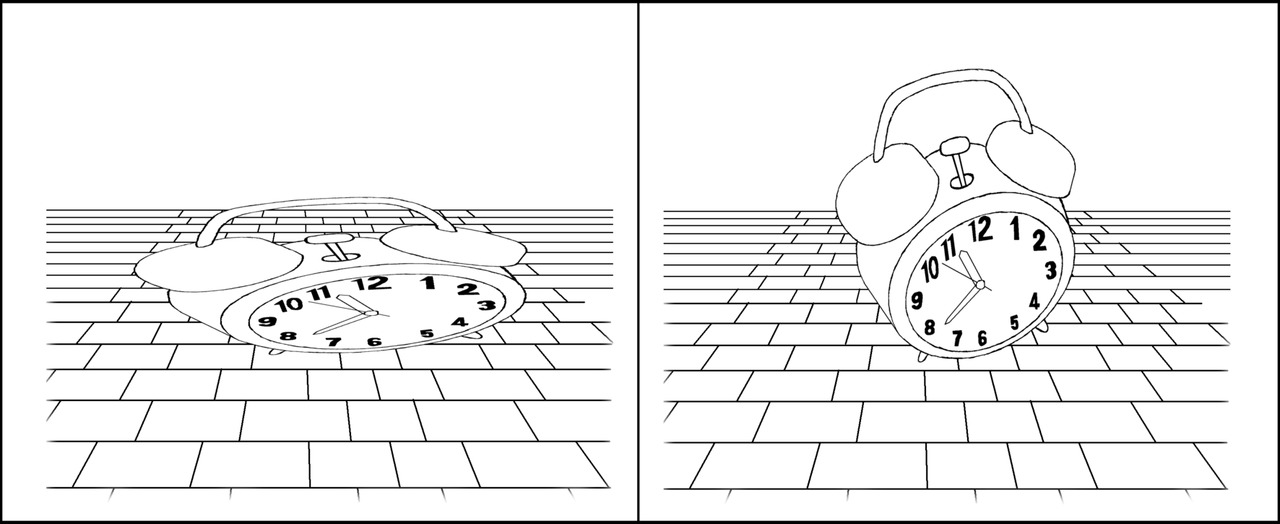
In the right picture.
It was this pattern of watches that I stretched vertically and squeezed horizontally. Made the dial look more like a circle. Even in this case, the correct, normal perspective (geometry) of the picture does not work out. The watch seems to be standing on one left (for us) leg and tilted (falling) towards the viewer.
Why, in my humble opinion, such a mistake was made.
If the subject is photographed from the top point, then in the figure it will look as if we are looking at it from above. But! We look at the drawing on the asphalt not vertically from above, but almost horizontally from the side. The photograph of the clock by which this picture was drawn was not taken at the same angle from which viewers look at the clock pattern.
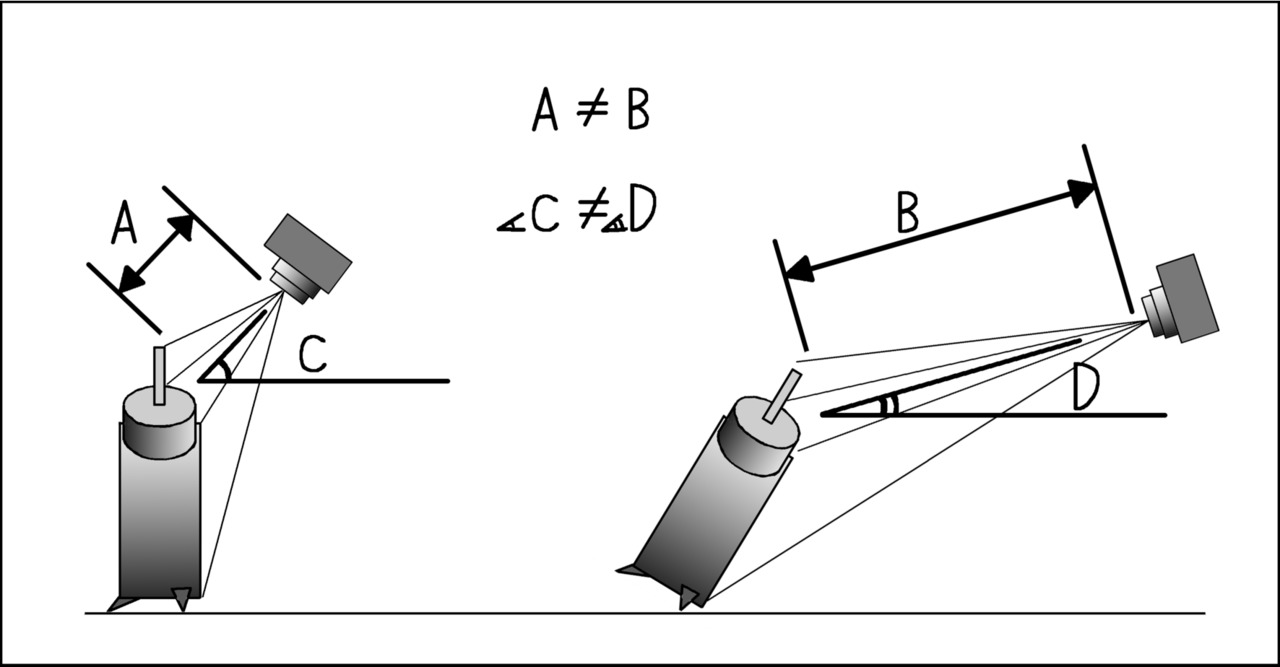
In the picture to the left.
The angle and distance from the clock to the camera while taking a preliminary photo. In the photograph on which the drawing was drawn, the clock is photographed almost vertically from above, from a short distance. About the small distance between the clock and the camera, says a big difference in the sizes of the numbers 12 and 6. In the picture to the right.
The angle and distance from the picture to the camera while shooting the picture. In the drawing, viewers look and take pictures, almost from a horizontal direction, but see the clock as if they were looking at the clock from above. Therefore, there are similar distortions of the perspective (geometry) of the 3D drawing.
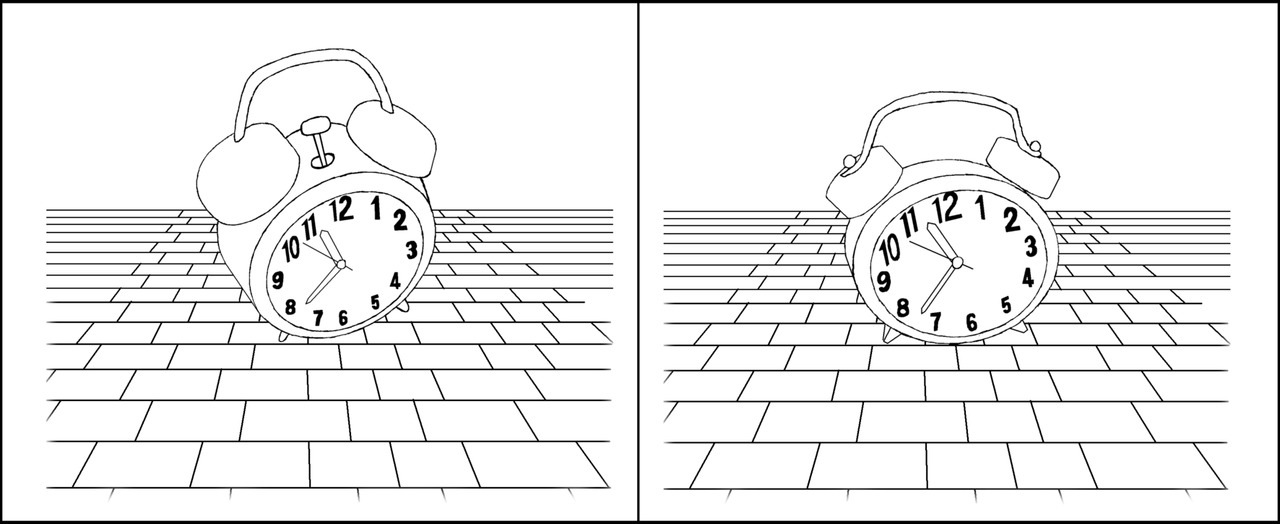
Original watch stretched to a round dial.
In the right picture.
Something like this might look like a clock, if first, correctly build the perspective of the clock. Another thing is that it would be problematic to draw such a height, such a size clock. Because the drawing would turn out almost to the horizon. Perhaps this is why the picture was squeezed vertically?
Criticism is only fruitful then
when she, in condemnation, indicates that
what should be that which is bad.
Lev Tolstoy.
Following the advice of Leo Tolstoy, I criticize fruitfully, I point out what should be that which is bad.
How to avoid a similar mistake in drawing perspectives.
The first way.
Pre-build the projection of the clock. On this correct projection, apply details, colors, shadows, highlights, reflections from those watches whose photographs were liked by the customer or the artist himself.
The second way to avoid this error.
Take a picture of the watch yourself at the right angle and from the right distance.
How to draw such a clock correctly will be very simply and clearly shown in one of the books in this course. Or in one of the lessons on my Patreon page.
https://www.patreon.com/ArtistFarit
A chapter in a course or exercise on Patreon will be called “Cylinder Lying Horizontally.”
The second example
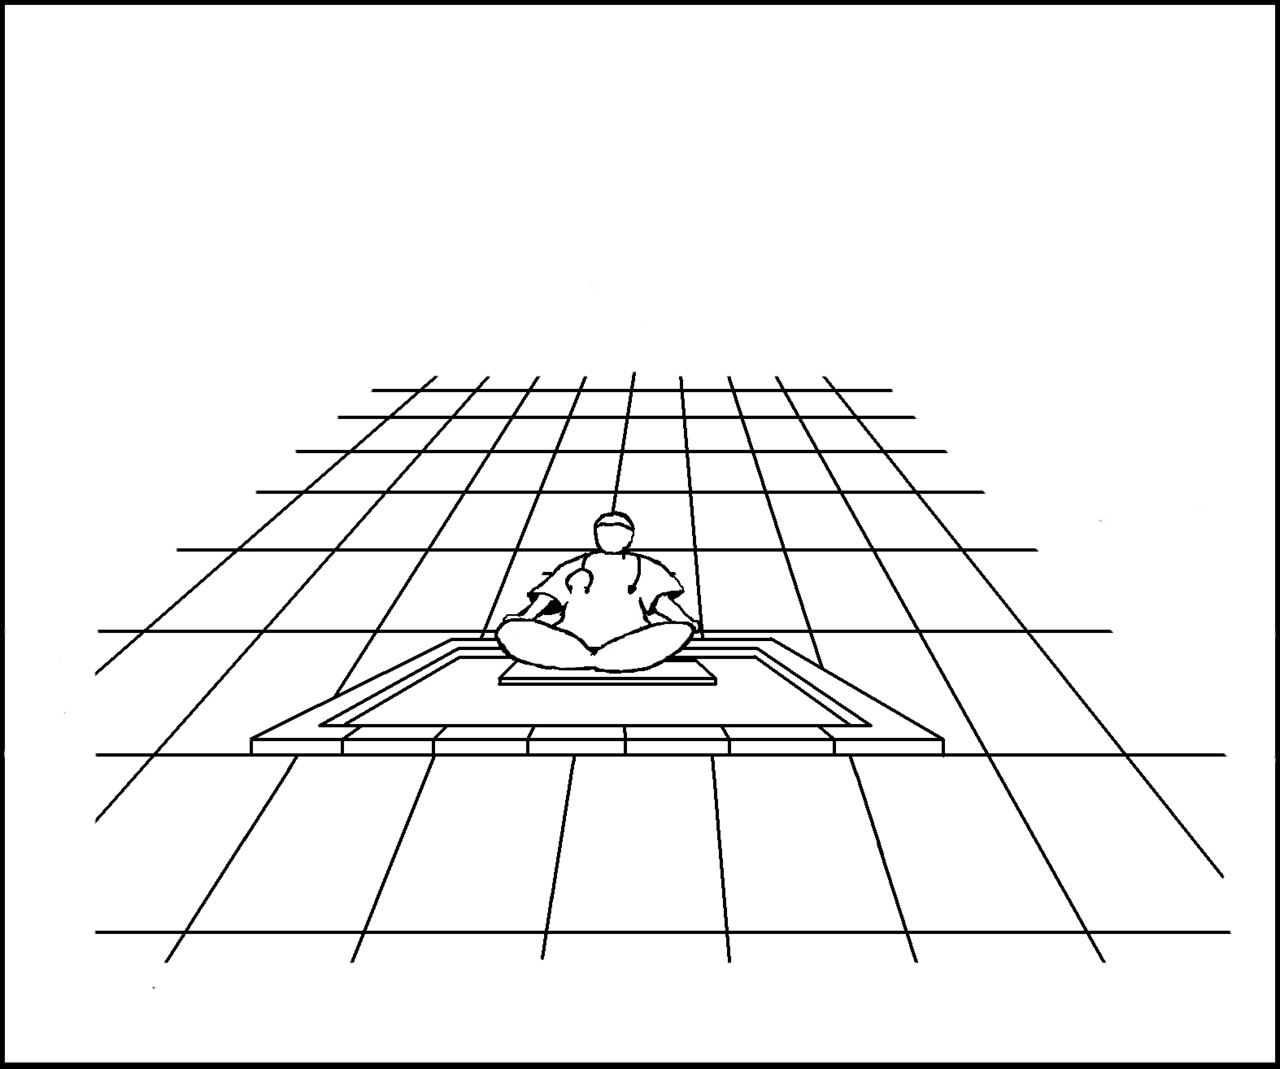
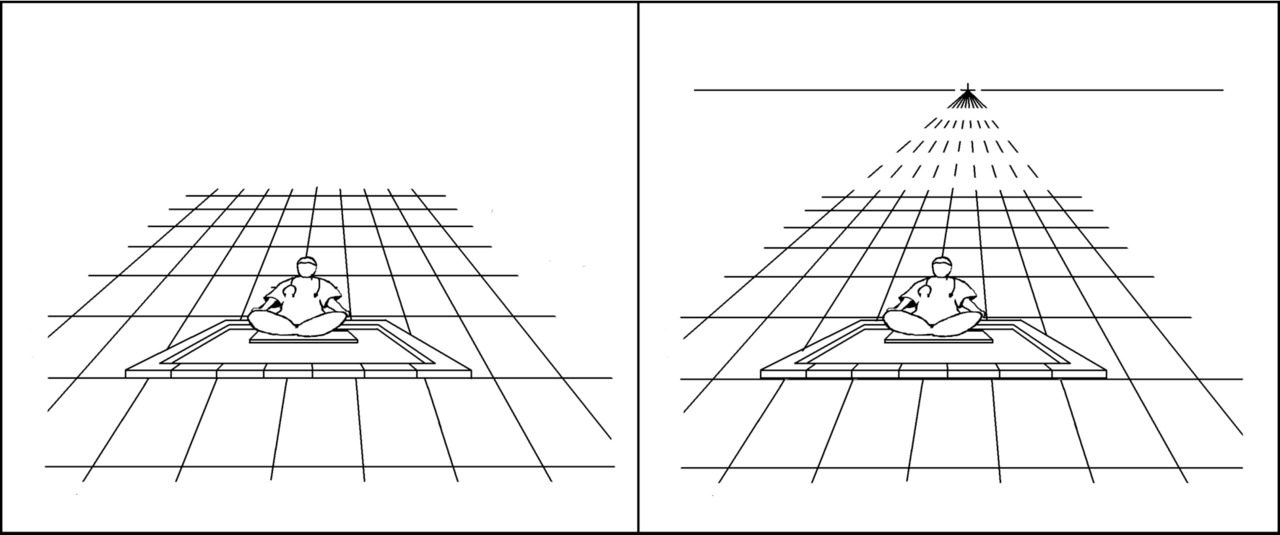
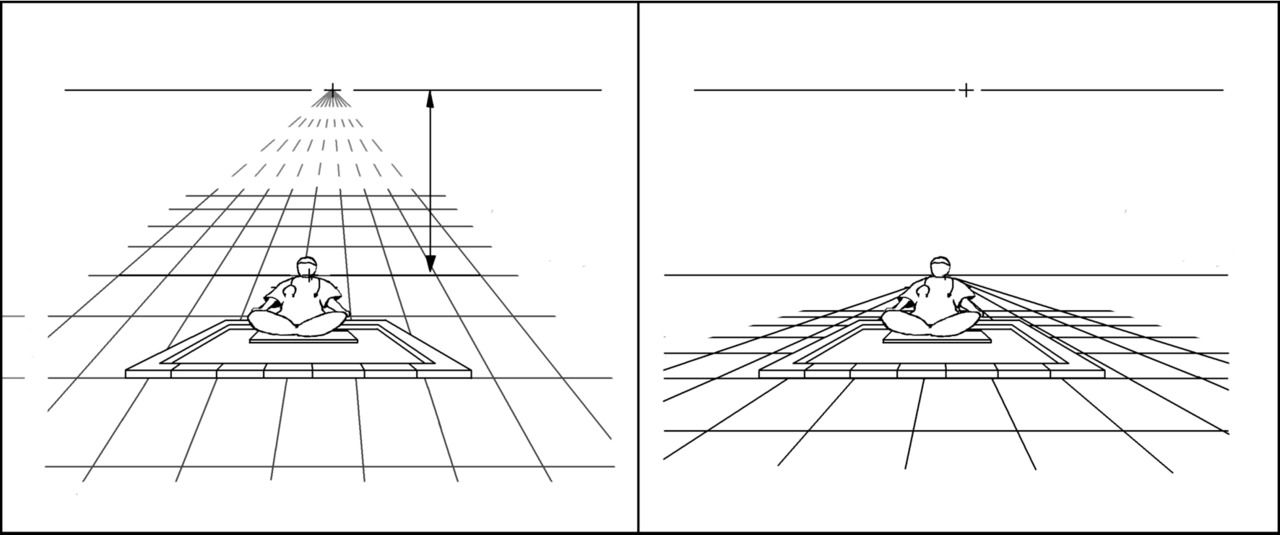
The original drawing with the painted horizon of the site.
In the right picture.
Search for the horizon of the original pool photo. From the lines of the side edges of the pool we can find the horizon of the original photograph of this pool. The horizon in the photograph with which the pool was drawn is located at the intersection of the sides of the pool. We continue the line of side sides of the pool. The continuation of the sides intersects on the horizon. The horizon of the original photograph in which this drawing was drawn is at the height of the shoulders of the seated person.
It can be seen that the horizon of the site and the horizon of the drawn pool do very much not coincide. Therefore, similar errors are obtained in the perspective of the drawing.
Conditions for shooting the photograph with which they drew the pool. The photograph of the pool (according to which this picture is drawn) was taken from a lower height. A photograph of the pool was taken from the height of the shoulders of a seated person.
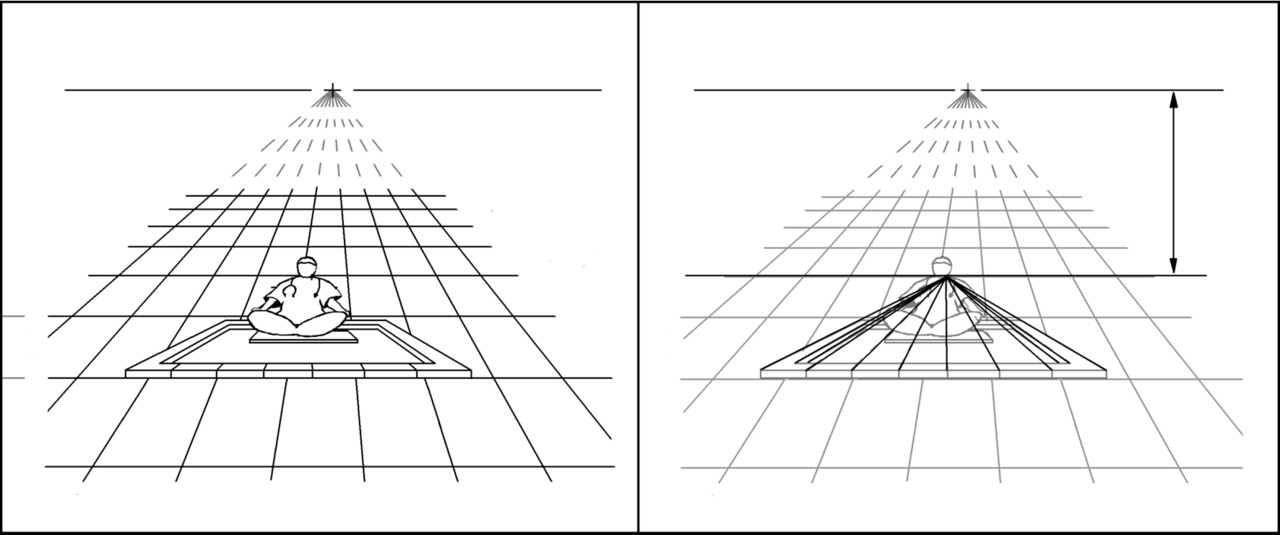
In the right picture.
Conditions for shooting the picture. We look at the figure from the height of human growth (a standing person). Therefore, it seems that the pool is not parallel to the surface on which it is painted. But even if you sit down and look at the picture from a small height, this error can no longer be corrected.
Original drawing with non-coincident horizons of the site and drawing.
In the right picture.
An example of what this pool should look like if you draw it in compliance with the laws of perspective (geometry). The continuation of the side sides of the pool intersect on the horizon line of the site. Correcting the geometry of objects is relatively simple. It is especially simple to correct (and draw) the perspective (geometry) of rectangular objects. Unfortunately, the “geometry” of a seated person is more difficult to fix. The person (just redrawn from the photo), in the right figure, turned out to be tilted back. Since the horizon of the photograph of a person remained in the same place, at the height of his shoulders. To correct the perspective of the “geometry” of a person, you need to photograph a person from the right distance, at the right angle, from the right height.
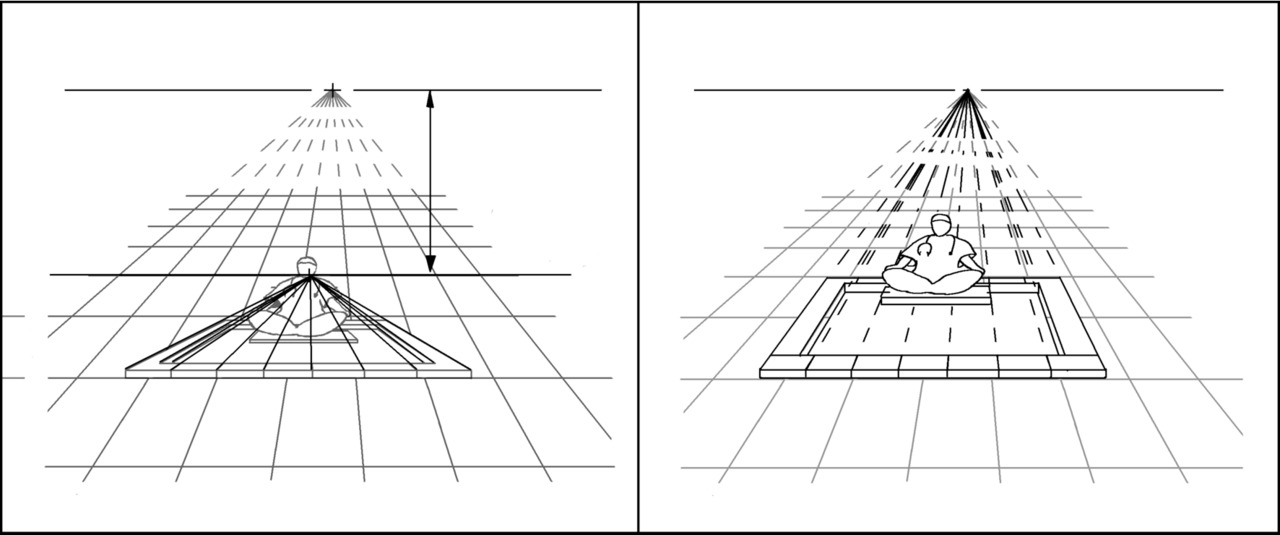
Original drawing with non-coincident horizons of the site and drawing. In the right picture.
The original drawing of the pool is left, while a new platform is drawn, the horizon of which coincides with the horizon of the pool. The photograph on which this drawing was drawn looked something like this. A pool with its horizon coinciding with the horizon of the site looks more correct. In my humble opinion.
The discrepancy between the real horizon and the horizon in the figure can sometimes be understood. Example: An artist paints a hole (pit, mainsail) in asphalt. In hole, the artist draws his own, separate horizon of the picture, different from the real horizon of the site. This kind of dips (grottoes) with its own horizon, a very common and popular form of 3D drawing.
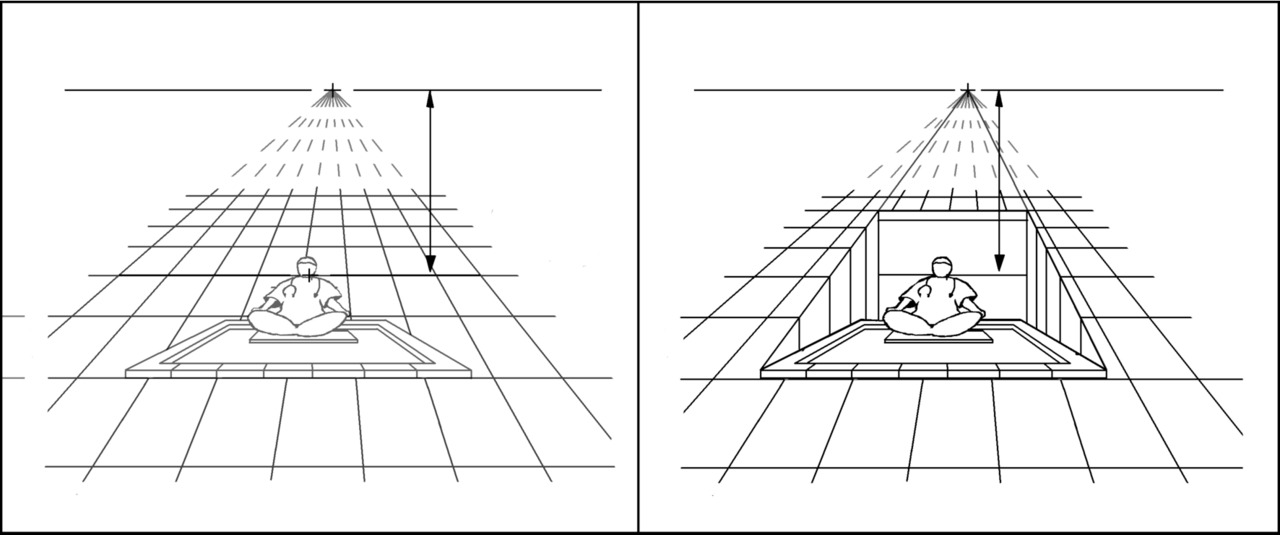
In the right picture.
A possible version of the picture with a dip (pit) in the plates. In a dip, behind a person’s back, one can see his own horizon of this drawing. The pool is located in a dip, very peculiar. The pool side closest to us lies at the site level, and the far (rear) side of the pool lie well below the site level.
If there is no second artificial horizon in the drawing, the perspective of the drawing should be oriented to the real horizon. Then the picture will not look strange in terms of the laws of perspective.
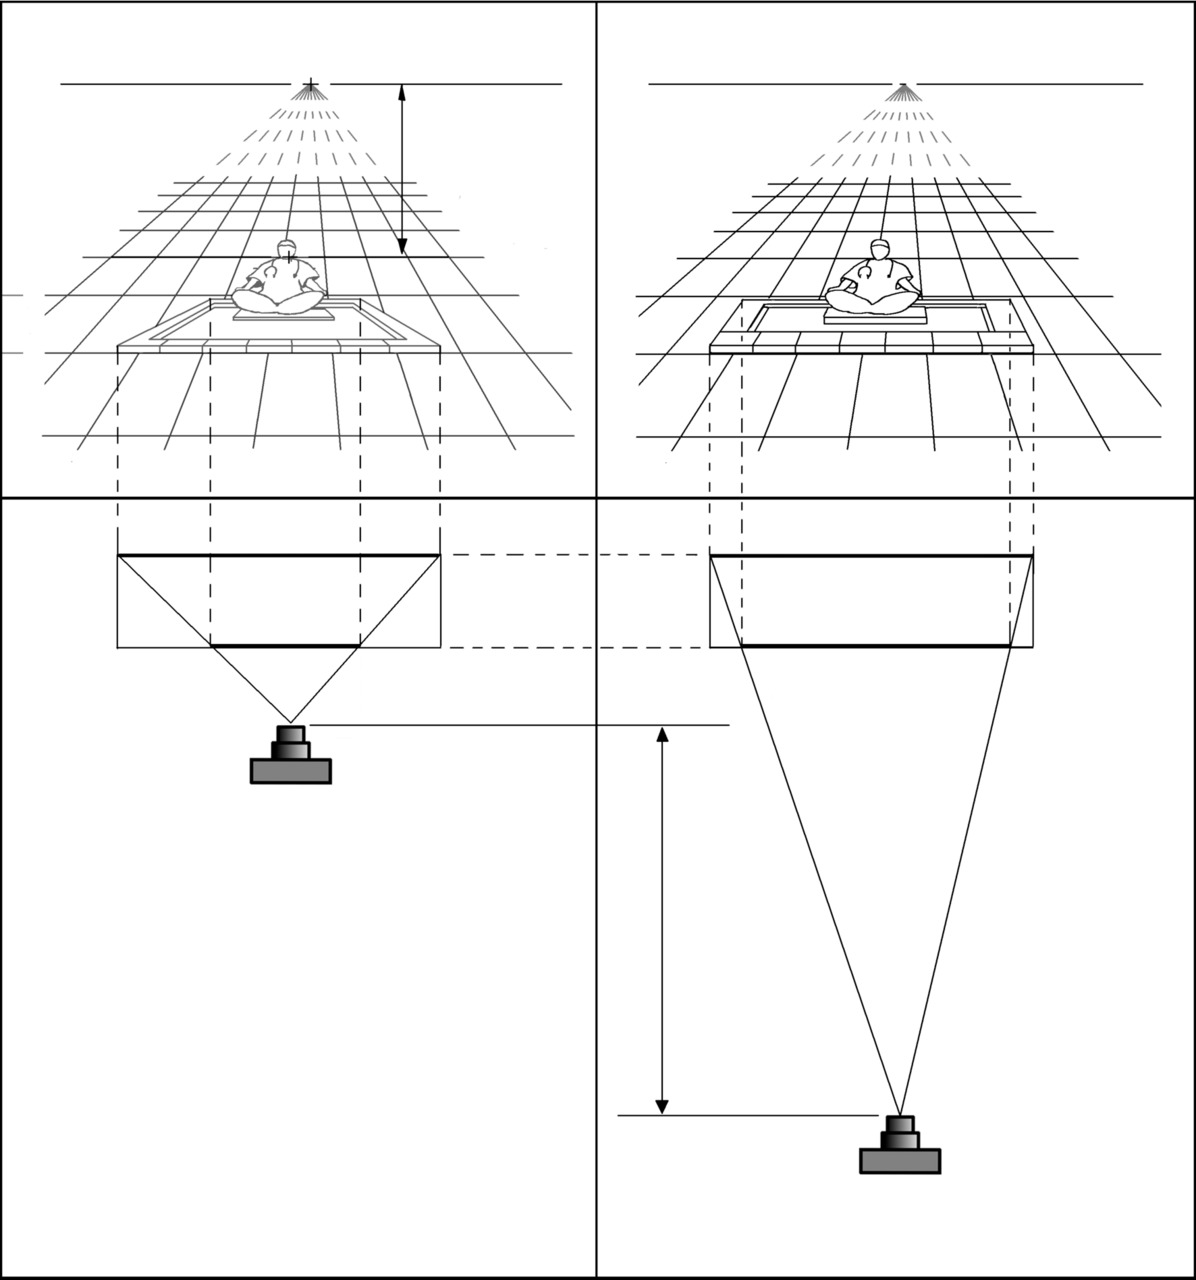
But this is not the only mistake in the perspective of this picture.
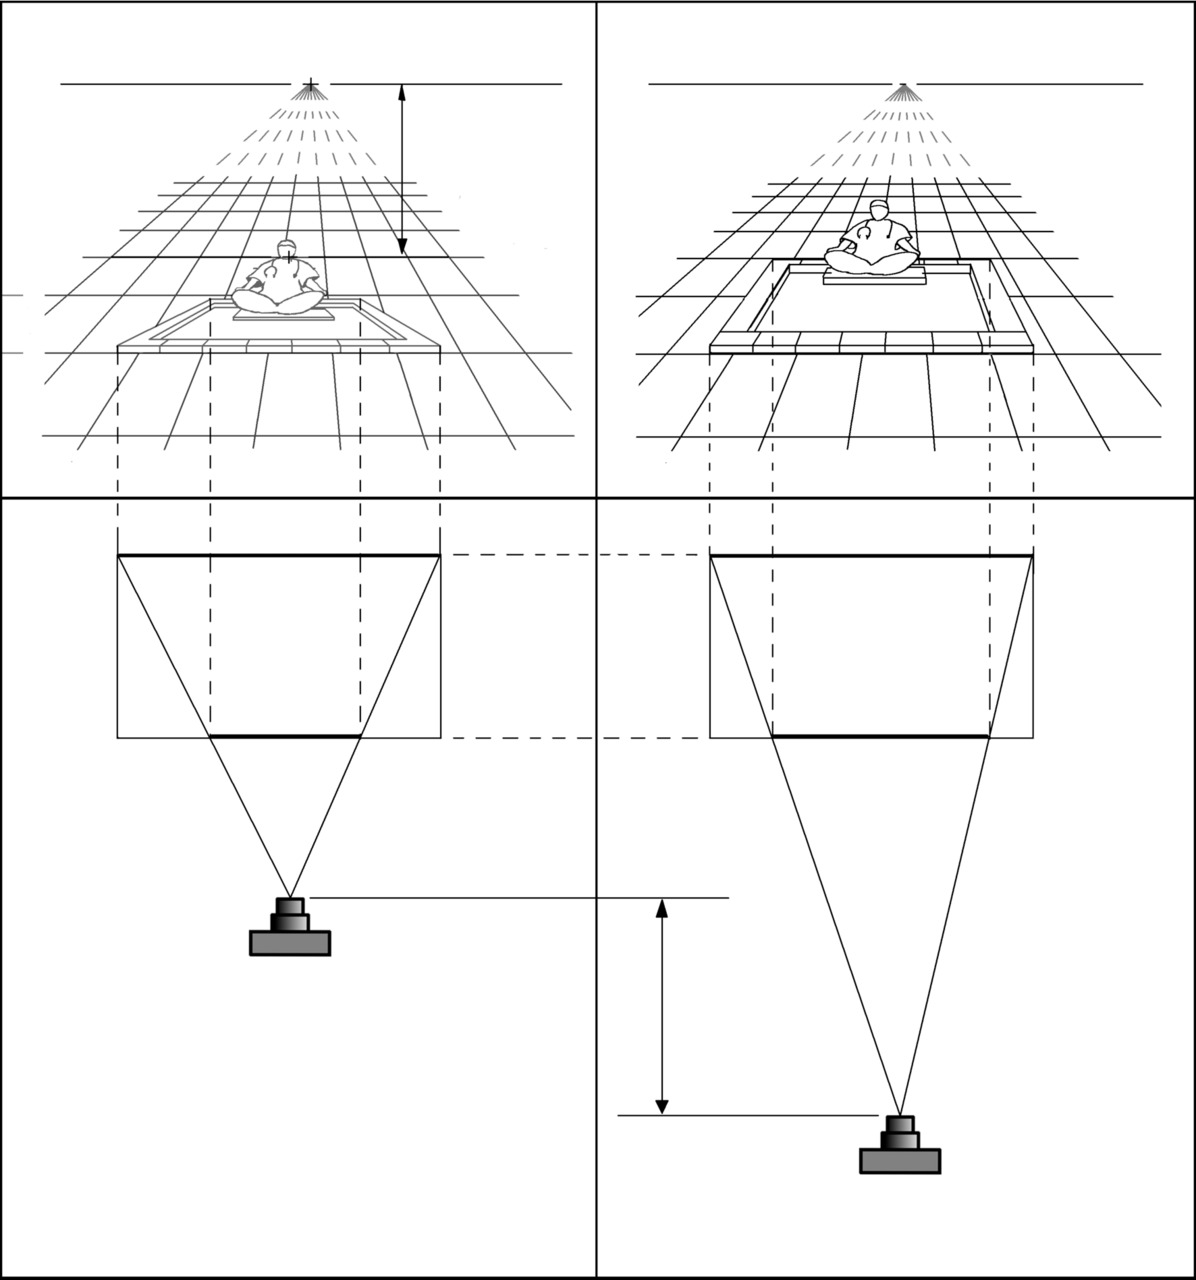
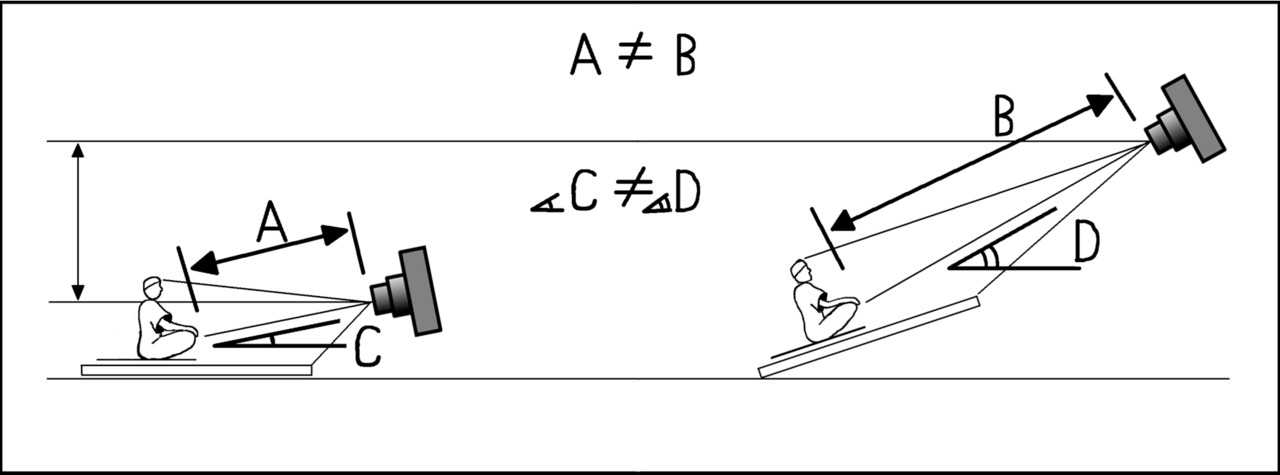
The distance of taking a preliminary photograph of the pool. The distance from which the pool was photographed is small. You can understand this by comparing the sizes of the near (front) and far (rear) sides of the pool in the photo. The larger on photograph the difference in the length of the front and rear sides of the pool, the smaller the distance from which the pool was photographed.
In the right picture.
The distance the picture was taken. The distance from which they look at the picture more. You can understand this by comparing the sizes of the near (front) and far (rear) sides of the pool in the photo. The smaller the difference in the length of the front and rear sides of the pool, the more the pool was photographed from a greater distance.
Never point out errors
if you don’t know how to fix them.
Bernard Show
Following the advice of Bernard Shaw.
I point out errors, knowing how to fix them, or how to prevent such errors.
How to correctly build the perspective of such drawings, step by step, and will be available in one of the next books of this course. Or in one of the lessons on my Patreon page.
https://www.patreon.com/ArtistFarit
In the chapter or exercise “Parallelepipeds’.
These were drawings with obvious errors in the perspective, which, I hope, can be seen by all, or most viewers, most beginners and experienced artists.
Further there will be less noticeable errors in building the perspective of the picture. I deliberately did not draw the details of these drawings, so that it was harder to recognize. In order not to offend the artists who made these mistakes. These are very talented artists, I have not yet learned how to draw like them.
But I saved the distortion of perspective in the form in which the original drawings had them.
Next example
Бесплатный фрагмент закончился.
Купите книгу, чтобы продолжить чтение.