
Бесплатный фрагмент - AI Fast-Track Methodology
Building Real-World AI Applications with Modern Frameworks

Preface
Welcome to The AI Fast-Track Methodology: Building Real-World AI Applications with Modern Frameworks!
Whether you’re a beginner exploring AI or an experienced developer enhancing your expertise, this book introduces a clear, actionable methodology for navigating the world of AI development. Each chapter demonstrates how to tackle real-world applications step-by-step, providing a structured approach to building practical and impactful AI solutions.
Why I Wrote This Book
You know those AI books that either read like a math professor’s fever dream or throw you into the coding deep end without a life jacket? Yeah, this isn’t one of those. I wrote this book because, let’s face it, artificial intelligence is revolutionizing everything — from how we order food to how we diagnose diseases — but the learning curve can feel steeper than Mount Everest. I wanted to create something that meets you where you are: curious, maybe a bit overwhelmed, but ready to dive in. This book is giving you a roadmap to build real, functional applications without getting stuck in the jungles of abstract theory.
What Makes This Book Different
Imagine you’re trying to bake a cake, and most cookbooks either spend 20 pages explaining the history of flour or just hand you a list of ingredients without instructions. Frustrating, right? Well, this book is more like that friend who says, “Here, let me show you how to whip this up in no time — and make it taste amazing!” It’s not just another collection of tutorials; it’s a methodology for fast, efficient AI development. You’ll learn how to slice and dice big AI problems into bite-sized tasks, find ready-made solutions (because why reinvent the wheel?), and stitch everything together into an actual product.
Who Can Use This Book?
This book is for anyone with a spark of interest in AI. Are you:
— A curious beginner wondering where to even start with AI?
— A developer or data scientist tired of piecing together scattered tutorials that never quite work?
— An entrepreneur with big ideas but a budget tighter than your Wi-Fi? — An educator who’s been asked to “make AI fun” and needs practical examples that actually work?
What You’ll Learn
Let’s cut to the chase — what’s in it for you? By the time you’re done, you’ll know how to take an AI idea from “Wouldn’t it be cool if…” to “Wow, I built that!” Here’s the game plan:
— Understand the problem: Because guessing isn’t a strategy.
— Scan for existing solutions: From arXiv to GitHub, the goldmine of AI knowledge is already out there.
— Prototype: Use tools like Google Colab to test ideas quickly.
— Create user-friendly interfaces: Because nobody wants to interact with something that looks like it came from 1999. (Gradio and Streamlit!) — Deploy like a pro: Get your app out there using Flask, FastAPI, Docker, and cloud hosting.
By the end of the book, you’ll have the confidence and skills to tackle AI challenges head-on, whether it’s building a chatbot, analyzing data, or automating the mundane parts of your job.
Structure
The book is divided into two parts to guide you through both learning and doing. In Part I, we dive into a hands-on methodology for building AI applications, demonstrated through the creation of an innovative and engaging project step by step. Part II shifts gears to showcase a collection of ready-to-go AI prototypes spanning natural language processing and computer vision — two pillars of modern AI. Each prototype comes with a blend of theory and code, providing a foundation that you can refine and expand using the methodology from Part 1. Together, these parts ensure a balance of understanding and practice, empowering you to turn AI ideas into real-world solutions.
Prerequisites
Before we dive into the exciting world of building AI applications, let’s talk about what you need to follow along. The good news? Not much. This book is designed to be approachable for AI enthusiasts of all levels, whether you’re a seasoned engineer or someone who’s only just starting the term “machine learning.”
Python
While we’ve done our best to keep things simple, you’ll need a basic understanding of Python. If you can write a function, loop through a list, and not break into a cold sweat at the sight of a library import, you’re golden. Don’t worry if you’re not an expert — this isn’t a coding bootcamp, and everything we do will be explained step by step.
What About Hardware?
Ah, the classic AI question: “Do I need a GPU?” It’s no secret that GPUs are the shining stars of AI, powering everything from self-driving cars to your favorite cat-detecting app. But let’s be real — not everyone has a top-tier gaming PC or a cloud subscription lying around. And that’s okay.
This book is intentionally designed to be CPU-friendly. Why? Because not everyone has access to expensive GPUs, and figuring out how to rent one or use cloud platforms like Google Colab or Kaggle can become an additional overhead, although those platforms offer free GPUs in limited quotas.
Got a laptop that feels like it’s one coffee spill away from retirement? No worries. As long as it can run Python, you’re set. We’ve deliberately structured the code examples to run efficiently on a CPU. You won’t need a NASA-grade supercomputer to execute these projects — just a bit of patience and a machine that’s still alive enough to follow instructions.
So, grab your laptop, stretch those Python muscles, and let’s get started!
Part I
Methodology
Introduction
Let me tell you a secret:
AI development doesn’t have to be as complicated as people make it seem. Sure, it has a reputation for being the kind of thing only geniuses in lab coats can pull off, but the truth is, you don’t need to spend years mastering theoretical models or reinventing the wheel every time you start a project.
That’s the beauty of the Fast-Track Methodology. It’s like your AI development GPS — guiding you through the quickest, smartest route to success while skipping the unnecessary detours. Whether you’re building a chatbot, analyzing data, or creating something entirely new, this methodology is about working efficiently, using what’s already out there, and focusing on results.
Let’s break it down.
The Problem Everyone Faces
In today’s world, everyone wants everything faster, cheaper, and better — AI projects included. But here’s the rub: most traditional AI workflows are anything but fast. They involve weeks (or months) of data wrangling, training custom models, and dealing with the occasional existential crisis when nothing works.
And let’s not even talk about the resources. Not everyone has a supercomputer sitting in their garage or a budget that rivals an expensive movie.
So how do you build impactful AI applications when you’re short on time, money, and patience? That’s where the Fast-Track Methodology comes in. It’s designed to:
— Get results quickly without compromising quality.
— Maximize the use of existing resources (think of it as recycling, but for code).
— Lay a foundation for scaling and adding features later. — Share and demonstrate your projects easily.
What Is the Fast-Track Methodology?
In simple terms, this methodology is a structured approach to AI development that helps you go from an idea to a working product without getting bogged down in unnecessary complexity.
It’s built around five key phases, each designed to help you move forward efficiently.
Here’s how it works:
1. Identify Core Objectives
Think of this phase as your compass — it points you in the right direction and keeps you from wandering aimlessly. Before you write a single line of code, you need to answer a few critical questions:
— What’s the problem you’re solving? — What’s the simplest version of your solution that will still provide value?
The key here is focus. If you try to do everything at once, you’ll end up doing nothing well. Instead, zero in on the core functionality and worry about the bells and whistles later.
2. Leverage Existing Solutions
This is the phase where you remind yourself that you don’t have to do it all. There’s a whole universe of pre-trained models, open-source libraries, and datasets out there just waiting for you to use them. Why waste weeks building something from scratch when someone’s already done 90% of the work for you?
Here’s a fun analogy: Imagine you’re building a house. You could cut down trees, shape the wood, and make your own bricks — or you could just buy materials from the store and start building. The result? A livable house in weeks instead of years.
3. Prototype Rapidly
Once you’ve got your tools and resources, it’s time to start building — but don’t aim for perfection. This phase is all about creating a minimum viable product (MVP) that shows your idea works, even in its simplest form. For example, if you’re building an AI model to detect objects, your prototype doesn’t need to handle every edge case or look pretty. It just needs to detect objects well enough to prove the concept.
The goal? Progress over perfection. You’ll have plenty of time to polish later.
4. Iterate and Refine
Here’s where you take your rough prototype and start turning it into something truly impressive. This phase is about:
— Improving accuracy by tweaking parameters or adding better data.
— Enhancing the user experience with intuitive interfaces. — Adding features that weren’t essential for the prototype but make the final product shine.
5. Deploy and Expand
Congratulations, you’ve built something awesome! Now it’s time to share it with the world. In this phase, you focus on:
— Deploying your application using tools like Flask, FastAPI, or Docker.
— Gathering feedback from users to identify what works and what needs improvement. — Planning for future features and scaling based on user needs.
Think of it as planting a tree. Your MVP is the seed, and deployment is when it starts to grow. With care and attention, it can expand into something much bigger.
Why This Methodology Works
At its core, the Fast-Track Methodology is about working smarter, not harder. Here’s why it’s effective:
— Speed Matters: Delivering results quickly builds momentum and credibility, whether it’s with stakeholders, users, or your own confidence.
— Efficiency Wins: By using existing resources, you avoid wasting time on problems that have already been solved. — Iteration is King: No product is perfect on the first try. This methodology ensures you can refine and improve without starting from scratch.
The Methodology in Action
Let’s take a generic example to show how this works in real life. Say you want to build an AI tool to track vehicle traffic. Using the Fast-Track Methodology:
— You define the core objective: count vehicles and classify them (cars, trucks, bikes).
— You find a pre-trained object detection model online.
— You build a quick prototype to test it on a small dataset.
— You refine the code and add a user-friendly interface. — You deploy the tool and gather feedback from transportation planners, who suggest adding pedestrian tracking as a future feature.
In a matter of days, you can go from idea to working product. Not bad, right?
The Fast-Track Methodology isn’t just a way to build AI applications — it’s a mindset. It’s about recognizing that you don’t need to do everything at once and that starting small is often the fastest path to big results. Let’s create an AI-powered Digital Coach to guide you through your physical exercises with precision and ease using this methodology!
Step 1: Identify Core Objectives
Imagine this: You’ve decided to work out at home, but there’s no trainer around to tell you if your form is correct, count your reps, or gently remind you that skipping leg day is a bad idea. That’s where our AI-powered Digital Coach comes in — a digital coach that uses computer vision to track your movements, count your exercise repetitions, and provide real-time feedback on your form.
Sounds futuristic? It is. But with today’s tools, it’s entirely achievable. The first step in bringing this idea to life is identifying what exactly this app needs to do to be both functional and valuable to its users.
This chapter is all about zooming in on the core objectives of your application. Instead of trying to solve every problem at once, we’ll focus on the essential tasks your app must perform to be useful. Think of it like building a house: before you decorate the walls, you need a solid foundation.
The Idea in a Nutshell
The idea behind the AI-powered Digital Coach is simple: create an AI-based tool that acts as a personal trainer using a camera. Here’s what we envision:
— The app detects the user’s body movements during exercises using computer vision. — It accurately counts repetitions for selected exercises (like squats, push-ups, or lunges).
These functionalities will serve as the baseline. Advanced features like exercise personalization, performance analytics, or voice feedback can be added later. For now, we’ll focus on building a minimum viable product (MVP) that delivers core functionality.
Defining the Core Objectives
Let’s dive into the essential tasks that the Vision Physical Exercise Assistant needs to perform. These objectives will form the backbone of our development process:
1. Real-Time Pose Detection
The app must be able to track the user’s body in real time. This involves recognizing key points like joints (shoulders, elbows, knees) and understanding how they move during an exercise. Without this, the app can’t do anything else.
Key questions to ask:
— What level of accuracy is “good enough” for our MVP? — Are there pre-trained models available to handle pose estimation?
2. Exercise Repetition Counting
Counting reps accurately is non-negotiable. Whether the user is doing push-ups, squats, or jumping jacks, the app needs to reliably detect when a repetition starts and ends.
Key questions to ask:
— How do we define a “complete rep” for each exercise? — Can the system handle variations in user speed or form?
Congratulations! We’ve taken the first step in building the AI-powered Digital Coach! By identifying the core objectives, we now have a clear focus for what this app will do and, just as importantly, what it won’t do (yet).
In the next step, we’ll explore how to leverage existing solutions — because reinventing the wheel isn’t just unnecessary; it’s exhausting. Let’s get to work!
Step 2: Leverage Existing Solutions
If there’s one thing AI developers love, it’s building things. But here’s the kicker: most of the heavy lifting for common tasks has already been done. That’s why leveraging existing solutions is a cornerstone of the Fast-Track Methodology. The challenge isn’t building from scratch — it’s knowing where and how to look for the right tools and choosing the one that fits your needs.
In this step, we’ll break down a full pipeline for finding and selecting the best pre-built libraries, frameworks, and models for your project. By the end, you’ll not only know what to use but also why it’s the right choice.
Why Start With Existing Solutions?
Here’s the golden rule: Don’t code what you can download. There’s no glory in reinventing the wheel when time, efficiency, and sanity are at stake. Pre-built solutions save you weeks (or months) and let you focus on building value, not wrestling with low-level details.
For our AI-powered Digital Coach, we’re looking for tools that can handle:
— Pose Detection: Identifying body key points in real time.
— Repetition Counting: Analyzing sequences of movement.
But how do you find these tools? Let’s dive into the search process.
The Search Pipeline: How to Find the Right Tools
Here’s a step-by-step guide to systematically search for existing libraries, models, and frameworks:
1. Start with Google
The simplest (and often most effective) way to begin is by Googling the task + “library” or “framework.” Here are example queries:
— “pose estimation library”
— “pose estimation python” — “real-time body tracking framework”
Most of the time, this will lead you to:
— Official websites of popular libraries.
— GitHub repositories with large user bases — Blog posts or tutorials reviewing various options.
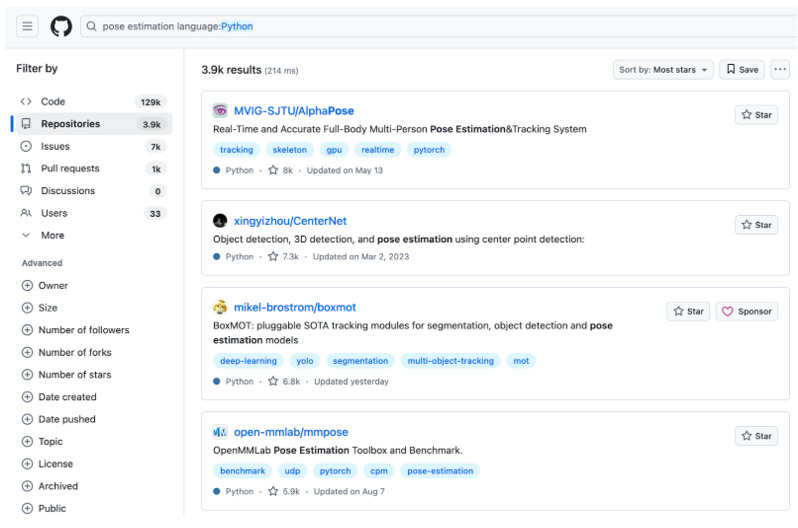
Let’s see what pops up when we Google “pose estimation library” and “real time pose estimation python”:

The search results include a mix of blog posts, official GitHub repositories, and even research-focused resources (we’ll explore those in more detail later). The types of entities you’ll see — blog posts, official repositories, research papers, or something else — will vary depending on the specific query you enter.
2. Dive Into GitHub
If Google doesn’t immediately land you on a goldmine, head over to GitHub. Use the platform’s search bar to query the task you’re looking for:
— “pose estimation”
— “AI exercise tracking” — “fitness computer vision”
GitHub results often include repositories ranked by the number of stars. While stars aren’t everything, they’re a good indicator of popularity and community trust.
Look for:
— Repositories with a high number of stars (500+ is a great starting point). — Recent commits (active projects are less likely to break). — Clear documentation (so you can actually use the library).
Let’s run the search query on GitHub for “pose estimation”, specify on Python and sort repositories by most stars:
3. Explore Research Resources
For cutting-edge tasks, you might need to look at academic papers. Most published research today comes with accompanying GitHub repositories. Great places to find this include:
Papers with Code:
— This site pairs research papers with code implementations.
— Use their search tool to find papers and projects related to your task. — Example query: “pose estimation.”
arXiv:
— While it’s primarily a preprint archive, many arXiv papers link directly to GitHub repos. — Bonus: You’ll often find links to model weights and pipeline instructions.
Since these platforms are primarily geared toward finding research papers focused on specialized applications, let’s try searching for a more specific use case in pose estimation.
For instance, consider “pose estimation for animals”.
Let’s see what PapersWithCode delivers for this query::
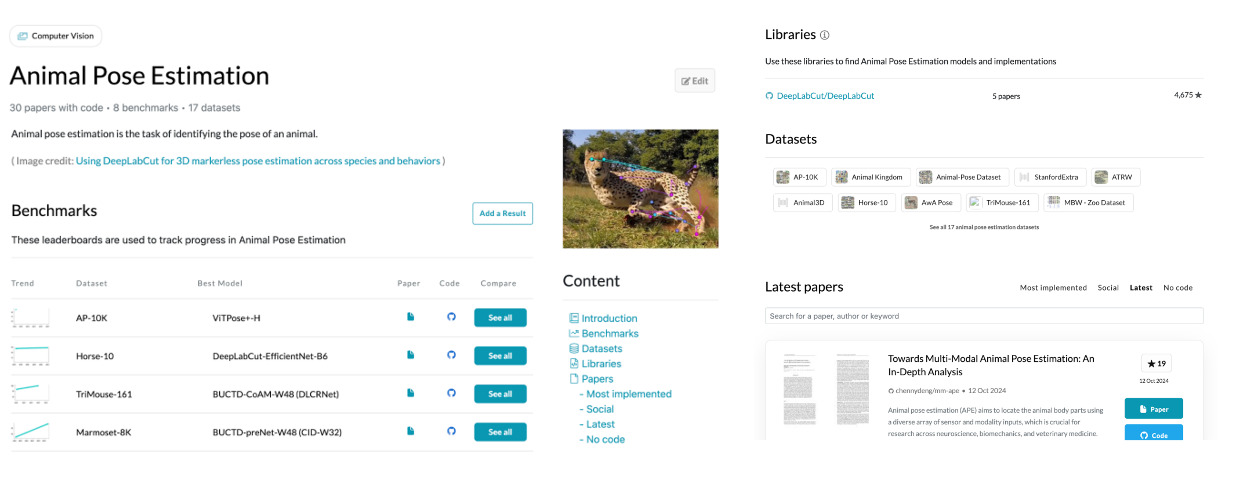
These are just snippets of the results. Results also include benchmarks, libraries, datasets, starred papers, and repositories featuring the frameworks used.
4. Evaluate Libraries Based on Key Criteria
Once you’ve found a few potential solutions, it’s time to narrow them down. Use these criteria to decide which library fits your needs:
— Ease of Use: Does the documentation make it easy to get started? Are there examples or tutorials?
— Popularity: Look for libraries with a large user base and community support (stars on GitHub, forum discussions, etc.).
— Activity: Check the commit history. Is the project still being actively maintained?
— Compatibility: Will this library integrate well with other tools you’re using? — Performance: Does the library meet your requirements for accuracy, speed, and resource usage? — License: Ensure the library’s license allows you to use it for your intended purposes, especially if you plan to monetize your app. Some open-source projects restrict commercial use under licenses like GPL. If the license doesn’t permit commercial use, reach out to the authors or maintainers. Many times, they’re open to granting permission or offering commercial licenses.
After identifying several promising libraries, the next step is to perform a quick comparative analysis to determine which one best suits our needs. This analysis is crucial — it ensures that we select a library that not only aligns with our project requirements but also saves us time and effort during development. Here is the table of preliminary libraries collected from different sources (AlphaPose with Google Colab, MMPose with its documentation and MediaPipe Pose with its documentation):
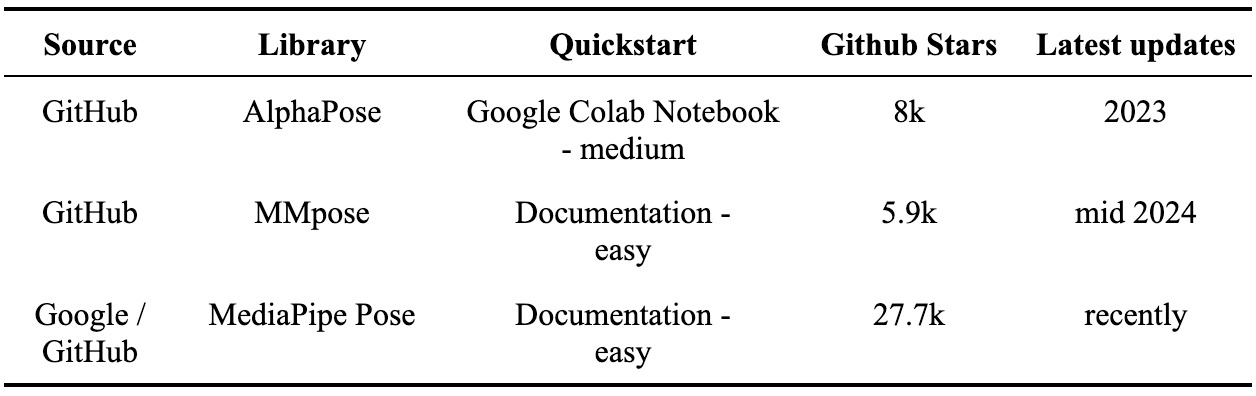
After collecting and reviewing several libraries, we can move forward with the evaluation:
— Ease of Use: MediaPipe stands out with its straightforward documentation that makes it easy to get started. MMpose has a slightly more complicated installation process. In comparison, AlphaPose offers a Google Colab notebook, but it’s cluttered with a large number of cells to execute, making the process more cumbersome. Meanwhile, Google’s ML Kit Pose Detection lacks a Python code sample in documentation, which limits its practicality for our project.
— Activity and Maintenance: MediaPipe Pose and MMpose are actively maintained, with regular contributions and updates visible in the repository. While AlphaPose is also maintained, its activity level is slightly lower. Given the importance of using an up-to-date library, MediaPipe Pose takes the lead here.
— Community and Stars: MediaPipe is the leader in GitHub stars, AlphaPose has slightly more GitHub stars (8k vs. MMpose’s 5.9k) than MMpose. — In addition, quick repos scanning shows that MediaPipe Pose and MMpose have real-time pose estimation models — that fact adds more points to these libraries.
Considering all these factors, MediaPipe Pose strikes the best balance between usability, activity, and community support, making it the ideal choice for building the AI-powered Digital Coach. Now let’s go prototyping!
Step 3: Prototype Rapidly
Now that we’ve chosen MediaPipe Pose as our library of choice, it’s time to put theory into practice and build something real. Together, we’ll write a Python prototype that counts squats and pushups from pre-recorded videos.
For simplicity, we’ll process pre-recorded videos as input. This doesn’t compromise the algorithm’s capability — MediaPipe Pose runs in real time, so switching to a live camera feed later is straightforward. For now, using videos makes testing and debugging easier, while keeping the logic identical.
Let’s dive in step by step, building each module as we go. By the end, you’ll have a fully functioning prototype ready to analyze your workouts.
To make your life even easier, all the code referenced in this book will be available in an official repository. No need to copy code from screenshots or retype blocks of text like it’s 2003. Simply download or clone the repository, and you’re good to go.
1. Setting Up the Environment
Create a Python virtual environment and activate it. I will be using Python 3.10:

Now, let’s ensure we have the required libraries installed. Create a requirements. txt file and add the following dependencies:

Install dependencies:

With our environment ready, let’s start coding!
2. Imports and Setup
We’ll begin by importing the necessary libraries:

cv2 is used for video processing and numpy for mathematical calculations.
3. Calculating Angles Between Keypoints
To detect motion (like squatting or pushing up), we need to calculate angles between keypoints. The following function calculates the angle at joint formed by 3 points a, b and c where each point is represented in 2D with x and y coordinates:

4. Processing the Video and Setting Up MediaPipe Pose
Now let’s set up the main pipeline for video processing and pose estimation. For simplicity, we’ll focus on squats first.
To calculate squats, we track three key joints: the hip, knee, and ankle. Using their positions, we calculate the angle at the knee during each movement. When the knee angle drops below 70°, the system detects the “down” phase of the squat. When the angle rises above 160°, it marks the “up” phase and counts one complete squat. A state-tracking flag ensures accurate counting, so partial movements or pauses don’t result in extra reps. This simple yet effective logic ensures precise squat detection, all visualized in real-time for clear feedback.
Add the following code to initialize MediaPipe Pose:

And finally initialize a count_squats function to start processing an input video frame by frame by calculating angle between hip, knee and ankle and detect squat downs and ups.

The count_squats function also visualizes the counts and angles, providing real-time feedback as the video plays.
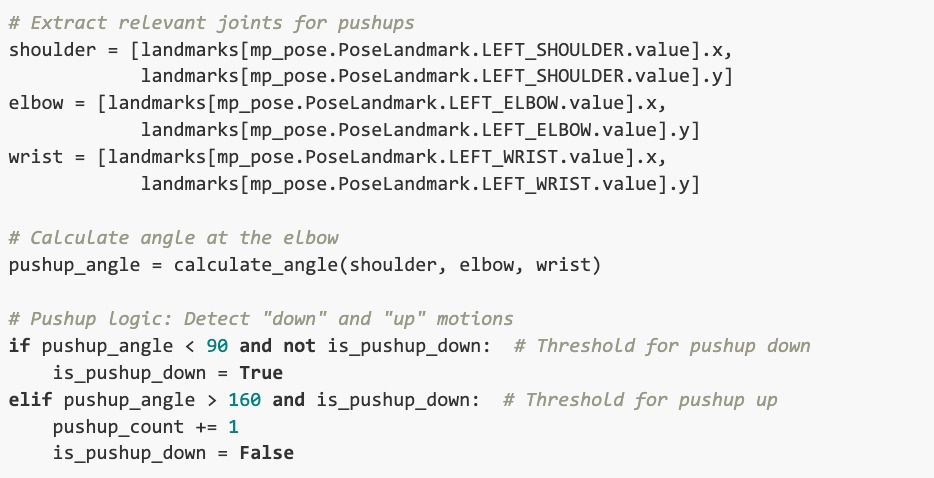
5. Extending to Pushups
Building on the same logic, we can add functionality to count pushups. Just replace the joints (hip, knee, ankle) with those relevant to pushups (shoulder, elbow, wrist).
The whole code will be available in the book’s official GitHub repository in the ai-digital-coach directory.
Here is the main difference between counting squats and pushups:
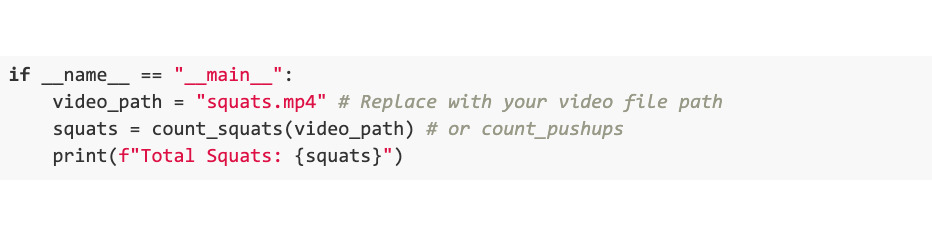
6. Running the Program
Finally, let’s tie it all together with a function calling code:
Now it is time to see how it all looks with all these fancy visualizations implemented.
For demonstration purposes, we’ll use a video of a friend of mine who agreed to be a part of the book without showing his head. He will show squats. Below in Figure 4 are the detected DOWN and UP positions, the angle value, and the current squats count.
Бесплатный фрагмент закончился.
Купите книгу, чтобы продолжить чтение.