
Бесплатный фрагмент - Food Underfoot
The Cuisine of The Ancient Roads
Introduction
Since ancient times, humans have lived in deep harmony with nature — not merely as observers, but as participants in the great rhythm of life. Long before agriculture, supermarkets, and refrigeration, food did not come wrapped or labelled. It had to be recognised, sought out, gathered, and preserved. On long journeys and nomadic paths, our ancestors carried no provisions. They lived from the land, trusting in what the Earth offered: wild sustenance.
For the ancient traveller, wild plants were not a last resort — they were life itself. Leaves and roots, berries and seeds, mushrooms and shoots were transformed into nourishing meals through knowledge passed down through generations. What modern eyes may dismiss as roadside weeds, they understood as remedy, sustenance, and spice. Forests, meadows, swamps, and mountains were both pantry and pharmacy.
This book is devoted entirely to wild plants — not mushrooms, meat, or fish — each of which is a world of its own and deserves separate attention.
It is an invitation to rekindle our connection with nature’s abundance. Together, we will wander through seasons and landscapes, uncovering forgotten flavours: acorn bread (Quercus spp.), nettle soup (Urtica dioica), rowanberry jam (Sorbus aucuparia), fireweed tea (Chamaenerion angustifolium, syn. Epilobium angustifolium), dandelion-root coffee (Taraxacum officinale), and more.
You will find no recipes here calling for shop-bought flour or potatoes. Instead, you will discover the taste of place: wild ingredients freely available to those willing to step into a meadow or woodland and open themselves to flavours both ancient and new.
To help you navigate, the book is divided into chapters. Feel free to begin wherever your curiosity draws you — be it wild vinegars, herbal milks, plant-based cheeses, or rustic, forest-baked breads — and let your skills grow naturally from there.
This book is for the curious — for those who wish to harvest lightly, cook creatively, and rediscover the quiet joy of belonging. Perhaps one day, with a basket in hand and your feet on a mossy path, you will feel the spirit of an old traveller stirring within you — one who walks with trust, with knowledge, and with gratitude for the gifts underfoot.
About the Author
The author of this edition is a certified biologist (UrSPU, degree in Biology, 1999; RUDN, program “Russian Herbalism,” 2018) who has dedicated many years of her life to the study of folk medicine and herbal traditions.
Chapter 1. Identification and foraging
In this chapter, you will learn how to make vinegars from foraged ingredients — aromatic, healing, and unique. They will enrich your cooking and bring true character to your pantry.
Why plant identification matters
Wild plants are found everywhere: in shaded woods, sunlit meadows, and along quiet trails. They nourish, inspire, and support us. Yet within this abundance are toxic mimics that resemble edible species. A mistake in identification can be harmful — or even deadly. Learning to recognise safe species and distinguish them from their dangerous counterparts is the foundation of responsible foraging.
Poisonous look-alikes: be aware
Vinegar is formed through a two-stage fermentation. First, the sugars contained in the raw material are converted into alcohol by yeasts; then the alcohol is transformed into acetic acid by bacteria (Acetobacter). Here are the main steps of the process:
Here are some examples that highlight the importance of correct identification:
1. Choosing raw materials
A wide range of plants can be used for vinegar fermentation, such as:
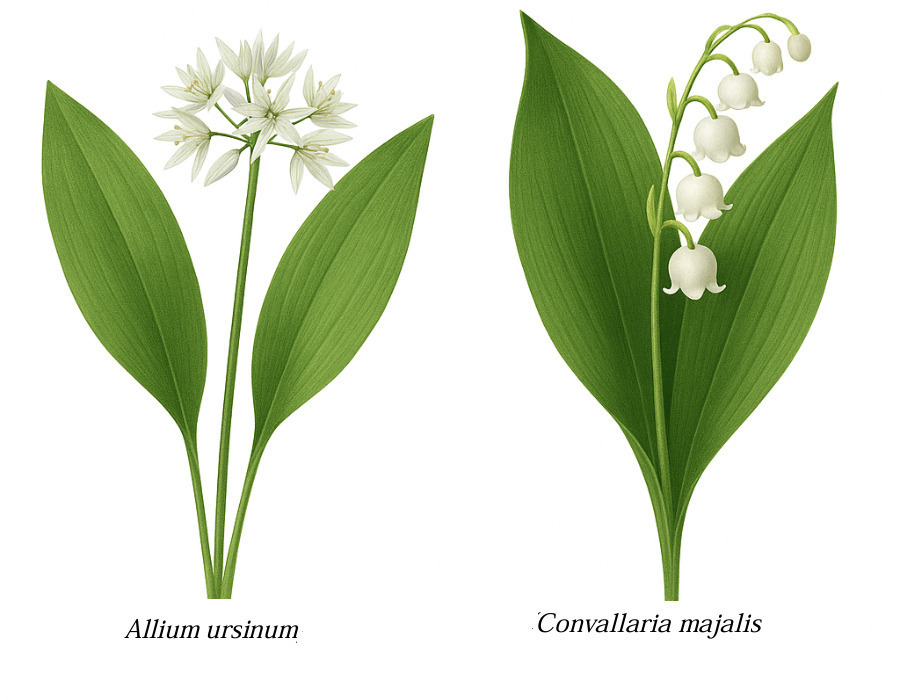
Wild garlic vs. lily of the valley
Wild garlic (Allium ursinum) is prized for its intense aroma and culinary versatility. However, it closely resembles lily of the valley (Convallaria majalis), a highly toxic plant containing convallatoxins in all parts.
It is essential that the plants are fresh, clean, and free from mould or contamination.
2. Fermentation base
To begin fermentation, you will need:
Key difference: wild garlic smells strongly of garlic when crushed; lily of the valley has no such scent.
Tip: Crush a leaf gently — if it smells like garlic, it’s safe. If it’s odourless or smells odd, avoid it.
3. Fermentation process
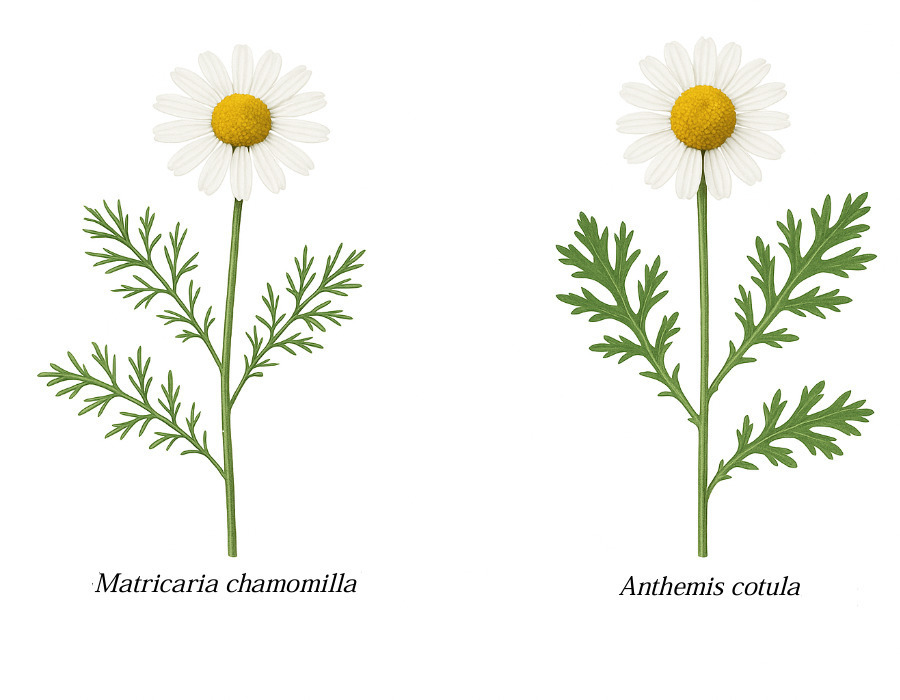
Chamomile vs. stinking chamomile
4. Fermentation conditions
Real chamomile (Matricaria chamomilla) has soothing properties and a sweet scent. Its mimic (Anthemis cotula) has a sharp, unpleasant odour and can cause allergies. The base of Matricaria’s flower head is hollow, whereas that of Anthemis is solid.
To help you navigate, the book is divided into chapters. Feel free to begin wherever your curiosity draws you — be it wild vinegars, herbal milks, plant-based cheeses, or rustic, forest-baked breads — and let your skills grow naturally from there.
5. Filtering
Once fermentation is complete (when the vinegar has become sufficiently sharp), strain the liquid through muslin or a sieve to remove plant residues. Decant into sterilised bottles or jars for storage.
Tip: Slice the flower head — if it’s hollow, it’s true chamomile. If solid and smelly, it’s the stinking kind.
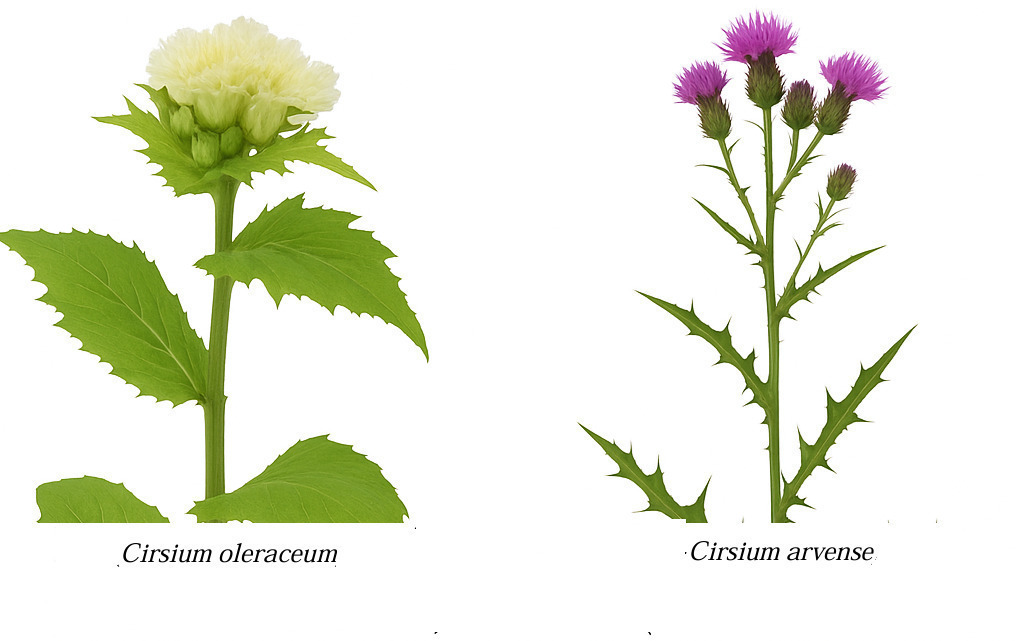
Cabbage thistle vs. creeping thistle
Cabbage thistle (Cirsium oleraceum) is one of the softest and most palatable representatives of its genus, with pale green leaves lacking strong spines and light yellow flowers. Its young shoots and leaves are tender and suitable for cooking or stewing. Creeping thistle (Cirsium arvense), by contrast, is tougher, with pronounced spines on the leaves and purple flowers. Its roots can sometimes be used after processing, but the aerial parts are too fibrous and bitter.
Tip: Pay attention to flower colour and leaf texture. Cabbage thistle has soft, wide leaves with a slightly wavy edge and almost no spines. Creeping thistle has narrow, stiff leaves with sharp spines, and bright pink to purple flowers. Cabbage thistle prefers moist, shady places like damp meadows and ravines, while creeping thistle thrives in dry, sunny fields.
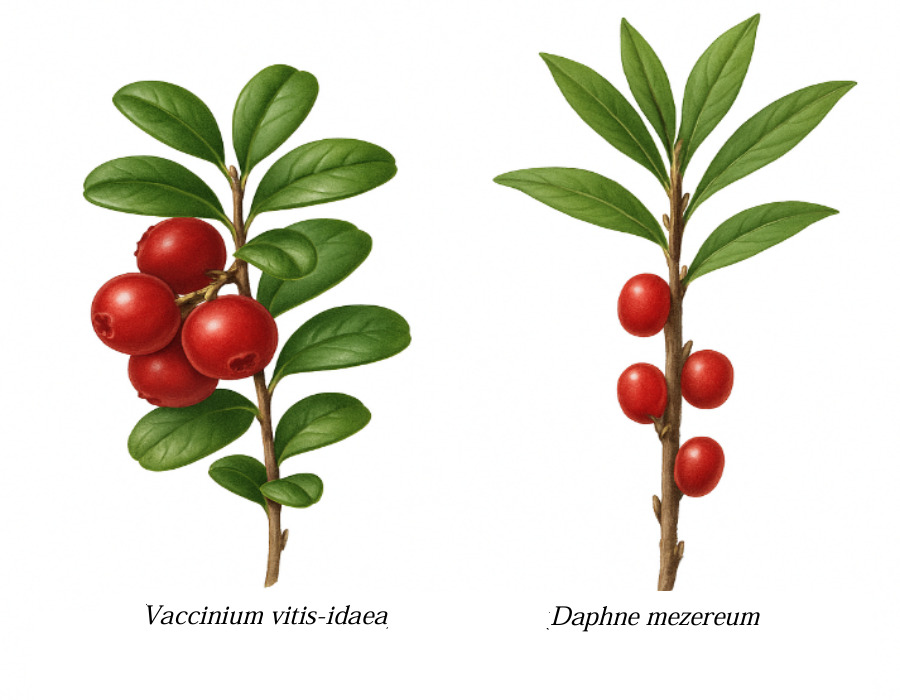
Lingonberry vs. mezereum / spurge laurel
Lingonberry (Vaccinium vitis-idaea) is a low-growing evergreen shrub with small, leathery dark green leaves and bright red berries. The berries are sweet and tart, used fresh or in jams, compotes, and juices. Common daphne (Daphne mezereum) is a deciduous shrub up to 1 metre tall. Its leaves fall off before flowering, so in spring it appears as a bare bush with clusters of bright pink flowers, followed by shiny red berries. All parts of this plant are poisonous, especially the bark and berries, which may cause vomiting, convulsions, and coma if ingested.
Tip: Lingonberry leaves remain through winter, and berries grow in the axils of the lower leaves. The skin is thick and slightly matte. Daphne berries grow on bare branches without leaves, are shiny, and very soft.
Ground elder vs. poison hemlock
Ground elder (Aegopodium podagraria) is a tasty, edible plant with delicate leaves, excellent for salads and soups. It can be mistaken for toxic members of the Apiaceae family, especially poison hemlock (Conium maculatum). One clear distinction is smell: ground elder has a fresh, herbaceous aroma, while hemlock smells foul and “mousy”. Another clue is the leaf stalk: in ground elder, the petiole wraps around the stem in a sheath.
Tip: Ground elder has “crow’s foot” leaf shapes with triple divisions and a sheath at the petiole base. Hemlock has purplish spots on a smooth, bluish stem and an unpleasant rodent-like smell. Never harvest a plant if the stem shows purple blotches.
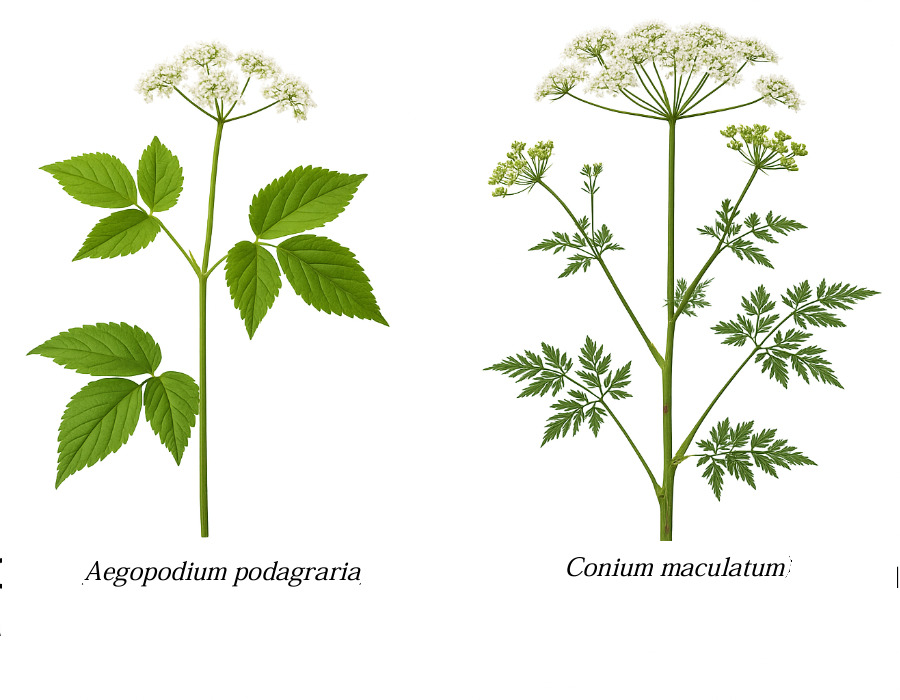
Common hogweed vs. Sosnowsky’s hogweed
Common hogweed (Heracleum sphondylium) is a wild plant long used in folk cuisine. Young leaves and stems are edible raw, pickled, or boiled and used in soups and stews. It reaches about 1.5 metres, has softly hairy stems, large triple-lobed leaves, and white to pinkish umbrella-shaped inflorescences. Though its sap can cause mild skin reactions in hot weather, it’s far less toxic than invasive species. Sosnowsky’s hogweed (Heracleum sosnowskyi), by contrast, is an introduced invasive that grows up to 3–4 metres, with thick stems covered in purple spots, deeply dissected leaves, and enormous white flower heads up to 80 cm wide. Its sap is extremely caustic and can cause severe burns, especially in children.
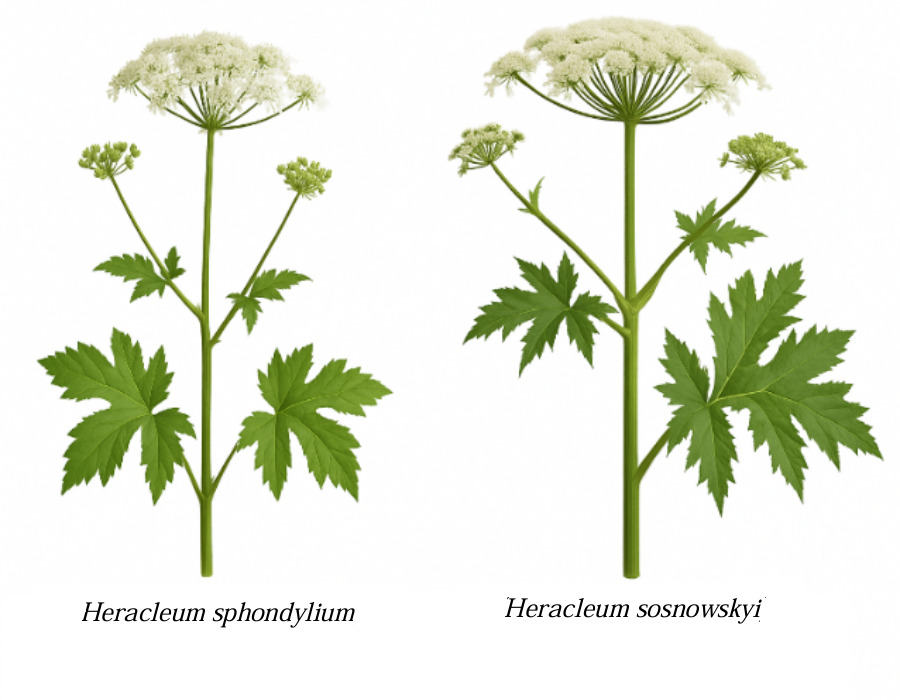
Tip: Common hogweed has rounded leaves, a softer stem, weak herbaceous smell, and rarely exceeds 1.5 metres in height. Sosnowsky’s hogweed is much larger, smells acrid, has narrow coarse leaves and releases abundant caustic sap when damaged. If unsure, avoid contact entirely.
Spear-leaved orache vs. common mugwort
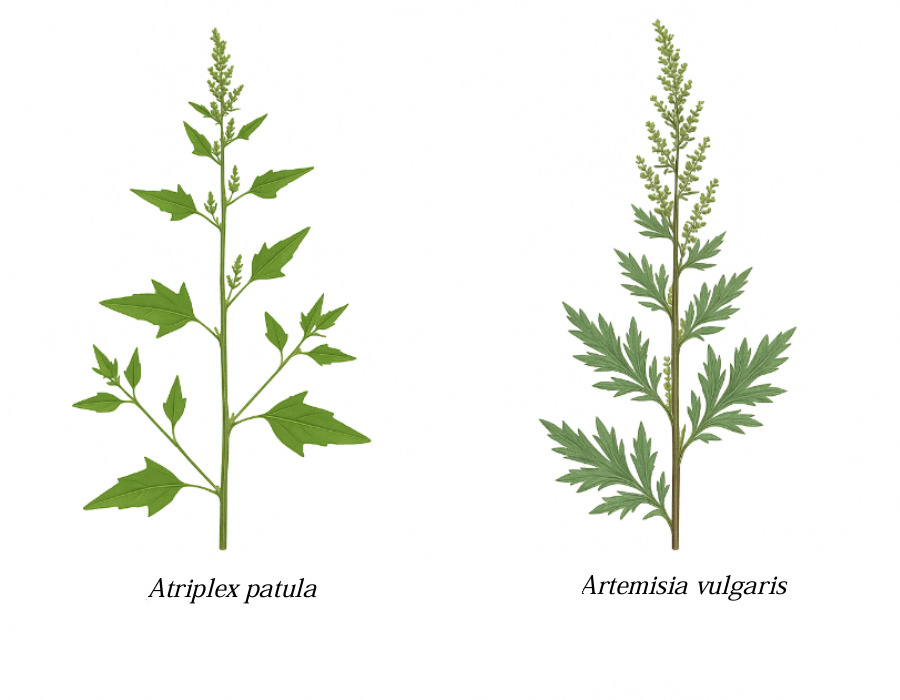
Spear-leaved orache (Atriplex patula) is one of the most widespread edible wild plants from the amaranth family. Its young leaves and shoots can be eaten raw or boiled, with a taste similar to spinach. It’s especially good before flowering. The leaves are triangular to diamond-shaped with a whitish coating, and it grows up to 70 cm tall, often found on disturbed ground and roadsides. Mugwort (Artemisia vulgaris) is a bitter, aromatic plant from the aster family. Its leaves are fragrant, deeply cut, and silvery underneath. Though edible in very small amounts as a seasoning or medicine, it contains strong essential oils and is unsuitable for regular consumption.
Tip: A. patula has soft, bluish-coated leaves with a mild, non-bitter taste. A. vulgaris has narrow, dissected leaves with a sharp bitter flavour and a strong herbal aroma. Only young orache is edible; mugwort should be used with caution and never in large quantities, especially when collecting seeds for flour.
Wild carrot (Daucus carota) vs. water hemlock (Cicuta virosa)
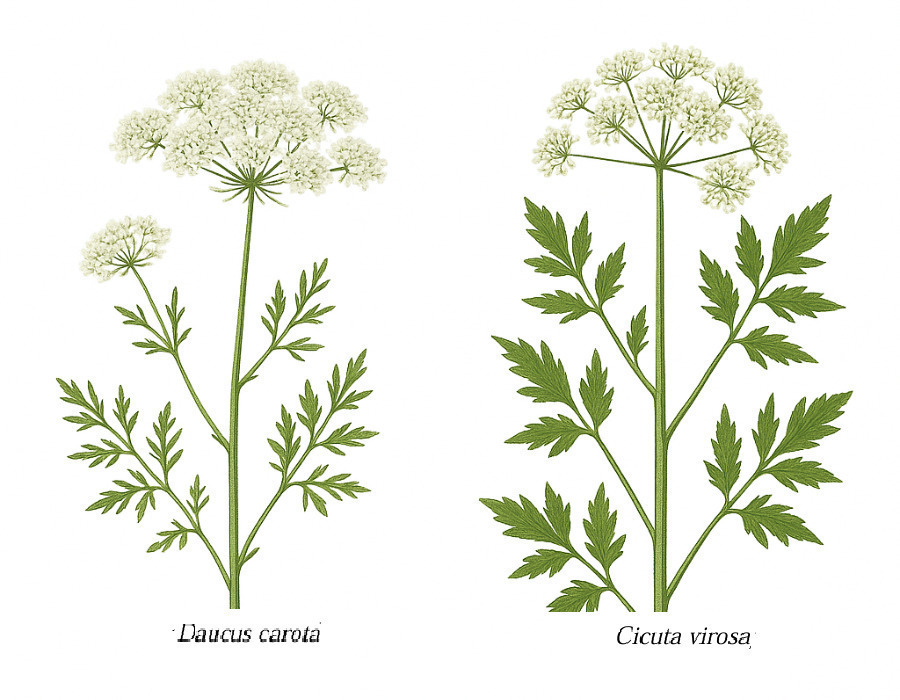
Wild carrot has an edible root and delicate, lace-like flower clusters. However, it closely resembles water hemlock, one of the most toxic plants in temperate climates. The key differences lie in the smell and root shape: wild carrot smells pleasantly carroty, while water hemlock has an unpleasant mouse-like odour and a hollow, mottled root.
Tip: Rub the root: wild carrot smells sweet and familiar, while hemlock is repulsive. Also, wild carrot often has a small dark spot (“pseudo-flower”) in the centre of the umbel — absent in water hemlock.
Bracken fern vs. male fern

Young shoots, ‘fiddleheads’, of bracken fern (Pteridium aquilinum) can be eaten after proper cooking in some traditional cuisines, but now many health authorities, including the WHO and FDA, advise against its consumption — even when cooked — because it contains ptaquiloside, a carcinogenic compound. Mature parts and similar species are toxic. Bracken has smooth stalks and triangular fronds; male ferns (Dryopteris spp.) tend to be denser and feature brown scales at the base.
Tip: Bracken fiddleheads are smooth and smell like fresh grass. Dryopteris shoots are hairy, clustered, and musty.
Plant identification techniques
These examples show: visual similarity alone is never sufficient. Pay attention to smell, texture, leaf shape, and habitat when identifying any plant.
Identification techniques
The ability to recognise wild plants develops with time and practice. There are several helpful methods, each suited to different situations and levels of experience:
Field guides
Field guides are compact books or leaflets containing descriptions, illustrations, and photographs of plants. They are indispensable in the field because they do not require internet access. A good field guide should include:
— A detailed description of external features: leaf shape, stem colour, type of inflorescence.
— Information about habitat and seasonal characteristics.
— Comparisons with similar species, including poisonous look-alikes.
For beginners, guides with vivid colour illustrations are ideal. More experienced foragers may prefer botanical references with scientific classifications. It is advisable to consult several sources to reflect the diversity of local flora and seasonal variation.
Consultation with experienced foragers
There is no substitute for hands-on learning. Studying with experienced foragers is highly valuable. They can show you plants in their natural environment, explain key identification features, share regional knowledge, and help you avoid common mistakes.
Consider the following:
— Join local ecological or botanical clubs.
— Participate in forums or social media groups focused on wild flora.
— Attend plant identification walks, excursions, or workshops.
Self-study
If you prefer to explore the world of wild plants independently, start with a simple approach:
— Choose 3–5 well-known and easily recognisable species, such as:
— Stinging nettle (Urtica dioica)
— Common dandelion (Taraxacum officinale)
— Broadleaf plantain (Plantago major)
— Wild garlic (Allium ursinum)
— Study their appearance, characteristics, and seasonal growth using both books and online resources.
— Take nature walks, observe the selected plants, and compare them with your research.
— Gradually expand your list, reinforcing your knowledge through repeated practice.
This method requires patience but leads to a deep understanding of your local flora and greater confidence in identifying safe species.
Resources for self-study
Online Botanical Databases and Guides
Herbarium.live — Digital Herbarium
— A collection of high-quality herbarium specimens with detailed scientific descriptions.
Useful for plant identification, comparison with herbarium standards, and study.
GBIF — Global Biodiversity Information Facility
— A global database of biodiversity observations.
Includes species distribution, range maps, publications, data export, and records.
The Plant List
— A comprehensive taxonomic database of the world’s plants.
Allows searches by Latin names, synonyms, and authors of plant descriptions.
Plants of the World Online (Kew Gardens)
— An authoritative resource from the Royal Botanic Gardens, Kew.
Global plant data, distribution, ecology, and taxonomy.
Interactive maps and floristic atlases
eFloras.org (including Flora of China, North America, etc.)
— Offers detailed botanical descriptions and identification keys.
Especially useful for studying regional flora.
BIN RAS Distribution Maps (GBIN — Russian Academy of Sciences)
— Specialized academic-level resources on the flora and fauna of Russia.
Range maps and scientific data.
Mobile applications (with photo recognition)
PlantNet
— A free, crowdsourced plant identification app.
Good botanical accuracy; data can be exported to GBIF.
iNaturalist
— A project by the California Academy of Sciences and National Geographic.
Photo recognition with verification by the scientific community; data export supported.
Seek by iNaturalist
— A simplified version of iNaturalist, designed for kids and beginners.
No registration required; works offline.
Flora Incognita
— A highly accurate European app developed by the Technical University of Ilmenau.
Scientific descriptions, conservation status, and common European plants.
PictureThis
— A commercial app with a free trial period.
Offers plant recognition, brief descriptions, and care tips.
Foraging safety principles
Responsible wild plant gathering is not only about finding food or medicine — it’s also about honouring and protecting the natural world. Follow these key principles to stay safe and harvest sustainably.
Choosing the right time and place
— Time of collection: The best time to gather is in the morning — plants are fresh, vibrant, and rich in nutrients. By afternoon, especially during heat, they may wilt or lose some beneficial properties. After rain, many plants spoil more quickly.
— Where to pick: Choose clean, unpolluted areas far from roads, industrial zones, or fields treated with pesticides. Forests, meadows, nature reserves, and national parks (where foraging is allowed) are good choices.
Tools for safe and sustainable foraging
Using the right tools makes harvesting safer and more efficient:
— Scissors or secateurs: Sharp tools allow you to collect cleanly, reducing damage and preserving plant roots.
— Baskets or cotton bags: Breathable containers prevent overheating and moisture buildup, keeping your harvest fresh.
— Gloves: Important for protecting your hands from nettles, thorns, or irritating sap.
Practising ecological foraging
Harvest in ways that allow nature to regenerate:
— Don’t uproot entire plants: Take only what you need — leaves, flowers, or seeds — and leave the roots intact whenever possible.
— Harvest in moderation: Avoid taking more than 10–20% of any plant species in one area to maintain healthy populations.
— Respect rare species: Learn to identify protected or endangered plants and avoid harvesting them altogether.
Seasonality of harvesting
Nature lives in cycles, and each season brings its own gifts:
Spring
A time of awakening: young leaves and shoots of nettle, dandelion, ground elder, and plantain are especially rich in nutrients. Edible flowers like violet, primrose, and wild garlic are valuable for fresh use, teas, and tinctures.
Summer
Nature flourishes with blossoms and ripening berries. Gather elderflower, linden, and chamomile for infusions, and fruits like raspberries, blackberries, rose hips, and blueberries for jams and drying.
Autumn
The season of gathering and storing. Roots such as burdock, couch grass, and dandelion are harvested now, along with nuts and seeds like hazelnuts, acorns, and edible chestnuts. Late berries like viburnum and rowan are rich in vitamins.
Winter
Even in winter, nature offers gifts. Pine, spruce, or cedar needles make vitamin-rich teas. Birch or willow bark can be used for decoctions. If the ground isn’t frozen, you can carefully dig burdock or chicory roots.
Regional characteristics
Every landscape shapes its local flora:
— Forests: Provide nettles, wild garlic, fern shoots, and berries like raspberries, blackberries, blueberries, and lingonberries. Mushrooms may also be present — harvest only if you’re confident in your knowledge.
— Steppes: Rich in herbs like amaranth, wild sorrel, ragwort, chamomile, wormwood, and yarrow.
— Bogs and wetlands: Offer cranberries, cloudberries, and specialized herbs like Labrador tea (Ledum), which should be handled with care due to toxicity.
— Mountains: Host rare and protected plants such as Rhodiola rosea or edelweiss (not to be harvested). Edible alpine plants include raspberries, blueberries, and sea buckthorn.
Tips for beginners
If you’re just starting to explore wild plants, keep these recommendations in mind:
— Start simple: Learn a few common and easy-to-identify species first.
— Keep a journal: Record harvest locations, dates, and conditions to build your own foraging guide.
— Be cautious: If you’re unsure about a plant, leave it. Safety comes first.
— Observe nature: Spend time outdoors watching how plants grow, change, and respond to the seasons.
— Exchange seeds: Trade seeds of rare edible wild plants to grow at home.
— Share knowledge: Contribute your discoveries and recipes through blogs or community groups.
— Build community: Organise local workshops, walks, or wild food festivals.
— Enjoy the process: Let plant gathering be not just a practical skill but a way to connect deeply with the natural world.
FINAL NOTE
Identifying and harvesting wild plants is an art that blends knowledge, mindfulness, and deep respect for the living world. By following the principles in this chapter, you’ll not only gather safely but also turn your finds into nourishing meals and healing remedies.
In the chapters ahead, we’ll continue this journey along ancient trails — turning foraging into a culinary adventure that revives ancestral wisdom and awakens forgotten flavours.
Chapter 2. Preparing wild plants for use
Before nature’s gifts can be turned into wholesome meals or healing remedies, they must first be properly prepared. This essential process not only ensures safe consumption but also enhances flavour and preserves the nutritional richness of wild plants.
This chapter will guide you through the steps for cleaning, drying, storing, and processing your harvest, along with the tools and equipment you’ll need. Once you master these techniques, you’ll be able to transform nature’s abundance into true culinary treasures.
The importance of preparation
Wild plants gathered from forests, meadows, or riverbanks often bear traces of the environment — dust, insects, or traces of animals. Some may also contain natural toxins or bitter compounds that must be removed before consumption.
Proper preparation ensures safety, improves taste, and helps retain nutritional value. Whether you plan to use your harvest fresh or store it for later, preparation is a vital first step.
Cleaning and washing
Cleaning is the foundation of wild plant preparation. The method depends on the type of material — leaves, roots, fruits, or flowers — each requires specific handling.
Leaves and herbs
— Tender leaves (e.g., Urtica dioica — stinging nettle), Aegopodium podagraria — ground elder, Taraxacum officinale — dandelion): Rinse gently in cool water to remove dust and insects. For deeper cleaning, soak in cold water for 5–10 minutes, then rinse under running water.
— Tougher leaves (e.g., Plantago major — plantain): May be waxy or retain more soil. Use a soft brush or sponge to scrub gently under running water.
Tip: Wear gloves when handling stinging or prickly plants such as nettles — this will protect your hands and make preparation easier.
Roots and rhizomes
— Roots (e.g., Arctium lappa (greater burdock), Cichorium intybus (chicory), Taraxacum officinale (dandelion)): Rinse thoroughly under running water. Use a stiff-bristled brush or fine scourer to scrub away dirt. Cut larger roots into pieces for easier cleaning.
Tip: Soak especially dirty roots in cold water for 15–20 minutes before scrubbing.
Fruits and berries
— Berries (e.g., Rosa canina (rose hips), Vaccinium corymbosum (blueberries), Rubus idaeus (raspberries)): Rinse gently under a gentle flow of water. To remove insects, soak in lightly salted water (1 tsp salt per litre) for 10 minutes, then rinse again.
— Hard-skinned fruits (e.g., Quercus robur (oak acorns), Castanea sativa (sweet chestnuts)): Rinse under running water and use a brush if necessary.
Flowers
— Flowers (e.g., Sambucus nigra (elderflower), Tilia cordata (lime), Taraxacum officinale (dandelion)): Gently shake to dislodge any dust or insects. Rinse briefly under a light stream of water; avoid soaking, as flowers lose their aroma.
Tip: Drain in a colander or blot on kitchen paper. Gently pat leaves and herbs dry with a paper towel to remove excess moisture.
Drying
Drying is one of the oldest preservation methods. Properly dried plants retain much of their flavour, aroma, and nutritional value and can be used in teas, seasonings, powders, or tinctures.
Drying methods
Choose your method based on the plant type and your available equipment.
Air drying
— Leaves and herbs: Spread in a single layer on cloth or mesh in a dark, well-ventilated place. Avoid sunlight. Turn every 1 to 2 days. Drying takes 3 to 7 days.
— Flowers: Tie into small bundles and hang upside down in a dry, dark room for 5 to 10 days.
Tip: Cover with gauze or mesh to protect from insects.
Oven drying
— Roots and thick leaves: Slice thinly and spread on a parchment-lined tray. Set the oven to 50–60°C with the door slightly open. Drying takes 2–4 hours.
Tip: Check at regular intervals (e.g. every 30 minutes) to avoid overdrying or scorching.
Dehydrator drying
— Suitable for all types of plants.
— Set to 35–40°C for herbs and flowers, 50–60°C for roots and fruits. Drying time: 4–12 hours.
Tip: Dehydrators preserve more nutrients and allow precise control.
Signs of proper drying
— Leaves and herbs: Crumble easily.
— Roots: Become hard and brittle.
— Fruits and berries: Should be dry with no internal moisture. Berries may stay slightly pliable; nuts should be firm and dry.
Storage
Proper storage keeps dried plants fresh, fragrant, and effective for months or even years.
Storage recommendations
— Herbs and leaves should be kept in glass jars with airtight lids or paper bags. Avoid plastic.
— Roots and seeds: Use glass or ceramic containers with secure lids.
— Fruits and berries: Best in cloth bags or glass jars.
General Tips
— Store in a cool, dark, dry place, away from direct sunlight or heat.
— Label containers with plant name and harvest year.
— Check regularly for mould or pests, and discard any spoiled material.
Shelf life
— Leaves and herbs: up to 1 year
— Roots and seeds: up to 2 years
— Fruits and berries: up to 1 year
Main processing methods
Besides drying, methods like fermentation and pickling help preserve wild plants while enriching their flavour.
Fermentation
Fermentation transforms plant sugars into beneficial acids and flavours. It preserves and enhances nutrients.
Basic fermented greens recipe
Ingredients:
— 500 g fresh leaves (e.g., Urtica dioica (nettle), Aegopodium podagraria (ground elder), Taraxacum officinale (dandelion))
— 1 tbsp salt
— Water
Preparation:
— Wash and coarsely chop the leaves.
— Pack tightly into a clean glass jar.
— Dissolve salt in water and pour over leaves until fully submerged.
— Cover with gauze and leave at room temperature for 3 to 5 days.
— After fermenting, seal with a lid and refrigerate.
Use: in salads, soups, or as a tangy side.
Pickling
Pickling preserves plants in a vinegar-based brine. Ideal for shoots, roots, and some flowers.
Simple pickled wild garlic recipe
Ingredients:
— 200 g wild garlic shoots (Allium ursinum)
— 200 ml water
— 100 ml apple cider vinegar
— 1 tsp salt
— 1 tsp sugar syrup (or sugar)
Preparation:
— Wash and cut the shoots into 5–7 cm pieces.
— Boil the water with salt, sugar, and vinegar.
— Pack the wild garlic into a sterilised jar and pour the hot liquid over it.
— Allow to cool, seal, and refrigerate.
A tangy addition to salads or savoury snacks.
Tools and equipment
You’ll need some basic kitchen items and, optionally, tools for handling larger batches.
Basic Tools:
— Knives: Sharp ones for cutting leaves, roots, and fruit.
— Cutting boards: Use separate boards for different ingredients to avoid cross-contamination.
— Colanders and sieves: For washing and draining plant materials.
— Containers: Glass jars, cloth bags, or paper bags for storing dried or prepared plants.
— Gloves: Useful when handling irritants or prickly plants such as Urtica dioica (stinging nettle).
Optional equipment:
— Dehydrator: Speeds up drying and allows more control over temperature.
— Fermentation jars: Preferably glass or ceramic with airlock lids.
— Grinder or blender: For making powders or pastes from dried plant material.
Tip: No dehydrator? Use a low-temperature oven or air-dry carefully in a well-ventilated, shaded place.
FINAL NOTE
Preparing wild plants is an art that blends knowledge, patience, and creativity. By mastering the methods of cleaning, drying, storing, and processing, you’ll preserve nature’s gifts and unlock their flavours.
In the next chapters, we’ll explore how these prepared ingredients can be used to create nourishing, original, and deeply connected dishes — a culinary journey along the ancient paths of flavour.
Chapter 3. Bread and baking from wild plants
Return to the roots
Baking bread and other flour-based foods using wild plants is a meaningful way to reconnect with ancestral culinary traditions. By making flour from roots, seeds, and stems, you can create nutritious, aromatic, and unique foods that enrich your table and deepen your connection to the land.
In ancient times, people didn’t always have access to wheat or rye. But that didn’t stop them from baking bread. They used what nature offered: burdock roots, acorns, nettle seeds, goosefoot, and more. These ingredients are rich in fibre, vitamins, and minerals, and they lend distinct flavours and textures to baked goods. Today, as more people pursue natural and sustainable living, baking with wild plants becomes not just an experiment but a way to enrich the diet with wholesome, unprocessed foods.
Preparing flour from wild plants
Flour from roots
Cattail rhizomes (Typha latifolia)
— Harvest: Early spring, when starch content is highest.
— Preparation: Carefully dig up rhizomes (they’re fragile), rinse thoroughly to remove silt. Slice thinly (2–3 mm), let air-dry briefly to eliminate surface moisture, then dry in the shade or oven at ≤ 50°C.
— Grinding: Once fully dried (they should be hard and brittle), grind into fine powder using a coffee grinder or mill.
— Use: Produces a dense, slightly sticky flour with a neutral flavour; ideal for flatbreads, thickening porridge, or mixing into dough.
Sweet flag roots (Acorus calamus)
— Harvest: Autumn (late September to October), after leaves wither.
— Preparation: Dig, wash, and slice roots thinly. Dry in a shaded, ventilated space or at 40–45°C.
— Grinding: Grind to powder.
— Use: Adds spicy-bitter flavour; use in small amounts (5–10%) in gingerbread, cakes, or biscuits.
Dandelion roots (Taraxacum officinale)
— Harvest: Late September to early October.
— Preparation: Wash, trim off thin lateral roots, slice (3–5 mm), air-dry 1 to 2 days, then oven-dry at 40–50°C until crisp.
— Grinding: Grind to powder.
— Use: Slightly bitter, coffee-like taste; dark brown colour; rich in fibre. Add to baked goods (≤ 10%) or use as a thickener.
Burdock roots (Arctium lappa)
— Harvest: Autumn or early spring.
— Preparation: Peel and slice (2–3 mm), dry in shade or at ≤ 50°C.
— Grinding: Grind to powder.
— Use: naturally sweet flavour due to its inulin content; good for bread, flatbreads, and pastries.
Couch grass roots (Elymus repens)
— Harvest: Late summer (August to early September).
— Preparation: Clean, cut, and dry in direct sunlight in warm, dry conditions, or use an oven at 50–60°C”.
— Grinding: Grind to powder.
— Use: Starchy and dense; good as a thickener or mixed with other flours (up to 30–40%).
Common reed rhizomes (Phragmites australis)
— Harvest: Early spring (March — April).
— Preparation: Dig, wash, cut lengthwise to remove tough fibres, slice thinly. Air-dry, then dry in shade or oven at ≤ 50°C.
— Grinding: Grind when brittle.
— Use: High in amylopectin; neutral flavour with mild sweetness. Good for baking and thickening.
Marshmallow roots (Althaea officinalis)
— Harvest: Late autumn (October — November).
— Preparation: Dig, peel, wash, slice (3–4 mm), dry at 40–45°C until brittle.
— Grinding: Grind to powder.
— Use: High in mucilage and starch; creates a light, “puffy” texture; usually mixed with other flours (20–25%).
Liquorice roots (Glycyrrhiza glabra)
— Harvest: Autumn or early spring.
— Preparation: Wash, remove lateral roots, slice thinly, dry in shade or at 45–50°C.
— Grinding: Grind to powder.
— Use: Naturally sweet with a mild liquorice taste; flavouring for biscuits, sweets, or cakes. Use sparingly (≤ 10%).
Leuzea roots (Leuzea carthamoides)
— Harvest: Autumn (September — October).
— Preparation: Dig, clean, slice thinly, dry in shade or ≤ 45°C.
— Grinding: Grind to fine powder.
— Use: Slight bitterness, dense flavour. Use as a minor additive (5–15%) to enrich bread with “medicinal” qualities.
Jerusalem artichoke tubers (Helianthus tuberosus)
— Harvest: Late autumn (October — November), after first frost.
— Preparation: Wash, slice (3–4 mm), let air-dry, then dry in oven at 50°C until brittle.
— Grinding: Grind to fine powder.
— Use: High in inulin, sweet taste. Suitable for diabetic-friendly baking or as a flour substitute (20–30%).
Each root and rhizome must be thoroughly dried before grinding to avoid spoilage. For best quality, grind just before baking. Store flour in airtight containers in a cool, dry place.
Wild root flours can be combined with conventional ones. Always consider the aftertaste and texture: root flours are typically used at 10–30% of total flour weight, depending on the desired effect.
Seed flour
Nettle seeds (Urtica dioica)
— Harvesting: Ripen in late summer, typically August to early September. Mature seed tassels droop, turn dark green or brown, and crumble when shaken. Harvest on dry days, away from roads and livestock areas.
— Preparation: Hang cut tassels in bunches in a well-ventilated, shaded place for 3 to 5 days. Rub between your hands over a sieve to separate seeds from stems. Optionally dry seeds further at 40–45°C for 1–2 hours.
— Grinding: Use a coffee grinder in short pulses to preserve nutrients. Sift for finer texture.
— Features: Rich in protein, vitamins A and E, iron, and unsaturated fats. Nutty, herbal flavour. Use as an additive (up to 10–15%) in breads, pancakes, porridge, smoothies, and raw bars. Store in a tightly sealed jar in a cool, dark place.
Orache seeds (Atriplex patula)
— Harvesting: Mature in autumn, usually in September. Seeds turn dark grey or black and fall easily. Cut tassels in dry weather after leaves have wilted.
— Preparation: Spread on paper or cloth in shade for 3 to 5 days. Thresh by rubbing or shaking in a bag. Sieve or winnow to remove husks. Dry at 40–45°C if needed.
— Grinding: Grind thoroughly; whole seeds are hard to digest. Sift to reduce grittiness.
— Features: Rich in protein, iron, phosphorus, and magnesium. Similar to quinoa (Chenopodium quinoa), but milder. Gluten-free. Ideal for flatbreads (1 part orache flour to 4 parts regular flour), porridge, or thickening soups. Store in a dry, airtight container.
Flax seeds (Linum usitatissimum)
— Harvesting: Collected in late summer to early autumn when capsules turn brown and begin splitting.
— Preparation: Spread in a single layer in a warm, dry room (out of direct sunlight) for 5 to 7 days, stir occasionally.
— Grinding: Grind dry seeds in short pulses to avoid heating. Use immediately after grinding to prevent oil oxidation.
— Features: Rich in omega-3 fatty acids, fibre, and protein. Nutty, oily flavour. Mix with wheat or rye flour (10–20%) in baked goods for added nutrition and moisture retention.
Hemp seeds (Cannabis ruderalis)
— Harvesting: Late summer to early autumn, when seeds detach easily. C. ruderalis is a wild, low-THC variety found in Russia, Kazakhstan, and Northern Europe.
— Preparation: Rinse to remove dust and fibres, then dry in a warm, ventilated area or at 40–45°C until crisp.
— Grinding: Grind in a coffee grinder. Shell fragments may remain, adding texture and a slight bitterness.
— Features: High in complete plant protein, essential fats, and B vitamins. Nutty, slightly bitter taste. Use (up to 15–20%) in energy bars, breads, pancakes, or biscuits. Adds moisture and elasticity to dough.
Amaranth seeds (Amaranthus retroflexus)
— Preparation: Dry collected heads on cloth in shade for 3 to 4 days. Thresh gently; sift out chaff. Dry seeds at room temperature or at 40–45°C for 1–2 hours.
— Grinding: Grind to coarse or fine flour; sift to improve texture.
— Features: Up to 18% protein, plus calcium, iron, and antioxidants. Gluten-free with mild, nutty-herbal flavour. Use in baked goods, porridge, patties, or energy mixes. Limit to 20–25% in dough due to low binding strength.
Sorrel seeds (Rumex acetosa)
— Harvesting: Late June to early July, when seed heads turn pale brown and pods detach easily. Cut tops with stems and place in cloth bags to prevent seed loss.
— Preparation: Spread in a ventilated, shaded area on paper or cloth for 2 to 3 days. Thresh gently; sieve to remove chaff. Dry further at room temp or at 40–45°C if needed.
— Grinding: Use mortar or grinder in short pulses to avoid overheating. Sift for fine, creamy flour.
— Features: Rich in organic acids, fibre, vitamin C, magnesium, and calcium. Mild sour, grassy taste. Add 10–15% to rye or wheat flour for tang and nutrition. Also suitable for thickening soups and sauces (up to 20%).
Willowherb seeds (Chamaenerion angustifolium)
— Harvesting: Ripen late July to August. Capsules turn brown and open easily. Harvest on dry days by cutting upper stems.
— Preparation: Dry in a shaded, ventilated area for 3 to 4 days. Separate seeds from fluff using a funnel or sieve. Dry at 40–45°C if needed.
— Grinding: Grind in short pulses (10–15 seconds) to avoid overheating. Sift to remove fibre.
— Features: Rich in plant oils, protein, and antioxidants. Nutty-honey aroma. Adds moisture and softness to gluten-free dough (use up to 10–15%). Great in pancakes, muffins, porridge, and bars. Store airtight in a cool, dark place.
Acorn flour (Quercus spp.)
— Harvesting: Collect in autumn (September — October) when acorns fall naturally. Choose clean, undamaged nuts.
— Preparation: Remove caps and shells. Cut and discard spoiled parts. Soak in cold water 3 to 5 days (changing water twice daily) or boil in multiple changes to leach tannins.
— Drying: After leaching, dry thoroughly in an oven (50°C, 2–4 hours) or air-dry in shade.
— Grinding: Grind into flour; sift for fine texture.
— Features: Gluten-free, high in starch, protein, and antioxidants. Nutty, caramel flavour. Ideal for scones, pancakes, biscuits, or porridge. Combine with other flours (30–40%) for structure.
Reindeer lichen (Cladonia rangiferina, C. stellaris)
— Harvesting: Late summer or autumn, in dry weather away from pollution. Choose clean, pale-grey specimens.
— Preparation: Rinse and soak in bicarbonate of soda solution (1 tsp per litre) for 1–2 days, changing once or twice. Rinse again.
— Drying: Air-dry in shade or use oven at ≤ 45°C until brittle.
— Grinding: Grind to powder or coarse meal. Sift for finer flour.
— Features: Low in starch, high in fibre and minerals, slightly bitter. Traditionally mixed with barley flour, mint, or berries. Use up to 10–15% in rye or oat dough. Store in airtight container.
Dough kneading techniques
Wild flours are often dense and gluten-free, so dough can be crumbly or inelastic. To improve texture:
— Combine different flours (e.g., root and seed) for balance.
— Add water gradually to avoid stickiness.
— Use binding agents such as starch, apple purée, or psyllium gel to help the dough hold together.
Recipes
Burdock root and nettle seed bread
Ingredients:
— 200 g burdock root flour
— 100 g nettle seed flour
— 1 tsp salt
— 1 tbsp honey
— 200 ml water
— 1 tsp bicarbonate of soda
Preparation:
Mix all ingredients thoroughly. Pour into a baking dish and bake at 180°C for 40–50 minutes.
Acorn flour tortillas
Ingredients:
— 150 g acorn flour
— 50 g orache flour
— ½ tsp salt
— 150 ml water
— 1 tbsp oil
Preparation:
Mix the ingredients to form a smooth, pliable dough. Divide and flatten into tortillas. Fry in a dry frying pan for 2–3 minutes on each side.
Biscuits with orache flour and linden flowers
Ingredients:
— 100 g orache flour
— 50 g dried linden blossoms
— 2 tbsp honey
— 50 ml water
— ½ tsp meadowsweet powder
Preparation:
Mix all ingredients. Shape into biscuits and bake at 160°C for 15–20 minutes.
Loaves from Inner bark (pine, elm, or birch)
Ingredients:
— 1½ cups (approx. 360 ml) inner bark (cambium), dried and ground
— ½ cup (approx. 120 ml) water
Preparation:
Combine into dough, shape into small loaves, and bake at 140°C for 20–25 minutes or cook over campfire embers.
Reed rhizome cakes
Ingredients:
— 1 cup (approx. 240 ml) crushed reed rhizomes
— ¼ cup (approx. 60 ml) water
— 2 tbsp plantain gel (optional)
Preparation:
Form into small cakes. Fry in a pan with or without oil for 4–5 minutes on each side.
Dandelion root bread
Ingredients:
— 1½ cups (approx. 360 ml) dandelion root flour (dried and ground)
— ½ cup (approx. 120 ml) water
Preparation:
Mix into dough, shape into loaves, and bake at 160°C for 20 minutes.
Sorrel seed tortillas
Ingredients:
— 1 cup (approx. 240 ml) ground sorrel seeds
— ⅓ cup (approx. 80 ml) water
— Salt to taste
Preparation:
Mix, knead into dough, shape tortillas, and fry for 3 minutes per side.
Nettle seed tortillas
Ingredients:
— 1 cup (approx. 240 ml) nettle seeds
— ½ cup (approx. 120 ml) water
— 1 tbsp plantain gel (optional)
Preparation:
Knead into soft dough, shape into tortillas, and fry for 3–4 minutes on each side.
Cattail rhizome bread
Ingredients:
— 1½ cups (approx. 360 ml) cattail rhizome flour
— ⅓ cup (approx. 80 ml) water
Preparation:
Mix, shape into loaves, and either sun-dry thoroughly or bake at 140°C for 20–25 minutes.
Willowherb seed tortillas
Ingredients:
— 1 cup (approx. 240 ml) willowherb seeds (cleaned and ground)
— ½ cup (approx. 120 ml) water
— Salt to taste
Preparation:
Form tortillas and fry in a dry pan for 3 minutes per side.
Yagel (reindeer lichen) loaves
Ingredients:
— 1 cup (approx. 240 ml) reindeer lichen flour
— ½ cup (approx. 120 ml) water
— Salt to taste
Preparation:
— Mix flour, water, and salt into a soft dough.
— Shape into small loaves.
— Bake at 150°C for 25 minutes.
Baking without yeast
Yeast is not available in the wild, but it can be easily replaced:
— Bicarbonate of soda and acid (e.g., berries, vinegar) — together they produce gas bubbles.
— Fermented drinks — herbal kvass (fermented rye drink, a traditional Slavic beverage) can serve as a natural leavening agent.
— Incorporated air — manually beating the dough can trap air and create a lighter texture.
Sourdough recipes
Simple starter (fermenting base) made from hops
Ingredients:
• A handful of dried hop cones (Humulus lupulus)
• 2 cups (approx. 480 ml) water
• 1 cup (approx. 240 ml) flour
• 1 tbsp honey or jam (optional)
Preparation:
— Boil the hop cones in water for 15 minutes.
— Allow the liquid to cool, then strain.
— Add the flour (and honey or jam, if using) and stir — the consistency should resemble single cream.
— Cover with a cloth and leave in a warm place for 1–2 days.
— When bubbles appear and a pleasantly sour aroma develops, the starter is ready.
Use: Ideal for baking bread, making pancakes, or preparing kvass. Keep in the fridge and refresh regularly with flour and water.
Hay (herbal) starter
Ingredients:
• A handful of dry hay or aromatic herbs (e.g. mint (Mentha spp.), St John’s wort (Hypericum perforatum))
• 1 litre water
• 2 tbsp sugar or honey
Preparation:
— Pour boiling water over the hay or herbs and stir in the sugar or honey.
— Cover, allow to cool, and leave in a warm place for 2–3 days.
— Strain — the result is a fragrant, living starter.
Use: Perfect for brewing bread kvass, fermenting herbal drinks, or as a base for other wild fermentations.
Tips and recommendations
— Experiment with different flour combinations.
— Adjust recipes based on the moisture content of wild flours.
— Use natural sweeteners such as honey or berry syrup.
— Store flour in a cool, dry place in airtight containers.
FINAL NOTE
Baking with wild plants is more than just a way to diversify your diet — it is a chance to reconnect with ancient traditions, when people lived in harmony with nature. By using flour made from roots, seeds, and other wild ingredients, you can create unique, delicious, and nutritious dishes.
Chapter 4. Wild Plant Vinegars
Vinegar is not merely a condiment, but an ancient elixir, valued by our ancestors for its flavour, healing properties, and ability to preserve food. In the wild kitchen, vinegar made from flowers, berries, and herbs is a universal remedy — for nourishment, for medicine, and for preservation. It accompanied travellers and herbalists alike as a source of vitality and taste.
In this chapter, we shall delve into the art of making vinegars from wild plants. You will discover how to transform the simplest gifts of nature into a fragrant and health-giving base for marinades, sauces, and dressings. Such vinegars not only lend dishes a delicate tang, but also enrich them with a bouquet ranging from floral to spicy, from fruity to resinous.
Vinegar as a gift of nature
Vinegar is among the oldest products known to humankind. As early as Ancient Egypt and Mesopotamia, it was obtained from fermented fruits and herbs and used as a drink, a medicine, an antiseptic, and a flavouring. It was both a household necessity and a magical substance.
In the tradition of wild cuisine, vinegar is a way to preserve summer in a bottle: the sunlit taste of berries, the fragrance of meadow herbs, the subtle tartness of wild fruits. Wild plants — nettle, dandelion, blackthorn, meadowsweet, maple — impart vinegars with distinctive, often layered flavours and rich colours.
Homemade vinegars from wild plants are a simple craft with great potential. They can replace factory-made condiments, elevate even the humblest dishes, serve as a base for dressings, drinks, and fermented foods, and even become part of your natural medicine chest.
In this chapter, you will learn how to make vinegars from foraged ingredients — aromatic, healing, and unique. They will enrich your cooking and bring true character to your pantry.
The basics of vinegar making
Vinegar is formed through a two-stage fermentation. First, the sugars contained in the raw material are converted into alcohol by yeasts; then the alcohol is transformed into acetic acid by bacteria (Acetobacter). Here are the main steps of the process:
1. Choosing raw materials
A wide range of plants can be used for vinegar fermentation, such as:
Flowers (dandelion, elderflower)
Berries (sloe, rosehip)
Herbs (nettle, ground elder)
It is essential that the plants are fresh, clean, and free from mould or contamination.
2. Fermentation base
To begin fermentation, you will need:
Ready-made vinegar (apple cider, wine), which already contains the bacteria required to turn alcohol into vinegar.
Vinegar mother — a gelatinous mass formed during previous fermentation, serving as a source of bacteria for the next batch.
Alternatively, sweetened water (water with sugar) can be used to supply sugar for the initial fermentation, if you do not have vinegar to hand.
3. Fermentation process
Preparing the raw material: Wash the plants, and chop them if necessary to speed up the release of aroma and active compounds. Berries may be lightly crushed or left whole.
Filling the vessel: Place the raw material into a clean glass jar, cover with vinegar (or sweetened water), leaving sufficient headspace for fermentation. To activate fermentation, add a little ready-made vinegar or vinegar mother, ensuring the presence of the right bacteria.
Starting fermentation: Cover the vessel with muslin or cloth to allow oxygen in, as bacteria require it to work. Keep the jar in a warm place (20–30°C). A stable temperature is important, as it affects the speed of fermentation.
Infusion: Over 2–4 weeks, the mixture will ferment. Check it regularly, noting aroma and flavour. The taste should gradually sharpen, and bubbles will appear — a sign of alcohol turning into vinegar.
4. Fermentation conditions
1. Use glass vessels (jars or bottles), which do not react with acid.
2. Cover with cloth or muslin to allow airflow while keeping out dust and insects.
3. Maintain a temperature of 20–30°C to ensure effective fermentation.
5. Filtering
Once fermentation is complete (when the vinegar has become sufficiently sharp), strain the liquid through muslin or a sieve to remove plant residues. Decant into sterilised bottles or jars for storage.
Tips:
If the vinegar becomes cloudy, develops an unpleasant odour or taste, it is best to start again. Check the cleanliness of your raw material, vessels, and the stability of the temperature.
Take care to prevent undesirable microorganisms entering during fermentation, as they may spoil the product.
Uses of vinegars
Culinary: Salad dressings, vegetable marinades, sauces.
Health: Dilute 1 teaspoon of vinegar in a glass of water as a morning tonic.
Household: Use as a hair rinse or a natural cleaning solution.
Tip: Store vinegar in a cool, dark place to preserve its aroma.
Vinegar recipes without sugar
Apple vinegar from peel and cores
A simple peasant method of preparation, using leftovers after preserving apples.
Ingredients:
— Peel and cores from 5–7 apples (preferably wild or sharp-tasting)
— 1 litre of water
— 1 tbsp of old vinegar (or leave out)
Preparation:
— Place the apple scraps in a jar and cover with water.
— Cover with muslin and leave in a warm place.
— After 5–7 days fermentation will begin. Stir daily.
— After 2–3 weeks, strain and leave to mature for another 1–2 weeks.
— Filter the finished vinegar and store in a bottle.
Uses: For food and as a healing remedy — especially diluted, to ease fatigue and aid digestion.
Herbal vinegar from sour infusions
A recipe using any sour-tasting herbs, especially sorrel.
Ingredients:
— A bunch of sorrel or ground elder (young leaves)
— 1 litre of rainwater or spring water
— A little old vinegar (optional)
Preparation:
— Chop the herbs and cover with water.
— Leave in a warm place for 2–3 days until fermentation begins.
— Strain, add a little vinegar as a starter, and allow to ferment for a further 2 weeks.
— Decant into a bottle and leave for another week.
Notes: A light vinegar with a mineral, herbal flavour. Traditionally used for dressing dishes and for treating greens before drying.
Vinegar from sour berries (sloe, rowan, lingonberry)
A northern method of vinegar-making.
Ingredients:
— 1 cup of fresh sour berries (such as lingonberry, sloe, guelder rose)
— 1 litre of boiled or spring water
Preparation:
— Crush the berries and place in a jar with water.
— Cover with cloth and leave for 5–7 days.
— Stir daily, monitoring the fermentation.
— Once the flavour has become distinctly sour and sediment begins to form, strain and leave to mature for a further 1–2 weeks.
— Decant into bottles.
Uses: A base for marinades and drinks.
Grain vinegar from rye or wheat
An Old Russian method of obtaining vinegar from soured grain.
Ingredients:
— 1 cup of sprouted rye grain
— 1 litre of water
Preparation:
— Cover the sprouted grain with warm water and leave for 2 days.
— Strain, and leave the liquid in an open jar at room temperature.
— After 5–7 days a light vinegar aroma will appear. Strain and mature to the desired strength.
Notes: A little old vinegar or fermented liquid (such as sauerkraut brine) may be added.
Birch sap vinegar
A Siberian spring recipe — vinegar was prepared when the sap began to sour naturally.
Ingredients:
— 1 litre of fresh birch sap
Preparation:
— Leave the sap at room temperature in an open jar.
— It will first sour, then begin to turn into vinegar.
— After 10–14 days, filter and decant into a bottle.
Uses: In folk medicine, and as a refreshing seasoning.
Vinegar recipes with sugar
Apple vinegar
Ingredients:
— 1 kg of wild apples (peel and cores may also be used)
— 1 litre of water
— 100 g of sugar syrup or honey
— 1 tsp of starter (or 2 tablespoons of prepared apple vinegar)
Preparation:
— Chop the apples into small pieces together with the peel and place in a jar.
— Boil the water, dissolve the sugar or honey in it, and cool until lukewarm.
— Pour the sweetened water over the apples so that they are completely covered.
— Add vinegar or starter, cover the jar with muslin.
— Leave in a warm place for 2–4 weeks, stirring daily.
— When the liquid turns sour and the apples sink to the bottom, strain the vinegar.
— Bottle and store in a cool place.
Uses: A universal homemade vinegar for cooking and health purposes.
Linden иlossom мinegar
Ingredients:
— 1 cup of fresh or ½ cup of dried linden (lime) blossoms
— 1 litre of water
— 100 g of sugar syrup
— 1 tsp of vinegar starter or a little natural vinegar
Preparation:
— Pour boiling water over the linden blossoms and steep for 10–15 minutes.
— Strain the infusion, add sugar, and cool.
— Transfer into a glass container and add the starter.
— Cover with muslin and leave at room temperature for 3–4 weeks.
— Strain and bottle when ready.
Notes: Fragrant, floral vinegar with delicate flavour.
Ground elder vinegar
Ingredients:
— 2 cups of young ground elder leaves
— 1 litre of water
— 100 g of sugar syrup
— 1 tsp of starter or a little vinegar
Preparation:
— Wash and chop the ground elder leaves.
— Prepare the sweet water, then cool.
— Place the greens in a jar and pour in the sweetened water.
— Add the starter, cover with muslin.
— Leave in a warm place for 2–3 weeks, stirring daily.
— Strain the finished vinegar and bottle.
Notes: Herbaceous vinegar with a fresh, green aroma.
Hawthorn berry vinegar
Ingredients:
— 1 cup of fresh hawthorn berries
— 1 litre of water
— 100 g of honey or sugar syrup
— 1 tsp of starter or a little vinegar
Preparation:
— Lightly crush the berries to release juice.
— Prepare sweetened water and cool.
— Pour the liquid over the berries and add starter.
— Cover with muslin and leave for 3–4 weeks.
— When the liquid acquires a distinct sourness, strain and bottle.
Uses: Traditionally used as a tonic and in marinades.
Dandelion vinegar
Ingredients:
— 1 cup of dandelion blossoms
— 1 litre of water
— 100 g of sugar (or sugar syrup)
— 1 tsp of starter (or a little vinegar)
Preparation:
— Collect fresh dandelion blossoms, wash, and lightly dry.
— In a pan, boil the water, add sugar (or syrup), and stir until dissolved.
— Place the blossoms in a jar or pan and pour over the sweet water.
— Leave to cool to room temperature, then add starter (or vinegar).
— Cover with muslin and leave for 3–4 weeks to ferment.
— Check occasionally; when the vinegar reaches the desired acidity, strain and transfer to bottles.
Notes: Light floral vinegar with a springtime aroma.
Nettle vinegar
Ingredients:
— 1 cup of fresh nettle (young leaves preferred)
— 1 litre of water
— 100 g of sugar (or sugar syrup)
— 1 tsp of starter (or a little apple vinegar)
Preparation:
— Wash and chop the nettle leaves.In a pot or jar, boil the water, add sugar (or syrup), and dissolve completely.
— Place the nettle leaves in the hot water and leave to infuse until cooled to room temperature.
— Add the starter (or vinegar).
— Cover with cloth and leave in a warm place for 3–4 weeks. Check occasionally.
— When the vinegar reaches the desired acidity, strain and bottle.
Notes: Refreshing, slightly sharp vinegar with a herbal character.
Mint vinegar
Ingredients:
— 1 cup of fresh mint leaves
— 1 litre of water
— 100 g of sugar (or sugar syrup)
— 1 tsp of starter (or a little apple vinegar)
Preparation:
— Collect fresh mint leaves and wash thoroughly.
— In a pan, boil the water, add sugar, and dissolve.
— Place the mint leaves in a jar or pan and cover with the sweet water.
— Allow to cool to room temperature, then add the starter (or vinegar).
— Cover with muslin and leave in a warm place for 2–3 weeks.
— Strain and bottle when the vinegar reaches the desired flavour.
Notes: Cooling, aromatic vinegar, ideal for summer dishes.
General tips and recommendations
Choice of ingredients: Gather plants on dry mornings so that they are fresh and aromatic.
Storage: Vinegar keeps for up to 1 year in a dark, cool place. Use glass bottles with tight lids.
Experiments: Combine ingredients — for example, add rose hips to dandelions for a new flavour.
Cleanliness: Sterilise jars and bottles to prevent mould.
Economy: Leftover plant matter after straining can be used in sauces.
Tip: If the vinegar tastes too sharp, dilute with water before use.
FINAL NOTE
Vinegars made from wild plants are a way to preserve the flavour and benefits of forest herbs, berries, and blossoms. They bring a light tang, enhance flavour, and diversify everyday cooking. Easy to prepare, they provide a wholesome and tasty base for marinades, dressings, and drinks. By using nature’s gifts, you create natural products with a vivid character and a seasonal touch.
Chapter 5. Milk and dairy products from wild plants
Plant-based milk is more than a modern trend — it is rooted in ancient tradition practised by our ancestors for centuries. In times when cow’s or goat’s milk was not always available, people found ways to obtain nutritious drinks from the plants around them. Today, we are returning to this knowledge to create delicious and healthy alternatives that not only diversify our diet but also bring the vitality and richness of the wild.
Milk from nature
Plant-based milk is more than just a substitute for animal milk — it is a unique product with its own flavour and texture. Rich in proteins, fats, and micronutrients, its preparation is both simple and fascinating. Using nature’s gifts, you can create beverages suitable for porridges, pastries, sauces — or simply to enjoy on their own.
Methods for making plant-based milk
The basic principle is to blend plant material with water and then strain it. However, each type of plant requires its own approach.
Milk from nuts
— Hazelnuts: Produces rich, buttery milk — perfect for porridges and desserts.
— Hazelnuts with linden flowers: An infusion of linden blossoms adds a gentle, honeyed note.
— Hazelnuts and hemp seeds: When blended, they form a creamy “butter” and thick milk — highly nutritious.
— Pine nuts: Resulting milk is creamy, with a light coniferous aroma — ideal as a base for cream or plant-based cheeses.
— Beechnuts: Delicate, slightly tart flavour — perfect for autumn porridges, puddings, and biscuits.
— Edible chestnuts: Produce thick, fragrant milk — great for desserts and sauces.
Tip: Nut milk may be sweetened with a little honey or seasoned with a pinch of sea salt.
Milk from seeds
— Nettle seeds: Delicate flavour with nutty undertones.
— Orache seeds: Nutritious and mild-tasting milk.
— Burdock seeds: Dense and oily — especially tasty in sauces and baked goods.
— Flax and amaranth seeds: Mucilaginous milk — excellent for digestive health and gravies.
— Wild cumin and nettle seeds: Spicy, savoury milk — ideal for hot sauces and mushroom dishes.
— Horse sorrel seeds: Tangy and robust in flavour — pairs well with nuts and berries.
— Psyllium seeds: When blended, form a thick, gel-like consistency — a natural thickener.
— Shepherd’s purse seeds: A springtime ingredient that yields light milk — good for soups and mashed vegetables.
Tip: Seeds can be lightly toasted before grinding to enhance flavour — but only slightly, to avoid bitterness.
Milk from roots
— Dandelirn roots: Earthy taste with a slight bitterness.
— Burdock roots: Naturally sweet milk due to its inulin content.
— Cattail rhizomes: After cooking, they turn into a creamy purée — a substitute for thick cream.
— Tip: Milk made from roots is particularly suited to thick soups and hearty porridges, offering earthy depth and natural sweetness.
Milk from sprouts and flowers
— Sprouted clover: Produces a vitamin-rich, refreshing milk.
— Linden blossoms: Brewed and blended with nettle powder into a creamy, milky mass.
— Pine pollen: When added to nut milk, it creates a fragrant “cream”.
Recipes for plant-based milk and thick bases
Milk from hazelnuts
Ingredients:
• 100 g hazelnuts
• 300 ml water
• Optional: 1 tsp honey or a pinch of salt
Preparation:
— Soak the nuts for 8–12 hours.
— Drain and rinse.
— Blend with fresh water.
— Strain through muslin cloth or a fine sieve.
— Add honey or salt, if desired.
Features: Requires soaking for better digestibility.
Taste: Delicate, creamy, slightly sweet.
Usage: Porridges, smoothies, baking.
Milk from pine nuts
Ingredients:
• 100 g pine nuts
• 400 ml water
Preparation:
— Blend the nuts with water.
— Strain.
Features: No soaking needed.
Taste: Rich, soft, with a light resinous note.
Usage: Cream soups, sauces, desserts.
Milk from beechnuts
Ingredients:
• 100 g beechnuts
• 300 ml water
Preparation:
— Soak overnight, then rinse.
— Scald with boiling water and chill to peel faster (optional).
— Blend with water.
— Strain.
Taste: Creamy, with a slight woody bitterness.
Usage: Autumn baking, puddings.
Milk from edible chestnuts
Ingredients:
• 100 g boiled chestnuts
• 250 ml water
Preparation:
— Blend with water.
— Strain.
Features: Use only edible chestnuts.
Taste: Mild, creamy, slightly sweet.
Usage: Desserts, especially with spices.
Milk from nettle seeds
Ingredients:
• 50 g dried nettle seeds
• 250 ml water
Preparation:
— Grind to powder.
— Blend with water for 1–2 minutes.
— Strain.
Features: Rich in protein and trace minerals.
Taste: Light, slightly herbaceous.
Usage: Smoothies, pastries, sauces.
Milk from orache seeds
Ingredients:
• 3 tbsp orache seeds
• 300 ml water
Preparation:
— Soak for 6–8 hours.
— Discard soaking water.
— Blend with fresh water.
— Strain.
Taste: Mild, nutty, slightly grainy.
Usage: Porridge, set milk dessert.
Milk from burdock seeds
Ingredients:
• 50 g dried seeds
• 200 ml water
Preparation:
— Grind seeds.
— Blend with water.
— Strain.
Features: Light detox effect.
Taste: Mild, earthy.
Usage: Soups, gravies, baking.
Milk from flax and amaranth seeds
Ingredients:
• 1 tbsp flax seeds
• 1 tbsp amaranth seeds
• 400 ml warm water
Preparation:
— Soak in warm water overnight.
— Blend until slightly mucilaginous.
— Strain if desired.
Features:
— Flax gives mucilage — good for digestion.
— Amaranth adds calcium and protein.
Taste: Mild, grainy-nutty, with a smooth texture.
Usage: Gravy base, porridges, baking.
Tip: No need to strain if you prefer a thicker consistency.
Milk from wild cumin and nettle seeds
Ingredients:
• 1 tsp wild cumin
• 1 tbsp nettle seeds
• 300 ml hot water
Preparation:
— Lightly toast cumin.
— Grind both seeds.
— Pour hot water and let infuse for 20 minutes.
— Blend and strain.
Features: Aids digestion.
Taste: Spicy and bold.
Usage: Mushroom dishes, sauces.
Milk from horse sorrel seeds
Ingredients:
• 2 tbsp seeds
• 300 ml water
Preparation:
— Grind to powder.
— Blend with water.
— Strain.
Features: High in antioxidants.
Taste: Tart and strong.
Usage: Soups, porridge, with berries and nuts.
Milk from shepherd’s purse seeds
Ingredients:
• 1½ tbsp seeds
• 300 ml warm water
Preparation:
— Slightly crush seeds before soaking.
— Soak for 6–8 hours.
— Blend until smooth.
— Strain.
Features: Supports urinary health.
Taste: Mild, herbal.
Usage: Spring soups, purées, dressings.
Milk from burdock roots
Ingredients:
• 100 g fresh roots
• 400 ml water
Preparation:
— Clean and cut roots.
— Soak for 8–10 hours.
— Simmer gently for 15–20 minutes.
— Blend with the cooking water.
— Strain.
Features: Prebiotic effect.
Taste: Naturally sweet.
Usage: Drinks, porridges, soups, baking.
Milk from cattail rhizomes
Ingredients:
• 200 g fresh rhizomes
• 300–350 ml water
Preparation:
— Clean and cut rhizomes.
— Boil for 15–20 minutes.
— Reserve about 50 ml broth.
— Blend rhizomes with the broth.
— Strain if desired.
Features: Starchy and filling.
Taste: Neutral, slightly starchy.
Usage: Cream substitute, puddings, sweet breakfasts.
Tip: Reduce the broth for a thicker result.
Milk from dandelion roots
Ingredients:
• 100 g fresh roots
• 300 ml water
Preparation:
— Clean and cut.
— Boil for 10 minutes, then cool.
— Blend and strain.
Features: Stimulates liver function.
Taste: Light bitterness, floral aftertaste.
Usage: Smoothies, sauces.
Tip: Light dry-roasting removes excess bitterness.
Milk from clover sprouts
Ingredients:
• A handful of sprouts
• 200 ml water
Preparation:
— Rinse and blend.
— Strain.
Features: Rich in phytoestrogens and antioxidants.
Taste: Light, herbal.
Usage: Smoothies, teas, or as a base for dressings.
Tip: A few drops of vinegar brighten the taste.
Linden blossom infusion-milk
Ingredients:
• 1 tbsp linden blossoms
• 150 ml boiling water
• 1 tsp nettle powder
Preparation:
— Brew blossoms for 15 minutes.
— Add nettle powder and blend.
Features: Soothing and vitamin-rich.
Taste: Delicate, floral sweetness.
Usage: Light milk, cream base.
Tip: Lightly bruise flowers for a stronger flavour.
Using plant milk
— Drinks: Enjoy warm or chilled, optionally sweetened with honey.
— Cooking: Add to porridges, soups, and sauces.
— Baking: Use as a substitute for animal milk in recipes.
Tips and recommendations
— Store for no more than 3 days in the refrigerator.
— Use clean utensils to prevent spoilage.
— Experiment with additions: herbs, berries, and spices.
Fermentation basics: turning milk into yoghurt and cheese
Fermentation is a natural way to preserve plant-based dairy alternatives. Beneficial bacteria convert sugars into acids, producing a pleasantly sour flavour and thicker texture. Here’s what you need to know:
Base: Use milk made from nuts (e.g., hazelnuts, pine nuts), seeds (e.g., nettle, orache), or roots (e.g., dandelion, burdock).
Starter culture: Choose from:
— Probiotic capsules (available at pharmacies; contain beneficial bacteria)
— A spoonful of live culture yoghurt
— Fermented herbal infusion (e.g., elderflower or fireweed tea)
— Sourdough kvass
Conditions: Ferment at 30–40°C for 6–24 hours using a yoghurt maker, warm oven, or insulated container.
Control: Taste after 6–8 hours. If too mild, continue fermenting.
Tip: Cleanliness is crucial. Sterilize jars and utensils to avoid contamination with unwanted microbes.
Techniques for making cheese and cream
After fermentation, plant milk can be turned into cheese or cream:
For Cheese:
— Strain the fermented milk through muslin cloth to separate the whey.
— Add herbs, spices, or salt to enhance flavour.
— Press the curds: 12–24 hours for soft cheese, 1–2 weeks for hard cheese.
For Cream:
— Blend cooked roots, sprouts, or nut pulp with a small amount of water.
— Strain for a smooth consistency, or leave the fibres for added richness.
Tip: Do not discard the whey — it can be reused in soups, baking, or for fermenting drinks.
Recipes for fermented foods
Fermented milk drink with herbs
Ingredients:
— 500 ml nut or seed milk
— 1 tsp nettle, mint, or meadowsweet powder
— 2 tbsp starter (rye kvass, berry infusion, or plant-based yoghurt)
Preparation:
— Heat the milk to 35–38°C.
— Add the starter and herbs; stir well.
— Pour into a glass jar, cover, and leave in a warm place for 12–24 hours.
— Strain through a sieve or muslin cloth.
— Chill before serving.
Features: A probiotic-rich base with herbal phytonutrients.
Flavour: Mildly sour with a gentle herbal aftertaste.
Use: A refreshing summer drink or a light snack.
Tip: Store in the fridge for up to 3 days.
Plant-based kefir with kvass
Ingredients:
— 500 ml nut or seed milk
— 100 ml fermented berry infusion or rye kvass
Preparation:
— Mix the milk and infusion.
— Leave in a warm place for 1 to 2 days.
— Chill the finished drink.
Features: A simple alternative to traditional kefir without dairy or commercial starter.
Flavour: Tangy and fresh, with subtle berry or bread notes.
Use: A thirst-quenching summer drink that supports digestion.
Tip: Great in green smoothies or on its own.
Fermented beverage made from ground elder
Ingredients:
— 500 ml milk made from ground elder
— 2 tbsp berry or bread-based starter
Preparation:
— Mix the milk with the starter.
— Leave in a warm place for 12–24 hours.
— When light gas bubbles appear, the drink is ready.
— Chill before serving.
Features: Contains B vitamins and natural enzymes.
Flavour: Mild, herbal, slightly tart.
Use: A revitalising summer drink.
Tip: Best served chilled in the morning or afternoon as a kefir alternative.
Plant-based yoghurt recipes
Witch hazel yoghurt with elderflowers
Ingredients:
— 500 ml hazelnut milk
— 50 ml elderflower infusion
— 2 tbsp live culture yoghurt or 100 ml berry/rye starter
Preparation:
— Heat the milk to 38–40°C.
— Add the elderflower infusion and starter; mix well.
— Pour into a glass jar, cover, wrap, and leave in a warm place for 8–12 hours.
— Refrigerate the finished yoghurt.
Features: Elderflower enhances antiviral and cooling properties. The nut base provides richness and balances acidity.
Flavour: Light, floral — reminiscent of a summer morning.
Use: With berries, fruit, granola, or in sauces.
Tip: For a thicker texture, add psyllium gel (is a viscous substance formed when psyllium husk, a type of soluble fibre, absorbs water), agar-agar, or refrigerate for 2–3 hours after fermentation.
Nettle seed yoghurt with willowherb
Ingredients:
— 500 ml nettle seed milk
— 50 ml fermented willowherb (fireweed) infusion
— 2 tbsp live plant-based yoghurt or 100 ml rye/berry kvass
Preparation:
— Heat the milk to 38–40°C.
— Mix with the fermented infusion or starter.
— Pour into a glass jar, cover, and insulate.
— Leave in a warm place for 12–14 hours.
— Chill before serving.
Features: Nettle milk is rich in micronutrients; willowherb supports digestion and adds a mild, pleasant flavour.
Flavour: Earthy and slightly tart.
Use: In porridge, smoothies, or with nuts and jam.
Tip: If the yoghurt is too runny, add more starter or extend the fermentation time.
Plant-based cheeses and cheese-like products
Soft Cheese Made from Hazelnuts and Chives
Ingredients:
— 300 ml hazelnut milk
— 1 tsp chive powder
— 2 tbsp plant-based starter (e.g. oatmeal or berry kvass)
— 1 tsp vinegar
— Salt to taste
Preparation:
— Mix the milk with the starter; ferment in a warm place for 12 hours.
— Strain through muslin cloth.
— Add vinegar, salt, and chive powder.
— Wrap in muslin cloth and press for 8–12 hours.
Flavour: Delicate, slightly sour, with herbal notes.
Use: For sandwiches or vegetable platters.
Beech nut cheese with mint and thyme
Ingredients:
— 500 ml beech nut milk
— 2 tbsp bread kvass or plant-based yoghurt
— 1 tsp dried mint
— 1 tsp thyme
— ½ tsp salt
Preparation:
— Ferment the milk for 10–12 hours.
— Strain, then add herbs and salt.
— Wrap in muslin cloth and press gently.
Flavour: Dense and aromatic — perfect for snacks and salads.
Tip: A popular dairy-free cheese option for fresh dishes.
Cedar milk cheesecake
Ingredients:
— 500 ml cedar (pine nut) milk
— 1 tbsp vinegar
— ½ tsp salt
Preparation:
— Heat the milk to 60–70°C.
— Add vinegar — the milk will curdle.
— Drain through muslin cloth.
— Season with salt and press lightly.
Flavour: Crumbly and mildly salty.
Nettle and plantain cream cheese
Ingredients:
— 200 ml nettle milk
— 2 tsp boiled plantain seeds
— 1 tbsp dried nettles
— Salt and garlic, to taste
Preparation:
— Blend all ingredients until smooth and creamy.
— Chill before serving.
Flavour: Mild, herbal, and savoury.
Use: As a spread, filling, or dressing.
Hazelnut mascarpone
Ingredients:
— 300 ml full-fat hazelnut milk
— 1 tsp vinegar
Preparation:
— Heat the milk gently, then add the vinegar and stir.
— Blend or whisk until thick and creamy.
Flavour: Soft, creamy, and delicate.
Use: In desserts, with fruit, or as a cream layer.
Cream and double cream recipes
Pine nut cream
Ingredients:
— 1 cup (approx. 240 ml) pine nuts
— 1,5 cups (approx. 360 ml) water
Preparation:
Blend until smooth. Do not strain.
Flavour and Texture: Delicate, thick.
Uses: Desserts, sauces, cream soups.
Fermented clover milk and thyme cream
Ingredients:
— 300 ml clover seed milk
— 1 tbsp thyme infusion
— 2 tbsp berry infusion (as a starter)
Preparation:
Mix all ingredients and leave in a warm place for 24–36 hours.
Flavour: Herbal, slightly spicy.
Uses: With vegetables, bread, or fresh berries.
Cream from pine pollen and nut pulp
Ingredients:
— 1 tsp pine pollen
— 3 tbsp nut pulp (leftover from milk-making)
— 100 ml water
Preparation:
— Blend all ingredients until smooth.
— Add more water if necessary to adjust the consistency.
Flavour: Lightly nutty with a pine note.
Uses: Desserts, herbal sauces.
Nettle milk and shepherd’s purse sour cream
Ingredients:
— 300 ml nettle milk
— 1 tsp shepherd’s purse seeds
Preparation:
Simmer over low heat for 5–7 minutes until slightly thickened. Allow to cool.
Flavour: Mild, herbal.
Uses: In hot dishes, salads, or dressings.
Wild walnut and hemp seed butter
Ingredients:
— 2 tbsp wild walnuts (e.g. hazel, beech)
— 1 tbsp hemp seeds
— 1 tsp vegetable oil
— Salt to taste
Preparation:
Grind into a paste, then whisk until light and airy.
Storage: Store in a sealed jar in the refrigerator for up to 5–7 days.
Uses: As a spread, or added to porridge and sandwiches.
Desserts and other recipes
Vegetable milk pudding with flax
Ingredients:
— 200 ml hornwort milk
— 1 tbsp ground linseed
— Honey or raspberry syrup, to taste
Preparation:
— Bring the milk to the boil, then add ground linseed.
— Simmer over low heat for 3–5 minutes until thickened.
— Allow to cool, then add honey or syrup.
Flavour: Delicate, with a slight nutty aftertaste.
Uses: Breakfast, dessert, fruit topping.
Tip: For a thicker texture, refrigerate for 1–2 hours.
Nettle milk and birch pollen cream
Ingredients:
— 300 ml nettle milk
— 1 tsp birch pollen
— 1 tsp honey
Preparation:
— Blend all ingredients until smooth.
— Best served chilled or fresh.
Flavour: Mild, sweet, and rich.
Uses: Cream for pancakes, fruit, or desserts.
Tip: Store in the fridge for no more than 24 hours.
Fruit pastila with lamb’s quarters milk and blueberries
Ingredients:
— 300 ml lamb’s quarters milk
— 100 g blueberries
Preparation:
— Blend the milk with the berries until thick.
— Spread into a 0.5–1 cm layer and dry at 40–45°C (in a dehydrator or oven) for 6–8 hours.
Flavour and Texture: Sweet and tart, soft and fruity.
Uses: Snack, children’s treat.
Tip: Can be rolled into spirals or cut into strips.
Set milk dessert with elderflowers
Ingredients:
— 200 ml lime-blossom milk
— 50 ml elderflower infusion
— 1 tsp ground plantain seeds
Preparation:
— Mix the milk, elderflower infusion, and plantain seed powder.
— Let sit for 1–2 hours until it thickens.
— Serve chilled.
Flavour and Texture: Floral, refreshing, gelatinous.
Uses: A light summer dessert.
Tip: Garnish with fresh berries or edible flower petals.
Recipes for dips and sauces
Nettle milk purée with plantain seeds
Ingredients:
— 200 ml nettle milk
— 1 tbsp ground plantain seeds
Preparation:
— Mix the ingredients and heat gently for 5–7 minutes until slightly thickened.
Flavour: Delicate, slightly mucilaginous.
Use: As a garnish or a base for warm appetisers.
Tip: Add salt or spices to taste for a savoury version.
Nut curd and ground elder bake
Ingredients:
— 200 g nut “curd”
— 2 tbsp ground elder powder
— 1 tbsp linseed powder
Preparation:
— Mix all ingredients and place in a baking dish.
— Bake at 180°C for about 20 minutes.
Flavour and Texture: Filling, delicate, with a herbal aroma.
Use: As a breakfast dish, snack, or salad addition.
Tip: Serve with a nut or berry sauce.
Cattail curd with mint
Ingredients:
— 250 ml cattail milk
— 1 tsp kvass
— 1 tsp dried mint powder
Preparation:
— Ferment the milk for 12–24 hours until curdled.
— Strain through a cloth and mix in the mint powder.
Flavour and Texture: Refreshing, creamy, with a minty accent.
Use: Breakfast, dessert, spread.
Tip: Pairs well with fruits or flatbreads.
Tips and advice
Choosing Milk:
— Nut milk is creamy.
— Seed milk is mucilaginous and light.
— Root milk is thick and rich.
Storage:
— Yoghurts: up to 5–7 days
— Cheeses: up to 2 weeks
— Creams and spreads: up to 3 days
Additional ingredients:
— Herbs: ramsons, ground elder, plantain
— Flowers: linden, elderflower
— Berries: rowan, blueberry, raspberry
Residues:
Nut pulp and whey can be used in kvass, baked goods, or porridge.
FINAL NOTE
Plant milk and dairy alternatives are not only nourishing foods — they are a living connection to the forces of nature.
Each drop of plant milk holds the memory of the earth, the flavour of the forest, the breath of the meadows, and the energy of the sun absorbed by the plant.
By returning to these simple yet marvellous recipes, we are not merely enriching our diets — we are reviving an ancient bond with that which has sustained us for millennia.
Homemade plant milk is an act of care, creativity, and inner stillness — where food becomes meditation, and flavour becomes a guide to a world in which nature and humanity once again speak the same language.
Chapter 6. Sugar from nature
Long before cane and beet sugar became commonplace, people turned to the natural sweetness found in plants. People in temperate climates have been extracting sugar from tree sap, roots, berries, and sprouted grains for centuries. These age-old practices, rooted in careful observation and passed down through generations, can not only enrich modern diets but also inspire natural culinary creativity.
Wild sources of sugar
Maple (Acer spp.)
In spring, during the snowmelt, maples begin to “weep’ — their trunks push sap toward the crown under pressure. In the traditions of the Indigenous peoples of North America (Algonquin, Iroquois), maple sap was collected by carving incisions or drilling small holes, into which wooden or bone tubes were inserted to guide the sap. The sap was boiled down to make maple syrup or sugar, which was then dried and stored as flakes or powder and dried into flakes or a coarse sugar for storage.
Birch (Betula spp.)
Birch sap contains less sugar than maple sap but is more abundant. In Scandinavia, the Baltics, northern Russia, and Siberia, birch sap was collected during spring. It was consumed fresh, fermented, made into syrup, and added to porridges and beverages.
Liquorice (Glycyrrhiza glabra, G. uralensis)
Liquorice root contains glycyrrhizin — a compound 30–50 times sweeter than sugar. In Siberia, China, and the Middle East, liquorice root was dried, crushed, and boiled in water. The resulting decoction was thickened, strained, and used as a sweetener or medicine. It can be added to drinks, porridge, or baked goods.
Sprouted grains as a source of sweetness
When grains are sprouted, natural enzymes activate the breakdown of starches into sugars, primarily maltose. This process has been known since antiquity and forms the basis of sugar-free sweet porridges, drinks, and desserts.
Grains used: wheat, rye, barley (Triticum spp., Secale cereale, Hordeum vulgare)
Sprouted grains were dried, ground, and slow-cooked or sun-dried. In Europe, such porridges were prepared during Lent; in Russia, for holidays; and in Central Asia, a ritual dish called sumanak (or sumalyak) is still made for Navruz (spring New Year).
Traditional sugar recipes
Maple syrup (North American tradition)
Ingredients: 10 litres fresh maple sap
— Tap the tree during March — April by drilling a hole approximately one metre from the ground. Insert a wooden or bamboo spout.
— Strain the sap and begin boiling it over an open fire or hob.
— Boil in a wide pot until reduced to ~1 litre.
— Pour the thick, amber syrup into sterilised jars.
Tip: For crystallised maple sugar, continue boiling until thickened, but take care to avoid scorching.
Birch syrup (Northern Europe, Russia)
Ingredients: 20 litres birch sap
Preparation:
— Collect in April, during mild days and frosty nights.
— Filter and boil slowly.
— Reduce volume by 20×.
— The resulting syrup is deep amber in colour, with a rich, slightly bitter flavour.
Note: Great with meat, tea, and porridge.
Liquorice decoction (Eastern Europe & Central Asia)
Ingredients: 2 tbsp dried liquorice root, 500 ml water
Preparation:
— Grind roots.
— Simmer in water for 20–30 min.
— Strain — yields a naturally sweet, dark infusion.
— Optionally reduce to syrup.
Use: Add to tea, porridge, dough. Folk remedy for coughs and fatigue.
Sumanak (sumalyak) — syrupy paste from sprouted wheat (Central Asia)
Ingredients: 2 kg wheat, water as needed, 1 cup (approx. 240 ml) flour (optional)
Preparation:
— Wash and soak grain for 24 hours.
— Sprout for 2–3 days until shoots are 1–2 cm.
— Grind the sprouts, mix with water, and strain to obtain the “sweet milk’ base.
— Add flour if desired.
— Cook for 6–12 hours stirring continuously with a wooden spatula to prevent burning.
Tradition: Prepared for Navruz in large pots; families gather to sing and dance. Said to bring luck and purification.
Sprouted barley drink (Europe)
Ingredients: 500 g sprouted barley, 2 litres water
Preparation:
— Dry and grind the sprouts.
— Steep in hot (not boiling) water for 4–6 hours.
— Strain.
— Optionally boil down to a syrup.
Use: Base for malt beverages or syrups.
Sweet elecampane root (Eastern Europe, Siberia)
Ingredients: 50 g fresh/dried root, 500 ml water
Preparation:
— Grind and boil for 30 minutes.
— Strain and boil down to a syrup.
— Add honey if desired.
Taste: Honey-like, spicy; aids digestion.
Malt syrup from sprouted rye (Slavic/Baltic tradition)
Ingredients: 1 kg sprouted rye
Preparation:
— Sprout rye to 1–1.5 cm.
— Dry, grind into flour.
— Steep in hot water at 40–50°C for 6–8 hours.
— Strain.
— boil down until thickened to a syrup.
Use: Baking, drinks, porridge. Adds maltose flavour.
Reduced berry syrup (Northern/Eastern Europe)
Ingredients: 2 kg berries (rowan, viburnum, blueberry), water
Preparation:
— Mash or juice berries.
— Strain and boil to reduce to ~1/5 volume.
— Optionally add sour apples for stability.
Use: Syrup, porridge topping, base for pastila.
Sweet-and-sour burdock syrup (Japan, Siberia, Karelia)
Ingredients: 100 g burdock root, 500 ml water
Preparation:
— Wash, peel, chop the root.
— Boil for 30–40 min.
— Boil down to a syrup and strain.
Taste: Earthy, sweet-and-sour.
Tip: Can serve as a rehydrating herbal tonic while hiking.
Baked sprouts with berries (Europe)
Ingredients: 1 cup (approx. 240 ml) sprouted wheat, ½ (approx. 120 ml) cup dried berries (cranberry, cherry, blueberry), some water
Preparation:
— Mix sprouts and berries with water.
— Bake in ceramic/earthenware dish at 100–120°C for 3–4 hours.
Use: Paste for snacks, with mild sweetness and tartness.
Sweet flour from dried sprouts (Slavic/Finno-Ugric tradition)
Ingredients: Any amount of sprouted wheat or barley
Preparation:
— Sprout grain.
— Dry at 40–50°C.
— Grind to powder.
Use: Add to baked goods, porridge, raw treats.
Tip: Pairs well with nuts and dried wild fruits like rose hips or hawthorn.
Storage
— Syrups should be stored in sterilised glass jars in a cool, dark place for up to one year. Once opened, keep refrigerated.
— Dry sugars (e.g., maple sugar) should be stored in airtight containers in a dry place.
— Sprouted grains intended for future use can be dried and stored in glass jars for up to six months.
FINAL NOTE
Sweetness is not a gift of industry but a gift of the earth. Life-giving maple and birch sap, liquorice roots, and grains awakened by moisture generously offer natural sugar to humans. These ancient recipes are woven into the fabric of cultures — in rituals and songs, passed down through generations as part of festive joy or daily care.
By reviving them, we reconnect with the true taste of nature — pure, nourishing, and rich with time.
Chapter 7. Herbal powders
Herbal powders are an ancient way to preserve nature’s gifts for many months. Our ancestors dried herbs, roots, and flowers, grinding them into powder to use in winter when fresh plants were unavailable. Today, we are returning to these traditions to eat more sustainably and diversely. Turning nettles, linden, or meadowsweet into powder is not only a way to enhance flavour but also an opportunity to add vitamins, minerals, and antioxidants to your diet. In this chapter, you’ll learn how to harvest, dry, and grind plants to create powders that will inspire your culinary creations.
The basics of making herbal powders
Making powder is a simple process with three steps: gathering, drying, and grinding.
Gathering the Plants
• When to collect: Harvest in the morning, ideally during dry weather, when the plants are fresh and full of sap. Collect leaves before flowering, roots in autumn, and flowers at the beginning of blooming.
• Where to collect: In clean places away from roads and factories. Woodland edges, meadows, and open fields are ideal.
• What to pick: Select only healthy, undamaged plants.” plants without spots or damageer.
Tip: Take no more than a fifth of any given plant population in one area, to ensure sustainability and natural regeneration.
Drying
Drying is key to preserving flavour and nutrients. There are several methods:
• Air drying: Spread leaves and flowers in a single layer on a cloth or net in a dark, ventilated place. Turn them every 1 to 2 days. Duration: 3 to 10 days.
• Oven drying: Cut roots into thin slices, spread them on a baking tray lined with parchment. Dry at 40–50°C with the door slightly open for 2–4 hours.
• Dehydrator: Set to 35–40°C for leaves and flowers, and 50–60°C for roots. Time: 4–12 hours.
Tip: To test for dryness, leaves should crumble easily between your fingers and roots should snap cleanly.
Grinding
• Tools: Use a coffee grinder, blender, or mortar and pestle. For finer powder, sift through a sieve.
• Technique: Grind in small batches to avoid overheating and preserve aroma and nutrients.
Tip: Ensure all equipment is properly sterilised prior to use, to prevent contamination.
Storage
• Store powders in glass jars with tight-fitting lids or in paper bags.
• Keep your powders in an airtight container in a dry, dark place. Moisture is the enemy of long-term storage.
• Label the jars with the name of the plant and the date of preparation.
• Shelf life: Up to 1 year for leaves and flowers, up to 2 years for roots.
Tip: Check your jars every couple of months for any signs of mould, clumping, or unusual odours.
Use of herbal powders
• Cooking: Add to soups, sauces, baked goods, or sprinkle over salads.
• Beverages: Mix with tea or smoothies for extra nutritional value.
• Health: Incorporate as a food supplement to help support the immune system.
• Cosmetics: Add to facial masks, bath soaks, or body scrubs.
Tip: Start with ½ tsp of powder per serving to avoid overpowering the flavour.
Recipes
Nettle powder
Ingredients:
• 200 g fresh young nettle leaves
Preparation:
— Blanch the nettle leaves in boiling water for a few seconds to remove the sting, then rinse in cold water.
— Pat dry gently with a clean kitchen towel or tea towel and lay them out in a single layer on a mesh or drying rack.
— and lay them out in a single layer on a mesh or drying rack.
— Dry in a dark, ventilated place for 5 to 7 days, or in a dehydrator at 35°C for 6–8 hours, until brittle.
— Grind the dried leaves into a fine powder using a coffee grinder.
— Sift through a fine sieve and store in a glass jar.
Use: Add to soups, smoothies, or baked goods for a boost of iron and vitamin C.
Linden flower powder
Ingredients:
• 150 g fresh linden flowers (harvested at the beginning of blooming)
Preparation:
— Gently rinse the flowers and shake off any excess water.
— Spread the flowers in a single layer on a cloth or mesh in a dark, ventilated place.
— Dry for 4 to 6 days until completely dry and crumbly.
— Grind into powder and store in a sealed glass jar.
Use: Add to teas, desserts, or yoghurt for a floral aroma.
Dandelion root powder
Ingredients:
• 200 g fresh dandelion roots
Preparation:
— Remove any soil from the roots and slice thinly (2–3 mm).
— Rinse and pat dry with a clean kitchen towel or tea towel.
— Dry in the open air for 7 to 10 days, or in the oven at 50°C for 3 to 4 hours, until brittle.
— Grind into a fine powder using a coffee grinder.
— Sift through a fine sieve and store in an airtight jar.
Use: Add to coffee, soups, or as a chicory substitute for an earthy flavour.
Ground elder leaf powder
Ingredients:
• 200 g fresh ground elder (Aegopodium podagraria) leaves
Preparation:
— Rinse the ground elder leaves and pat dry with a clean kitchen towel or tea towel.
— Lay them out in a single layer on a mesh or drying rack in a dark place.
— Dry for 5 to 7 days, or in a dehydrator at 35°C for 6 to 8 hours, until crisp.
— Grind into a fine powder using a blender. — Store in a glass jar.
Use: Add to sauces, salads, or use as a seasoning for soups.
Willowherb leaf powder
Ingredients:
• 150 g fresh willowherb (Chamaenerion angustifolium) leaves
Preparation:
— Rinse the leaves and pat lightly dry with a clean kitchen towel or tea towel.
— Lay them out in a single layer on a cloth in a dark, well-ventilated place.
— Dry for 5 to 7 days, or in a dehydrator at 35°C for 5 to 7 hours, until brittle.
— Grind into a fine powder using a coffee grinder. — Store in an airtight jar.
Use: Add to teas, smoothies, or baked goods for a herbal aroma.
Examples of using herbal powders
— Mint powder (Mentha spp.) — used in caramels, fruit salad toppings, flavoured oil, vegetable pickling, and herbal sweets.
— Nettle powder (Urtica dioica) — added to grain casseroles, pie fillings, seed crackers, stuffed courgettes, vegetable pancakes, and crisp fritters.
— Herbal mix — used in root vegetable crisps, ratatouille, mustard, vegan bakes, nut paste, and savoury snacks.
— Couch grass powder (Elymus repens) — added to wild-style pasta, fried cabbage, sauces, vegetable pancakes, and omelettes.
— Flower powder — used as decoration for desserts, marmalades, and tart creams.
— Elecampane powder (Inula helenium) — used in broth bases, vegetable fillings, vegan pilaf, and vegetable fritters.
— Burdock powder (Arctium lappa) — added to meat mince, pumpkin noodles, buckwheat sauce.
— Thyme powder (Thymus serpyllum) — added to cabbage and mushroom marinades, yoghurt dressings, breadcrumb coatings, and garlic sauce.
— Mushroom powder (Fungi spp.) — used in vegetarian burgers, sauces with lentils, vegan sausages, and savoury fillings.
— Plantain powder (Plantago major) — added to millet porridge dressings, onion galettes, homemade dumplings, burgers, and creamy soups.
— Guelder rose berry powder (Viburnum opulus) — added to homemade ketchup.
— Rosehip leaf or fruit powder (Rosa canina) — used in chickpea paste, syrniki sauces, seed jam.
— Linden flower powder (Tilia cordata) — used in fruit pastes and syrup for desserts.
— Calendula powder (Calendula officinalis) — added to vegetable pancakes, stews, salad powders, and vegan cream cheese.
— Elderberry powder (Sambucus nigra) — added to warm cream sauces, roasted pumpkin, and handmade sweets.
— Raspberry powder (Rubus idaeus) — used in kissel, pancake sauces, thick fruit sauces, and fruit rolls.
— Red clover flower powder (Trifolium pratense) — added to lentil balls and tart fillings.
Tips and recommendations
• Combine powders for new flavours (e.g. nettle + dandelion)
• Use leftovers from sifting to make herbal infusions
• Keep tools clean and dry to avoid contamination
• Check powders every few months for freshness
FINAL NOTE
Herbal powders bring the forest to your kitchen. Whether made from nettle, linden, or dandelion, they carry the concentrated strength of wild plants — sun, wind, and time ground into a spoonful. Once you learn their craft, you’ll never run out of ways to enrich your meals with green vitality.
Chapter 8. Pesto with wild herbs
Pesto is not merely a sauce, but a living canvas of wild nature, woven together with herbs, nuts and oils into a fragrant mosaic of flavours. In the world of wild plants, it becomes a form of ancient alchemy: nettles, ground elder, pine needles, and elderflowers are transformed into culinary jewels that both nourish and comfort. These green sauces embody sustainable cooking, where every leaf and nut is gathered with gratitude to the Earth. Rich in vitamins, antioxidants, and beneficial fats, wild pesto reconnects us with the wisdom of our ancestors — those who once saw meadows and forests as inexhaustible storehouses of life.
In this chapter, we present entirely plant-based recipes as an invitation to nature-inspired creativity.
Pesto as a gift from the Earth
Pesto, originally from Italy, traditionally includes basil, pine nuts, and cheese. Here, we reimagine it using nature’s gifts: nettles instead of basil, hazelnuts instead of pine nuts, and herb or seed powders in place of cheese. This pesto is not only delicious but also ecological, crafted from the plants that grow all around us. It is rich in vitamins (C, K, A), minerals (iron, magnesium), and essential fatty acids, connecting us with the legacy of ancestral foragers.
In this chapter, you will learn how to gather, prepare, and combine wild plants to create a pesto that will become a jewel on your table — and a symbol of harmony with nature.
The basics of making pesto
Pesto is a thick, paste-like sauce in which ingredients are ground to a uniform or slightly coarse texture. Here are the key steps:
Choosing ingredients
• Greens and herbs: young leaves of nettle, ground elder (Aegopodium), plantain, ramsons, sorrel, chickweed, mallow, willowherb (Epilobium), or flowers such as dandelion, elderflower, and clover. Choose fresh, undamaged plants.
• Nuts and seeds: hazelnuts, walnuts, almonds, cashews, pumpkin seeds, sunflower seeds, hemp seeds. Add soaked orache or nettle seeds for creaminess.
• Oils: cold-pressed vegetable oils (cedar nut, linseed, milk thistle) for smooth texture.
• Acid: natural homemade vinegars (dandelion, blackthorn, elderberry) or sour fruit juices (wild apple, wood sorrel) for balance.
• Additional ingredients: salt, garlic (wild or cultivated), herbal powders (nettle, ground elder, willowherb), a touch of honey or syrup for roundness, and nettle powder for a “cheesy” note.
Tip: Gather herbs in the morning, during dry weather, and in clean areas far from roads.
Preparation
• Greens: Rinse with cold water and pat dry with a towel. Briefly blanch nettles, pine needles or parsnip greens in boiling water to soften them. Remove any tough stems from plantain or wild strawberry leaves.
• Nuts and seeds: Dry-roast briefly (2–3 minutes) in a pan to enhance aroma.
• Garlic: Use wild garlic fresh; use cultivated garlic sparingly.
Blending
• Traditional method: Use a mortar and pestle for an authentic texture.
• Modern method: Pulse briefly in a blender to retain some texture.
• Ratio: 2 parts greens, 1 part nuts/seeds, 1 part oil, plus 1–2 tsp acid per 100 g of greens.
Tip: Add the oil gradually to control the consistency.
Storage
• Transfer the pesto into a sterilised glass jar and cover it with a thin layer of oil (2–3 mm) to prevent oxidation.
• Store in the fridge for up to 5 to 7 days or freeze in ice cube trays.
• Always check the smell and colour before using.
Tip: If the pesto darkens, stir in 1 tsp of fresh oil before serving.
How to Use
• Spread on flatbreads
• Toss with pasta or noodles
• Stir into soups or stews
• Use as a dip or as a dressing for vegetables
• Marinate mushrooms or wild patties
• Thin with a little vinegar or water to make a salad dressing
Recipes
Classic nettle pesto (Urtica dioica)
Ingredients:
— 100 g young nettle leaves
— 50 g walnuts, lightly toasted
— 100 ml vegetable oil
— 1 wild garlic leaf
— ½ tsp salt
— 1 tsp vinegar
— 1 tsp nettle powder (for cheesy flavour)
Preparation:
— Blanch the nettles in boiling water, rinse with cold water, and dry.
— Blend the nettles, walnuts and garlic until they form a coarse paste.
— Stir in the oil, vinegar and salt.
— Transfer to a jar and top with a layer of oil.
— Store in the fridge for up to 5 days.
Use: Serve with pasta or flatbread.
Ground elder pesto (Aegopodium podagraria)
Ingredients:
— 100 g young ground elder leaves
— 50 g sunflower seeds
— 100 ml vegetable oil
— 1 wild garlic leaf
— 1 tsp vinegar
— ½ tsp salt
— 1 tsp goosefoot (lamb’s quarters) powder
Preparation:
— Wash and dry the leaves thoroughly, removing any tough stems.
— Blend the greens with the seeds, garlic and powder until smooth.
— Stir in the oil, vinegar and salt.
— Transfer to a jar and top with a layer of oil.
— Store in the fridge for up to 7 days.
Use: Perfect as a dressing for salads or as a fresh spread.
Plantain pesto (Plantago major)
Ingredients:
— 100 g young plantain leaves
— 50 g pumpkin seeds, lightly toasted
— 100 ml milk thistle oil
— 1 wild garlic leaf
— 1 tsp vinegar
— ½ tsp salt
— 1 tsp nettle powder (for cheesy flavour)
Preparation:
— Wash and dry the plantain leaves, then chop them finely.
— Blend the leaves, seeds, garlic and nettle powder into a smooth paste.
— Stir in the oil, vinegar and salt.
— Transfer to a jar and top with oil.
— Store in the fridge for up to 5 days.
Use: A perfect addition to vegetable soups and broths.
Clover leaf and clower pesto (Trifolium pratense)
Ingredients:
— 80 g fresh red clover leaves and blossoms
— 50 g nuts (walnuts or hazelnuts)
— 100 ml vegetable oil
— 1 wild garlic leaf
— 1 tsp vinegar
— ½ tsp salt
— 1 tsp nettle powder
Preparation:
— Wash and thoroughly dry the clover leaves and flowers.
— Blend the clover with the nuts, garlic and nettle powder until smooth.
— Stir in the oil, vinegar and salt.
— Transfer to a jar and cover with oil.
— Store in the fridge for up to 5 days.
Use: Delicious served with crusty bread or crackers.
Ground ivy pesto (Glechoma hederacea)
Ingredients:
— 1 handful of ground ivy leaves
— 1 garlic clove
— 2 tbsp pine nuts
— 3–4 tbsp vegetable oil
— 2 tbsp grated cheese (optional)
— Salt and freshly ground pepper, or herbs of your choice
— 1 tsp vinegar (optional)
Preparation:
— Blend the ground ivy leaves, garlic and pine nuts until roughly crushed.
— Add the oil, cheese (if using), vinegar, salt and seasonings.
— Blend again until a smooth paste forms.
— Spoon into a sterilised jar and refrigerate for up to 5 days.
Use: Perfect served with pasta, fresh bread, or roasted root vegetables.
Chickweed pesto (Stellaria media)
Ingredients:
— 100 g fresh chickweed
— 50 g sunflower seeds
— 100 ml linseed oil
— 1 wild garlic leaf
— ½ tsp nettle salt
— 1 tsp vinegar
— 1 tsp nettle powder
Preparation:
— Wash and thoroughly dry the chickweed.
— Blend the chickweed with the seeds, garlic and nettle powder until smooth.
— Stir in the oil and vinegar, then season with nettle salt.
— Spoon into a sterilised jar and cover with a thin layer of oil.
— Store in the fridge for up to 7 days.
Use: A flavourful green addition to soups, broths or vegetable stews.
Shepherd’s purse pesto (Capsella bursa-pastoris)
Ingredients:
— 100 g shepherd’s purse leaves
— 50 g hemp seeds
— 100 ml vegetable oil
— 1 tsp vinegar
— ½ tsp dried garlic
— ½ tsp salt
— 1 tsp nettle powder
Preparation:
— Wash and thoroughly dry the shepherd’s purse leaves.
— Blend the leaves with the seeds, dried garlic and nettle powder until smooth.
— Add the oil and vinegar, season with salt, and mix well.
— Spoon into a sterilised jar and cover with a thin layer of oil.
— Store in the fridge for up to 5 days.
Use: Serve alongside vegetable cutlets or fritters.
Goosefoot (orache) pesto (Atriplex spp., Chenopodium spp.)
Ingredients:
— 100 g young orache (goosefoot) leaves
— 50 g seeds (pumpkin, sunflower, or hemp)
— 100 ml vegetable oil
— 1 tsp vinegar
— ½ tsp salt
— 1 tsp sugar syrup
— 1 tsp nettle powder
Preparation:
— Wash and dry the orache leaves.
— Blend the leaves with the seeds, salt, syrup and nettle powder.
— Add the oil and vinegar, season with salt, and mix well.
— Transfer to a jar and top with a layer of oil.
— Store in the fridge for up to 5 days.
Use: Delicious served with roasted vegetables or as a savoury spread.
Wild garlic (ramsons) pesto (Allium ursinum)
Ingredients:
— 100 g wild garlic (ramsons) leaves
— 50 g dried pine nuts
— 100 ml vegetable oil
— 1 tsp vinegar
— ½ tsp salt
— 1 tsp nettle powder
Preparation:
— Wash and thoroughly dry the wild garlic leaves.
— Blend the leaves with the pine nuts and nettle powder until smooth.
— Stir in the oil and vinegar, season with salt.
— Spoon into a sterilised jar and cover with a thin layer of oil.
— Store in the fridge for up to 7 days.
Use: Serve with pasta.
Pine needle pesto (Pinus spp.)
Ingredients:
— 50 g young pine needles (chopped)
— 50 g walnuts
— 100 ml siberian pine nut oil (Pínus sibírica)
— 1 wild garlic leaf
— 1 tsp vinegar
— ½ tsp salt
— 1 tsp willowherb powder (Chamerion angustifolium)
Preparation:
— Steep the pine needles in boiling water, then rinse and dry.
— Blend the needles, nuts, garlic and powder.
— Stir in the oil and vinegar, season with salt.
— Spoon into a sterilised jar and top with a layer of oil.
— Store in the fridge for up to 5 days.
Use: Add to soups.
Knotgrass pesto (Polygonum aviculare)
Ingredients:
— 100 g knotgrass leaves
— 50 g pumpkin seeds
— 100 ml vegetable oil
— 1 tsp vinegar
— ½ tsp salt
— 1 tsp ground elder powder (Aegopodium podagraria)
Preparation:
— Wash and dry the leaves thoroughly.
— Blend with the seeds and powder until smooth.
— Stir in the oil and vinegar, season with salt.
— Spoon into a sterilised jar and cover with oil.
— Store in the fridge for up to 5 days.
Use: Serve with salads.
Willowherb pesto (Chamaenerion angustifolium)
Ingredients:
— 100 g young willowherb leaves
— 50 g nuts (e.g. walnuts or hazelnuts)
— 100 ml vegetable oil
— 1 wild garlic leaf
— ½ tsp salt
— 1 tsp willowherb powder
Preparation:
— Wash and dry the willowherb.
— Blend with the nuts, garlic and willowherb powder until smooth.
— Stir in the oil and salt.
— Spoon into a sterilised jar and top with oil. l.
— .Store in the fridge for up to 5 days.
Use: Serve with flatbread.
Shepherd’s purse and horseradish pesto (Capsella bursa-pastoris & Armoracia rusticana)
Ingredients:
— 80 g shepherd’s purse leaves
— 20 g grated horseradish root
— 50 g dried hazelnuts
— 100 ml vegetable oil
— 1 tsp vinegar
— 10 g fresh mint
— ½ tsp salt
— 1 tsp nettle powder
Preparation:
— Wash and dry the shepherd’s purse and mint.
— Blend the greens with the horseradish, hazelnuts, mint and nettle powder.
— Stir in the oil and vinegar, season with salt.
— Spoon into a sterilised jar and cover with a thin layer of oil.
— Store in the fridge for up to 5 days.
Use: Add to soups.
Elderflower pesto (Sambucus nigra)
Ingredients:
— 60 g elderflowers (stems removed)
— 40 g elder leaves
— 50 g walnuts
— 100 ml vegetable oil
— 1 garlic clove
— ½ tsp salt
— 1 tsp nettle powder
Preparation:
— Wash and dry the elderflowers and leaves.
— Blend the flowers, leaves, nuts, garlic and nettle powder.
— Stir in the oil and salt until smooth.
— Spoon into a sterilised jar and cover with oil.
— Store in the fridge for up to 5 days.
Use: Serve with salads.
Sorrel pesto (Rumex acetosa)
Ingredients:
— 100 g sorrel leaves
— 50 g roasted nuts (e.g. hazelnuts or walnuts)
— 100 ml vegetable oil
— 1 wild garlic leaf
— ½ tsp salt
— 1 tsp nettle powder
Preparation:
— Wash and dry the sorrel.
— Blend with the nuts, garlic and nettle powder until smooth.
— Stir in the oil and salt.
— Spoon into a sterilised jar and cover with oil.
— Store in the fridge for up to 5 days.
Use: Serve with vegetable cutlets.
Parsnip and nettle pesto (Pastinaca sativa &Urtica dioica)
Ingredients:
— 50 g cooked parsnip root
— 50 g nettle leaves
— 50 g nuts
— 100 ml vegetable oil
— 1 wild garlic leaf
— 1 tsp vinegar
— ½ tsp salt
— 1 tsp nettle powder
Preparation:
— Scald the nettle leaves in boiling water, rinse in cold water and pat dry. Boil the parsnip until soft.
— Blend the nettles, parsnip, nuts, garlic and nettle powder.
— Stir in the oil and vinegar, season with salt.
— Spoon into a sterilised jar and cover with oil.
— Store in the fridge for up to 5 days.
Use: Add to casseroles.
Sloe berry and ground elder pesto (Prunus spinose&Aegopodium podagraria)
Ingredients:
— 50 g sloe berries (pitted)
— 50 g ground elder leaves
— 50 g walnuts
— 100 ml vegetable oil
— 1 tsp light sugar syrup
— 1 tsp vinegar
— ½ tsp salt
— 1 tsp nettle powder
Preparation:
— Wash and dry the sloe berries and ground elder leaves.
— Blend with the walnuts, syrup and nettle powder until smooth.
— Stir in the oil and vinegar, season with salt.
— Spoon into a sterilised jar and cover with oil.
— Store in the fridge for up to 5 days.
Use: Serve with salads.
Tips and tricks
— Gathering: Harvest herbs in the morning from clean areas to preserve freshness and flavour.
— Preparation: Dry herbs thoroughly to avoid a watery texture.
— Storage: Freeze pesto in portions using ice cube trays.
— Experimentation: Mix herbs (e.g. nettle and sorrel) or add herb powders.
— Saving: Use leftover nut pulp (from straining plant milk or blending nuts) in baking or soups.
FINAL NOTE
Wildcrafted pesto is a simple and practical way to include more seasonal greens in your diet. By using a familiar sauce format, we discover new flavours, explore unusual combinations, and learn to cook with what nature offers. These pestos are easy to customise with different nuts, seeds, oils, or spices.
In this chapter, we explored the basics of making pesto from wild herbs, explored ingredient substitutions, and discussed the health benefits of such sauces. This is a great starting point for further experimentation.
In the next chapter, we will expand on this topic by exploring other types of green sauces and dressings to diversify our flavour palette and make dishes with wild herbs even more appealing.
Chapter 9. Sauces: a wild food palette
Sauces are one of the easiest and most accessible ways to diversify meals, add vibrant flavours, and harness the health benefits of wild plants. Herbs, roots, berries, and seeds serve not only as food but also as the basis for seasonings that enhance the flavour of dishes and make them more nutritious. In many traditional cultures, such additional ingredients have served both culinary and medicinal purposes. Pastes made from fresh herbs, fermented sauces, and berry purées can all be made from readily available seasonal ingredients. In this chapter, we’ll explore how to harvest, prepare, and combine wild ingredients to make sauces that are not only delicious but also nourishing. These sauces will add lively accents to your kitchen and help you view wild plants as a natural part of your everyday diet — simple, seasonal, and versatile.
Sauce-making basics
Wild plant sauces can be raw, cooked or fermented. Here are the key steps to making them:
Choosing Ingredients
— Greens and herbs: Choose young nettles, goosefoot, sorrel, shepherd’s purse, plantain and ramsons.
— Berries and fruits: Rose hips, sloe, hawthorn or wild apples add sweet and sour notes.
— Roots: Dandelion, parsnip or burdock provide earthy undertones.
— Oil: Hemp, cedar or linseed oil adds smoothness.
— Acid: Use vinegar or juice from sour berries and herbs for balance.
— Additional ingredients: Salt, herb powders, sugar syrup, garlic or dried herbs.
Tip: Harvest plants in the morning, in dry weather, and in clean areas away from roads.
Preparation
— Greens: Wash, dry and remove tough stems. Scald nettles with boiling water.
— Berries: Remove seeds (e.g. from sloe or rosehip) and rinse.
— Roots: Peel, chop and boil until soft (10–15 minutes).
— Garlic: Use wild garlic for a milder taste or cultivated garlic in small amounts.
Concocting
— Raw sauces: Blend ingredients in a food processor or grind with a mortar and pestle until smooth.
— Cooked sauces: Simmer berries or roots with a small amount of water, then purée.
— Fermented sauces: Mix ingredients with 2% salt by weight. Leave in a jar under slight pressure for 5 to 10 days at 20–25°C, checking regularly.
— Proportions: Use 2 parts base (herbs/berries), 1 part oil, and 1–2 tsp of acid per 100 g of base.
Tip: Taste during preparation to adjust salt and acidity.
Storage
— Raw sauces: Store in sterilised jars topped with a layer of oil in the fridge for up to 5 to 7 days.
— Cooked sauces: Refrigerate for up to 10 days or sterilise for long-term storage (up to 6 months).
— Fermented sauces: Keep refrigerated for up to 3 months.
— Freezing: Pour into ice cube trays for convenient portions.
Tip: Always check for mould or off odours before using.
Sauce Applications
— Cooking: Add to flatbreads, salads, soups or vegetable patties.
— Snacking: Serve with bread or raw vegetables.
— Marinades: Use to flavour mushrooms or grilled vegetables.
— Health: Sauces made from rosehip or nettles support immunity due to their high vitamin C content.
Tip: Thin the sauce with water or vinegar to make a salad dressing.
Recipes
Raw strawberry leaf and rosehip sauce (Aegopodium podagraria & Rosa spp.)
Ingredients:
• 100 g young strawberry leaves
• 50 g rosehip pulp, seeds removed
• 100 ml vegetable oil
• 1 wild garlic leaf
• 1 tsp vinegar
• ½ tsp salt
• 1 tsp nettle powder
Preparation:
— Wash the strawberry leaves and rosehip pulp, dry them, and remove any tough stems.
— Blend the strawberry leaves, rosehip pulp, garlic, and nettle powder until smooth.
— Pour in the oil and vinegar, add salt, and stir well.
— Transfer to a jar and cover with a layer of oil.
— Store in the fridge for up to 5 days.
Use: Serve with salads or flatbreads.
Fermented shepherd’s purse sauce (Capsella bursa-pastoris)
Ingredients:
• 150 g shepherd’s purse leaves
• 50 g hemp seeds
• 1 wild garlic leaf
• 1 tsp nettle powder
• 3 g salt (2% by weight)
• 50 ml water
Preparation:
— Wash and finely chop the shepherd’s purse.
— Mix the leaves, seeds, garlic, nettle powder and salt. Knead gently.
— Transfer to a sterilised jar, add the water, and press down until submerged.
— Place under light pressure and ferment for 7 to 10 days at 20–25°C, checking daily.
— Refrigerate and store for up to 3 months.
Use: Add to vegetable patties or cutlets.
Ground-ivy and nettle cauce (Glechoma hederacea & Urtica dioica)
Ingredients:
• 1 handful ground-ivy leaves
• 1 handful young nettle leaves (scalded)
• 1–2 cloves garlic
• 3–4 tbsp vegetable oil
• 2–3 tbsp plant-based yoghurt
• 1 tsp vinegar
• Salt and seasonings, to taste
Preparation:
— Scald the nettle leaves, rinse and dry them.
— Blend the ground-ivy, nettles, garlic, and oil until smooth.
— Add the yoghurt, vinegar, salt, and seasonings, then blend again.
— Chill for at least 1 hour before serving.
Use: Serve with vegetable dishes, grains, salads, or as a dip.
Sorrel and hawthorn sauce (Rumex acetosa & Crataegus spp.)
Ingredients:
• 100 g sorrel leaves
• 50 g hawthorn pulp, seeds removed
• 100 ml vegetable oil
• 1 tsp vinegar
• ½ tsp salt
• 1 tsp nettle powder
Preparation:
— Wash and dry the sorrel and hawthorn.
— Blend with the nettle powder until smooth.
— Add the oil, vinegar and salt, and whisk.
— Transfer to a jar and cover with oil.
— Store in the fridge for up to 5 days.
Use: Ideal for casseroles.
Dandelion root and nettle sauce (Taraxacum officinale & Urtica dioica)
Ingredients:
• 50 g boiled dandelion root
• 50 g nettle leaves
• 50 g dried walnuts
• 100 ml vegetable oil
• 1 wild garlic leaf
• 1 tsp vinegar
• ½ tsp salt
• 1 tsp nettle powder
Preparation:
— Scald the nettles. Boil the dandelion root for 10 minutes, then rinse and dry.
— Blend all ingredients.
— Add the oil, vinegar and salt, and whisk.
— Transfer to a jar and cover with oil.
— Store in the fridge for up to 7 days.
Use: Serve with vegetable cutlets or grains.
Sloe and ground elder sauce (Prunus spinosa & Aegopodium podagraria)
Ingredients:
• 100 g sloe berries (pitted)
• 50 g ground elder leaves
• 100 ml vegetable oil
• 1 tsp vinegar
• 1 tsp sugar syrup
• ½ tsp salt
• 1 tsp nettle powder
Flavour & properties: Deep blue infusion, slightly astringent taste; mild diuretic and anti-inflammatory.
Preparation:
— Wash and dry the berries and ground elder.
— Blend with the syrup and nettle powder.
— Add the oil, vinegar and salt, and mix well.
— Transfer to a jar and top with oil.
— Store in the fridge for up to 5 days.
Use: Serve with salads.
Ramsons and goosefoot seed sauce (Allium ursinum & Chenopodium album)
Ingredients:
• 100 g ramsons (wild garlic)
• 50 g dried goosefoot seeds
• 100 ml cedar oil
• 1 tsp vinegar
• ½ tsp salt
• 1 tsp willowherb powder
Preparation:
— Rinse and dry the ramsons.
— Blend with the seeds and powder.
— Add the oil, vinegar and salt, and whisk.
— Transfer to a jar and top with oil.
— Store in the fridge for up to 7 days.
Use: Serve with flatbreads or crackers.
Chickweed and pine nut sauce (Stellaria media & Pinus sibirica)
Ingredients:
• 100 g fresh chickweed
• 50 g dried pine nuts
• 100 ml linseed oil
• 1 tsp vinegar
• ½ tsp salt
• 1 tsp nettle powder
Preparation:
— Wash and dry the chickweed.
— Blend with the nuts and nettle powder.
— Add the oil, vinegar and salt, and mix well.
— Transfer to a jar and top with oil.
— Store in the fridge for up to 5 days.
Use: Add to soups or grain dishes.
Fermented plantain and burdock sauce (Plantago major & Arctium lappa)
Ingredients:
• 100 g plantain leaves
• 50 g boiled burdock root
• 1 clove garlic
• 3 g salt (2% by weight)
• 50 ml water
• 1 tsp goosefoot powder
Preparation:
— Boil the burdock root for 15 minutes. Finely chop the plantain and root.
— Mix with garlic, powder and salt. Knead slightly.
— Transfer to a jar, add the water and tamp down.
— Ferment for 7 to 10 days at 20–25°C.
— Store in the fridge for up to 3 months.
Use: Perfect with casseroles or hearty vegetable dishes.
Tips & tricks
— Gathering: Collect plants in organic areas in the morning after the dew has dried.
— Preparation: Remove tough parts and dry herbs thoroughly to prevent excess moisture.
— Storage: Sterilise jars for cooked sauces to extend shelf life.
— Experimentation: Combine herbs and berries (e.g. sorrel + turnip greens) for new flavours.
— Saving: Use strained pulp in broths or baking.
Tip: If the sauce is too sour, add ½ tsp sugar syrup.
FINAL NOTE
Wild plant sauces are a simple way to make food more colourful, healthy, and closer to nature. They help diversify familiar dishes, reveal new flavours, and allow us to use the seasonal gifts of the land. These recipes aren’t just about taste — they reflect respect for the Earth, creativity, and conscious cooking.
Coming up: wild vegetable oils and their culinary potential.
Chapter 10. Vegetable oils
Vegetable oils from wild plants offer a simple, affordable way to enrich your diet with natural nutrients. This chapter explores how to collect wild seeds and nuts, extract oil from them at home, and use it in your daily cooking and self-care routines. This simple yet rewarding skill aligns with the principles of sustainable and conscious eating. We’ll continue along the trails of wild cuisine — now with new flavour possibilities and practical, oil-based recipes.
Oils as a gift from the Earth
Oils from wild plants have long been prized for their nutritional value, rich flavour, and versatility. Unlike the usual oils from cultivated plants — such as sunflower or olive oil — oils from nettle, beech, rosehip, or hemp have their own distinctive flavour and composition, reflecting the natural environment from which they come. They are rich in healthy fats (omega-3 and omega-6), vitamins E and A, and antioxidants that support the health of the heart, skin, and immune system.
These oils can be used both in cooking — for salad dressings, porridge, and sauces — and in home skincare. Making these oils takes time and care, but the results are rewarding.
The basics of making plant oils
Extracting oils from wild plants involves gathering, preparation, and pressing. Here are the key steps:
Selecting ingredients
— Seeds: Nettle, ragwort, wild pumpkin, hemp
— Nuts: Beech, hazelnuts, pine nuts
— Fruits: Rosehip, blackthorn, wild apple (for oil infusions)
— Additional ingredients: Dried herbs (e.g. willowherb, snowdrop) for flavouring
Tip: Collect seeds and nuts in dry weather, when fully ripe, in clean areas away from roads.
Preparation
— Seeds: Wash and dry on a towel or in an oven at 50°C for 2–3 hours. Remove husks if necessary (e.g. pumpkin seeds).
— Nuts: Remove shells and lightly roast in a dry pan (2–3 minutes) to enhance flavour.
— Fruits: Wash, dry, and remove seeds or stones (e.g. rose hips, blackcurrants).
Oil extraction methods
Cold pressing (preferred):
• Use a manual or electric seed and nut press.
• Collect the oil through gauze into a dark glass bottle.
• Save the remaining press cake for baking or soups.
Heated extraction (for small quantities):
• Grind seeds or nuts and heat with a little water (1:1) at 60–70°C.
• Press through gauze and collect the oil.
Oil Infusion (for fruits and herbs):
• Add chopped fruits or herbs to a neutral oil in a 1:3 ratio.
• Infuse in a dark place for 2–3 weeks, shaking daily. Then strain.
Storage
— Store oils in dark glass bottles in the fridge for 3–6 months.
— Check for any rancid smell before use.
— Store infused oils for up to 2 months away from light.
Uses of oils
— Cooking: Use in salad dressings, sauces, baking, or marinades
— Snacking: Serve with bread and herbal powders
— Cosmetics: Rosehip and nettle oils are suitable for skin and hair care
— Health: Pumpkin seed or hemp oils support heart and immune health.
Tip: Do not heat cold-pressed oils to preserve their beneficial properties.
Recipes
Nettle seed oil
Ingredients:
— 200 g nettle seeds
— 1 tsp willowherb powder (optional, for flavour)
Preparation:
— Collect nettle seeds at the end of summer, rinse, and dry at 50°C for 2 hours.
— Grind the seeds in a coffee grinder and press them using a hand press.
— Collect the oil through muslin into a dark glass bottle; add willowherb powder (if using).
— Store in the fridge for up to 3 months.
Use: Add to salads or sauces.
Beech nut oil
Ingredients:
— 200 g beechnuts
— 1 tsp chive powder (optional)
Preparation:
— Shell the beechnuts and lightly toast them in a dry pan for 2 minutes.
— Grind the nuts and press them using a seed press.
— Collect the oil through muslin; add chive powder (if using).
— Store in the fridge for up to 6 months.
Use: Add to baked goods or use for skin care.
Rosehip seed oil
Ingredients:
— 150 g rosehip seeds
— 1 tsp rosehip powder (optional)
Preparation:
— Collect ripe rose hips, remove the seeds, rinse, and dry at 50°C for 3 hours.
— Grind the seeds and press through a hand press.
— Collect the oil through muslin; add rosehip powder (if using).
— Store in the fridge for up to 3 months.
Use: Use for skincare or as a salad dressing.
Pumpkin seed oil
Ingredients:
— 200 g pumpkin seeds
— 1 tsp nettle powder (optional)
Preparation:
— Wash the seeds, dry at 50°C for 2 hours, and remove the husks.
— Grind the seeds and press them using a seed press.
— Collect the oil through muslin; add nettle powder (if using).
— Store in the fridge for up to 4 months.
Use: Add to sauces or soups.
Orache seed oil
Ingredients:
— 200 g orache seeds
— 1 tsp orache powder (optional)
Preparation:
— Wash the seeds, dry at 50°C for 2 hours.
— Grind and press the seeds using a seed press.
— Collect the oil through muslin; add orache powder (if using).
— Store in the fridge for up to 3 months.
Use: Add to soups or sauces.
Hemp seed oil
Ingredients:
— 200 g hemp seeds
— 1 tsp shepherd’s purse powder (optional)
Preparation:
— Wash the seeds, dry at 50°C for 2 hours.
— Grind and press using a seed press.
— Collect the oil through muslin; add shepherd’s purse powder (if using).
— Store in the fridge for up to 4 months.
Use: Add to vegetable cutlets or sauces.
Oil infusion of orache leaves
Ingredients:
— 50 g dried orache leaves
— 150 ml cedar oil
— 1 tsp orache powder (optional)
Preparation:
— Wash, dry, and chop the orache leaves.
— Pour the cedar oil into a glass jar and add the leaves.
— Infuse in a dark place for 2–3 weeks, shaking daily.
— Strain through muslin; add orache powder (if using).
— Store in the fridge for up to 2 months.
Use: Use as a salad dressing.
Elderflower oil infusion
Ingredients:
— 50 g dried elderflowers
— 150 ml vegetable oil
— 1 tsp willowherb powder (optional)
Preparation:
— Wash, dry, and chop the elderflowers.
— Add to the vegetable oil in a glass jar.
— Infuse in a dark place for 2 weeks, shaking daily.
— Strain through muslin; add willowherb powder (if using).
— Store in the fridge for up to 2 months.
Use: Use for salads or skin care.
Tips & tricks
— Harvest: Collect seeds and nuts at peak maturity (August — September) for maximum oil content.
— Preparation: Dry all ingredients thoroughly to prevent mould.
— Storage: Use dark glass bottles and store oils in the fridge to avoid oxidation.
— Experimentation: Blend different oils (e.g. nettle + rosehip) for new flavours.
— Saving: Use the leftover press cake in baking or soups.
Tip: If the oil is bitter, mix it with vinegar to make a dressing.
FINAL NOTE
Wild plant oils are a practical way to embrace nature’s gifts with care and awareness. They help diversify the diet, enrich dishes with flavour and nutrients, and can also be useful in skin care. In this chapter, we explored how to collect seeds and nuts, extract oil, and apply it in everyday life. By learning these techniques, we take another step towards more conscious and respectful interaction with nature.
Chapter 11. Wild herb crisps
Making your own wild herb crisps at home is a delightful culinary experiment. In this chapter, you’ll find tips on gathering and preparing herbs, methods for making crispy crisps (baking, drying, and frying), and a selection of specific recipes.
Gathering and preparing wild greens
Where and when to gather:
— Choose environmentally clean areas, far from roads and industrial sites.
— The best time is early spring, when young shoots are especially tender.
How to collect:
— Leaves and stems: Use only healthy, undamaged, young specimens.
— Seeds and fruits: Flax, pumpkin, or sunflower seeds can be added to the coating.
— Rinsing: Thoroughly wash the greens under running water to remove sand and insects.
— Reducing bitterness (e.g. dandelion, burdock): Use only the youngest plants before flowering. Soak in cold salted water for 20–30 minutes or blanch briefly in boiling water.
Suitable plants:
— Nettle (Urtica dioica) — leaves
— Greater plantain (Plantago major) — leaves and seeds
— Burdock (Arctium spp.) — leaves and stems
— Common dandelion (Taraxacum officinale) — leaves
— Ground elder (Aegopodium podagraria) and Chickweed (Stellaria media) — leaves
— Sorrel (Rumex acetosa), Ramsons (Allium ursinum), Clover (Trifolium spp.), and Lamb’s quarters (Chenopodium album) — leaves and stems
Recipes
Nettle and plantain crisps
Ingredients:
• 100 g young leaves of stinging nettle (Urtica dioica) and greater plantain (Plantago major)
• 1 tbsp vegetable oil
• ½ tsp salt
• Spices, to taste
Preparation:
— Preheat the oven to 140°C.
— Lightly brush the leaves with oil and sprinkle with salt and spices.
— Arrange in a single layer on a baking tray.
— Bake, turning the leaves halfway through.
— Allow to cool before serving.
Burdock petiole crisps
Ingredients:
• 100 g peeled young leaf stalks (petioles) of burdock (Arctium spp.)
• 1 tbsp vegetable oil
• ½ tsp salt
• A pinch of seasoning, to taste
Preparation:
— Cut the leaf stalks (petioles) into thin strips.
— Toss the greens with oil and seasoning.
— Spread on a baking tray.
— Bake at 150°C for 20–25 minutes until crispy.
— Serve cooled.
Dandelion leaf crisps
Ingredients:
• 100 g young leaves of dandelion (Taraxacum officinale), before flowering
• 1 tbsp vegetable oil
• ½ tsp salt
• A few drops of vinegar (optional)
Preparation:
— If desired, soak the leaves in water with vinegar for 10 minutes to reduce bitterness.
— Dry the leaves, brush with oil, and sprinkle with salt.
— Bake at 130°C.
— Allow to cool before serving.
Ground elder and chickweed crisps
Ingredients:
• 100 g mixture of ground elder (Aegopodium podagraria) and chickweed (Stellaria media) leaves
• 1 tbsp vegetable oil
• ½ tsp salt
• A pinch of thyme
Preparation:
— Rinse and dry the leaves.
— Mix with oil, salt, and thyme.
— Spread on a baking tray.
— Bake at 130°C.
— Allow to cool before serving.
Sorrel crisps
Ingredients:
• 100 g sorrel (Rumex acetosa) leaves
• 1 tbsp oil
• ½ tsp salt
• 1 tsp sesame seeds (optional)
Preparation:
— Wash and dry the sorrel.
— Toss with oil, salt, and sesame seeds.
— Bake at 120°C.
— Allow to cool before serving.
Ramsons crisps
Ingredients:
• 100 g ramsons (Allium ursinum) leaves
• 1 tbsp vegetable oil
• ½ tsp salt
• A pinch of dried garlic
Preparation:
— Rinse and dry the ramsons.
— Toss with oil and garlic.
— Spread on parchment paper.
— Bake at 120°C for 10–15 minutes.
— Allow to cool before serving.
Mixed crisps of clover, sorrel and lamb’s quarters
Ingredients:
• 100 g mix of clover (Trifolium spp.), sorrel (Rumex acetosa), and lamb’s quarters (Chenopodium album) leaves
• 1½ tbsp oil
• ½ tsp salt
• Seasoning, to taste
Preparation:
— Wash and dry the greens.
— Toss with oil and seasoning.
— Spread on a baking tray.
— Bake at 130°C for 15 minutes.
— Allow to cool.
Plantain seed crisps
Ingredients:
• 2 tbsp plantain (Plantago major) seeds
• 4 tbsp water
• A pinch of salt and spices
Preparation:
— Soak the seeds in water for 10–15 minutes.
— Stir and spread thinly on parchment paper.
— Dry at 100–110°C for 20–30 minutes or use a dehydrator.
— Leave to cool, then cut into pieces.
Leafy crisps with linseed coating
Ingredients:
• 100 g of any edible wild greens (e.g. nettle, ground elder, plantain)
• 1 tbsp ground linseed
• 2 tbsp water
• Salt and spices, to taste
Preparation:
— Mix the linseed with water and spices; leave for 10 minutes.
— Dip the leaves into the mixture.
— Spread on parchment paper.
— Dry at 100–120°C for 20–25 minutes.
— Allow to cool.
Fried crisps in nut and flour batter
Ingredients:
• 80–100 g burdock (Arctium spp.) leaf stalks (petioles)
• 1 tsp starch
• 4 tbsp flour
• 1 tbsp ground seeds (e.g. flax)
• 200 ml vegetable oil for frying
• Salt and spices, to taste
Preparation:
— Mix flour with seeds, starch, salt, and spices.
— Heat the oil to 170–180°C.
— Dip the leaf stalks (petioles) in the batter and fry for 10–15 seconds on each side until golden.
— Drain on paper towels to remove excess oil.
Breading options
— Coarse flours give a hearty, rustic coating.
— Flakes add mild sweetness and texture.
— Seeds and nuts provide rich flavour and crunch.
— Starch helps to create a crispier crust.
Serving and Storage
— Enjoy the crisps fresh for the best crunch.
— Store in an airtight container for no more than 24 hours.
Safety tips
— Only use correctly identified edible plants.
— When trying a new plant, taste a very small amount first to check for allergic reactions.
— Avoid gathering herbs in potentially contaminated or polluted areas.
— Consume in moderation — do not exceed sensible portion sizes.
FINAL NOTE
Experiment and discover new flavours with wild herbs!
Transform leaves, stems, and seeds into crispy, original crisps — and enjoy truly unique snacks made right in your kitchen.
Chapter 12. Salads
Salads made with wild plants are not only a creative way to diversify your diet, but also a real treasure trove of vitamins and minerals. They reflect the seasonality and geography of your region, allowing you to experience the flavours of nature in its purest form.
Basic principles of wild plant salads
— Collect only edible plants, making sure to identify each one with confidence
— Use only young leaves and shoots — they are more tender and less bitter
— Combine textures: soft leaves, crisp stems, and juicy shoots
— Consider flavour balance: combine bitterness (Taraxacum officinale), sourness (Rumex acetosa), and savoury notes (Stellaria media)
— Avoid overloading the salad — three to five carefully chosen ingredients are preferable to a mix of fifteen
30 Wild salad plants
— Nettle (Urtica dioica) — young spring leaves, blanched in boiling water, bring a rich impart an earthy, herbaceous flavourand a wealth of vitamins.
— Ground elder (Aegopodium podagraria) — an aromatic herb with a delicate flavour, ideal as a spring salad base.
— Dandelion (Taraxacum officinale) — young leaves add a gentle bitterness that balances fatty or raw salads.
— Common sorrel (Rumex acetosa) — refreshing acidity that makes salads bright and invigorating.
— Lamb’s quarters (Chenopodium album) — neutral flavour and soft texture make it a good base or addition.
— Broadleaf plantain (Plantago major) — young leaves offer a dense texture and herbal flavour, especially pair well with garlic or vinegar-based dressings.
— Chickweed (Stellaria media) — tender and soft, with a subtle sweet note; lovely in fresh herb mixes.
— Wood sorrel (Oxalis acetosella) — bright sour note; crisp and refreshing; use sparingly as an accent.
Бесплатный фрагмент закончился.
Купите книгу, чтобы продолжить чтение.