
Бесплатный фрагмент - Expert advisor for MT4 for one evening
INTRODUCTION
The FOREX market, like the securities exchange, attracts more and more people by the day. It’s par for the course, everyone wants to make money from the thin air. But, it’s not all that simple.
The notion that the traders who make profit amount to no more than 5% is widely known. The life earnings of remaining 95% get divided between the first 5% and the brokers/dealing centers.
To join with the successful traders, you need to have a clear strategy and ironclad nerves. In principle, there are many profitable trading strategies and methods. The main problem lies in the psychology of the trader. As a rule, almost all traders start with a steady success. A soon after, they have to deal with a gradual or sudden collapse.
The fact is that when they’re starting to trade, the traders fulfill the conditions of their trading strategy. After a series of successful transactions, the latter relaxes, secure in his conviction that he has hit the jackpot and guaranteed himself a comfortable life. Here comes the excessive confidence in actions and the trader begins to deviate from the trading strategy. The transactions begin to be opened not by the system, but “on a hunch”. While swimming in euphoria from a series of successfully closed orders, the trader increases the trading lot. And not a long after this one is also being sent to those 95% of traders, who’re losing money.
You can solve the problem of the psychological side of trading with its automation — the use of a trading expert (adviser, trade bot), which will work with the account of the trader without the intervention of the human — the owner of the account.
The trading bot is devoid of emotions and is able to monotonously execute its algorithm with the arrival of each new price value. Of course, sometimes a trader will have to prohibit its actions, for example, during extremely important instances of financial and political news, when volatility increases exponentially. The example of such events in the recent past can be British Exit — the Brexit — a campaign of supporters of Britain’s withdrawal from the EU, the election of US and French presidents, an accident at the Fukushima-1 nuclear power plant, which provoked a collapse of the Japanese national currency, etc. You get the idea.
In this book, we will learn how to make the trading bots for the most common and most convenient MetaTrader4 trading terminal by MetaQuotes. To be more precise, in this book we will step-by-step create an Expert Advisor, completely ready for “use”. Naturally, I do not promise you the profitability of the final product, it is only important for us to learn how to make them.
After studying this book, you will be able to bring to life your boldest trading ideas by yourself without resorting to the services of mql coders. Also, you will be able to earn money by programming customized advisers.
Perhaps, half-way through this book, you will deviate from it and make your own upgrades to the adviser we are creating. This is as it should be. Let’s get going.
A LITTLE BIT OF THEORY
Types of data
The trading expert manipulates data. It works with incoming prices, price values of indicators, keeps counting the open orders, writes to the trading terminal log.
In mql4, the following data types exist:
Basic data types:
— integers (char, short, int, long, uchar, ushort, uint, ulong)
— logicals (bool)
— literals (ushort)
— strings (string)
— floating-point numbers (double, float)
— colors (color)
— date and time (datetime)
— enumerations (enum)
Complex data types:
— structures;
— classes.
At first, you will not need 70% of the above. Let’s consider only those we will need for the development of our trading expert.
— Int type — integers, i.e., 1, 2, 5, 100, 1425…
— Double type — numbers with a fractional part (with a decimal point): 1.0254, 0.0547…
— Bool type — it only has 2 values — true and false.
— String type — string variables, i.e. words: “word”, “four-word sentence”…
Variables
Variables are letter symbols that contain values of some type. Variables are like kegs with something inside.
The bool type is the same — for example, the variable bool b = true means that the keg with the name b contains true inside.
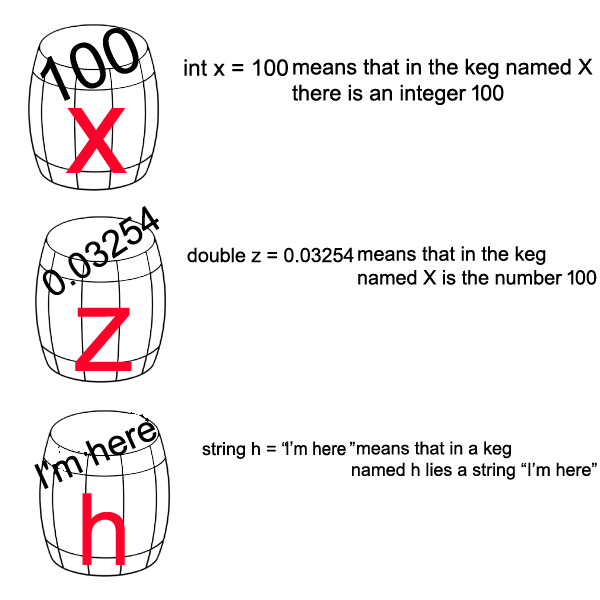
Before creating a variable for later use, you must assign its type, so that the MetaEditor’s compiler (the one where we will create our bot) knew what will be stored inside this variable. The variable names can not begin with a digit.
You can only assign a variable once. Later we will examine where they can be assigned and how it affects our subsequent actions.
The if-else conditional operators
The if-else conditional operators can be used left and right. If — means “if” clause, else — “if not, then”.
For example:
if (x <y) // If the content of the x keg is less than the content of the y keg
{
Do something here, for example, open an order. Or close another order, do anything you like!
} else // And if x is not less than y, do the task put in braces below
{
Do something here.
}
the use of the else operator is not must-have, it all depends on the specific task.
Two slashes — // — mean comments in the advisor code, right after the symbol. When you compile your Expert Advisor (turn your code into machine code, understandable for your computer), the comments will be ignored. If possible, you should write the comments for yourself, so as not to forget what has been done and why.
The blocks of comments are done like this:
/* this
is the commentary
block */
Anything put between the /* and */ symbols is also ignored by the compiler.
Cycles
There are for and while cycles in mql4. The for is used more often, but while is also popular.
for (int i=0; i <100; i++)
{
count something 100 times.
}
int i = 0 — assign a variable to work within this cycle; i <100 — the cycle runs 100 times, from 0 to 99; i ++ (increment) means that with each run (iteration) of the cycle, the variable i will be incremented by 1.
bool x = false; // assign value false for a variable x of bool type
while (x==false) // while x is false. Two equal symbols — == — mean comparison
{
/*
some conditions will come true here.
As soon as x is true, the cycle will stop.
*/
//for example
x = true;// set x to true after the first run
//and thus the cycle stops
}
In the process of writing an adviser, we will use both of these cycles, and you will puzzle them out easily.
DESIGN SPECIFICATION
Let’s describe what our future adviser should do and when:
The trading signals will be generated by two standard indicators — the Envelopes and ZigZag. These indicators are built into MetaTrader4 and you do not need to download them separately. I chose these two indicators because their values are being requested in different ways. In case of Envelopes — by using the standard iEnvelopes function, and in case of ZigZag — by the iCustom function — you need to research it yourself (it sounds dramatic, I know) so that sometime later you’ll be able to request the data of almost any non-standard indicators of MetaTrader4.
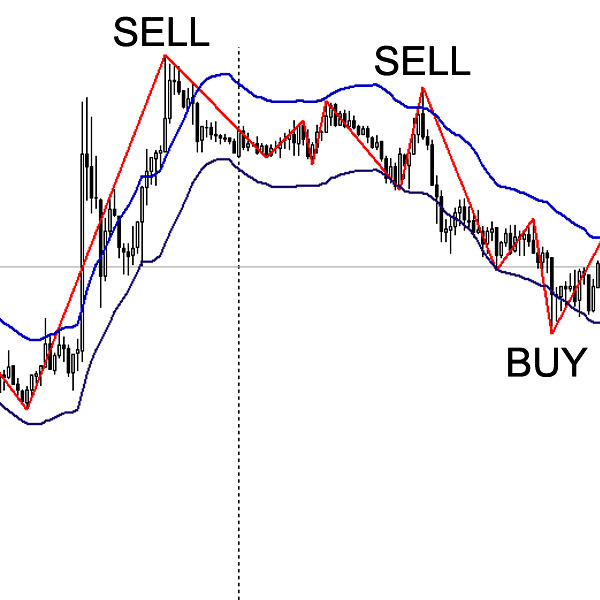
Let’s make a brief design specification:
— If the upper peak of the ZigZag indicator (hereinafter — ZZ) is generated above the upper line of the Envelopes indicator (with the parameter Shift = 10, with the standard others), we should make a sell order with a fixed lot set in the Advisor’s settings.
— If the lower ZZ peak is generated below the lower Envelopes one — a buy order (i.e., vice versa compared to the buy signal).
— By modification (we’ll examine later while writing the code, why we should do it this way and not immediately by installing the order), the adviser should be able to set Stop-Losses and Take-Profits over the orders.
— to add the option of closing the orders when the price reaches the opposite line of Envelopes. This function can be turned off in the settings.
If you are reading this book, I hope that you already have a MetaTrader4 trading terminal on your computer and you know how to set a demo account. If not, you need to install this terminal by pre-registering with any broker supporting MetaTrader4.
And now, translate your terminal into English! If you set your sights on pursuing programming, get used to English, no way round it! Leave the MetaEditor code editor in Russian, because when you translate it into English, its Help (F1) would also be in English. It’s not everyone’s cup of tea.
NOW WE GET THE INDICATORS” DATA
Open your MetaTrader4 and press F4 on the keyboard, or left click here:
In the popped up code editor, click New (Create), then the Expert Advisor (template), then Next, in the Name field after Experts\ add MyFirstEA — this will be the name of your first Expert Advisor. You’ll get Experts\MyFirstEA. We do not need the Autor and link fields for this test advisor. Click the Next button. The Event Handles of the Expert Advisor window should pop up. There is nothing to set here and just click Next. The Tester event handless of the Expert Advisor window will pop up, once more, do not select anything there and click Finish. Now we get a working area where our trading bot will soon be born.
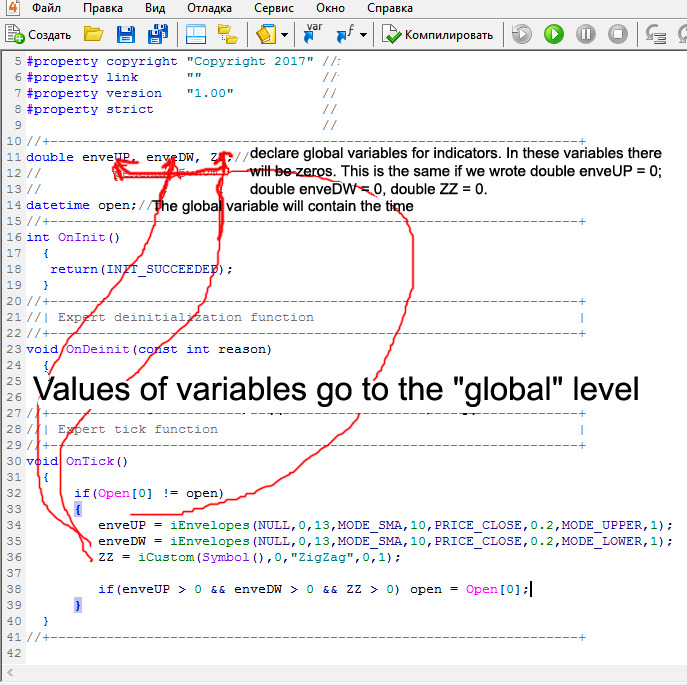
In the comments on the image below, we indicated which blocks are responsible for what.
To know the price values of indicators, we need to assign the global variables of the double type for the top and bottom lines of the Envelopes indicator. Let’s call them enveUP and enveDW. You can call them yourself. The same should be done to get the price value of the ZZ indicator. Let’s call this variable ZZ. Why the global variables, of all of them? In order for these values to be requested anywhere in the program (namely, in the advisor). The fact is that we will request the indicator values not with each incoming tick, but once for each candle. This will significantly improve performance because the terminal would not need to perform the same operation for each tick. If we enclose the request for our indicators in curly braces, while assigning their values NOT for the global variables, then these values will be visible only within those curly braces. And outside of them, we will get an error. I’ll try to describe the specifics in the picture below.
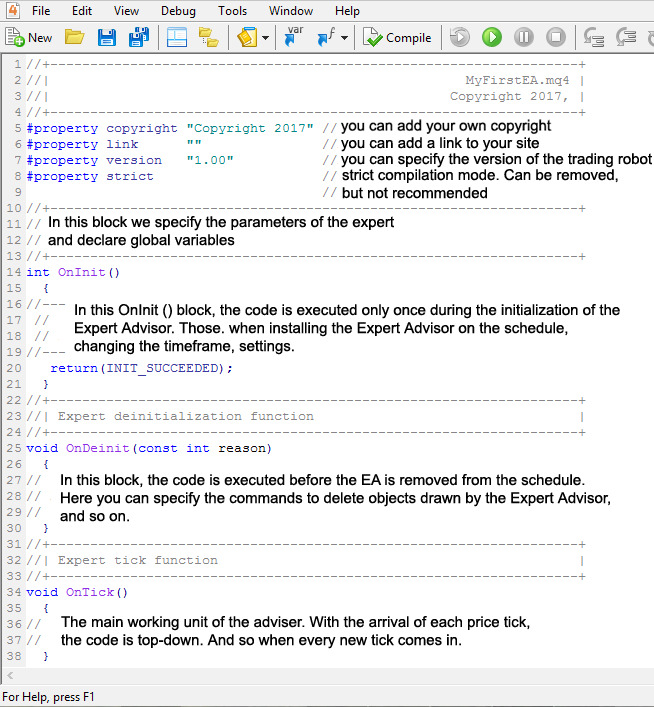
Copy this code into your editor:
//+ — — — — — — — — — — — — — — — — — — — — — — — — — — — — — — — — — +
//| MyFirstEA.mq4 |
//| Copyright 2017, |
//+ — — — — — — — — — — — — — — — — — — — — — — — — — — — — — — — — — +
#property copyright “Copyright 2017”
#property link””
#property version “1.00”
#property strict
//+ — — — — — — — — — — — — — — — — — — — — — — — — — — — — — — — — — +
double enveUP, enveDW, ZZ;
datetime open;
//+ — — — — — — — — — — — — — — — — — — — — — — — — — — — — — — — — — +
int OnInit ()
{
return (INIT_SUCCEEDED);
}
void OnDeinit (const int reason)
{
}
void OnTick ()
{
if (Open [0]!= open)
{
enveUP = iEnvelopes (NULL,0,13,MODE_SMA,10,PRICE_CLOSE,0.2,MODE_UPPER,1);
enveDW = iEnvelopes (NULL,0,13,MODE_SMA,10,PRICE_CLOSE,0.2,MODE_LOWER,1);
ZZ = iCustom (Symbol (),0,“ZigZag”, 0,1);
if (enveUP> 0 && enveDW> 0 && ZZ> 0) open = Open [0];
}
}
Let’s examine what each line means.
In global variables, except the variables for indicator values, we assigned a variable of datetime type with the open name. Now it set to 0.
IMPORTANT: Position the cursor on the word datetime and press the F1 on the keyboard — the HELP window will pop up with a description of what the datetime type is. You can do it for all built-in commands!
if (Open [0]!= open): If the Zero Candle Open Time IS NOT EQUAL open (i.e., it is set to zero), the code in curly braces will be executed. The Open [0] command means the Zero Candle Open Time (i.e., the time of the current, not yet closed candle). Again, position the cursor on Open and press F1 — read about this command.
EnveUP = iEnvelopes (NULL,0,13,MODE_SMA,10,PRICE_CLOSE,0,2,MODE_UPPER,1); — click on iEnvelopes and see what data should be indicated and in which order:
double iEnvelopes (
— string symbol, // the symbol name
— int timeframe, // timeframe
— int ma_period, // period
— int ma_method, // the averaging method
— int ma_shift, // the average shift
— int applied_price, // the price type
— double deviation, // the deviation (as %)
— int mode, // the line index
— int shift // shift
);
In our code, we did not foresee the option of changing the data of the Envelopes indicator. Let’s fix it. We need to reassign the Period and Deviation, expressed as percentage, as external parameters.
In the advisor’s code, write in front of the global variables:
input int period = 14;
input double deviation = 0.10.
The input command makes the variable visible in the properties of the Expert Advisor so the user can change it.
Let’s change the data request code for Envelopes. It should look like this:
enveUP = iEnvelopes (NULL,0,period, MODE_SMA,10,PRICE_CLOSE, deviation, MODE_UPPER,1);
enveDW = iEnvelopes (NULL,0,period, MODE_SMA,10,PRICE_CLOSE, deviation, MODE_LOWER,1);
The figure 1 at the end of the request means that we request the value of the first candle indicator, i.e. the second to the last one. The candle numbers are counted down from zero (the current one). The previous candle should be the first, followed by the second and so on.
To get ZZ we use the iCustom function:
ZZ = iCustom (Symbol (),0,“ZigZag”, 0,1);
Call F1 and find out more about it. The second to last zero digit here is the number of the indicator buffer that we need. To find out which buffer we need, we call the properties of the required indicator and switch to the Color tab:
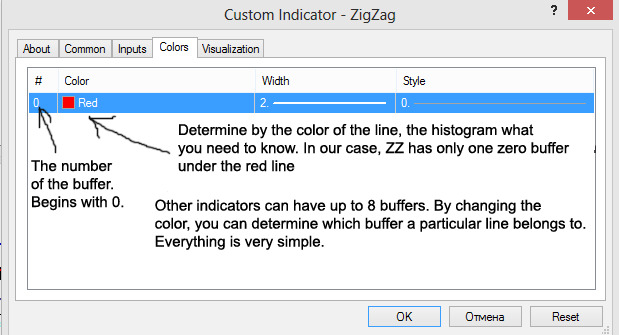
Let’s deal with ZZ and then add all its three parameters into the external variables. What parameters should we add? Let’s call the properties of the indicator:
Now we add the Depth, Deviation, and BackStep to the external variables and assign them the standard values. Note the blue keys before the names — 123 — which mean that these variables are of int type.
Бесплатный фрагмент закончился.
Купите книгу, чтобы продолжить чтение.